Adjusting the Head Height (iPF680/iPF685/iPF780/iPF785/iPF670/iPF770)
| Article ID: ART117317 |
| |
Date published: 05/12/2015 |
| |
Date last updated: 08/15/2015 |
Description
Adjusting the Head Height (iPF680/iPF685/iPF780/iPF785/iPF670/iPF770)
Solution
| Adjusting the Head Height (iPF680/iPF685/iPF780/iPF785/iPF670/iPF770) ID
:
8202123200
_
EN
_
2
|
| Solution |
The Printhead height setting affects printing quality.
Specifying a low Printhead height makes images clearer and enhances printing quality but may cause paper to rub against the Printhead.
On the other hand, specifying a high Printhead height will prevent paper from rubbing against the Printhead but may reduce the printing quality.
IMPORTANT
- Paper rubbing against or becoming caught on the Printhead may jam or result in printed documents that are soiled.
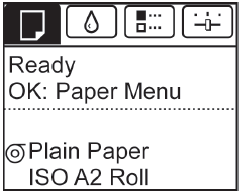
1. On the [Tab Selection screen] of the Control Panel, press  or  to select the Paper tab (  ).
NOTE
- If the [Tab Selection screen] is not displayed, press the [Menu] button.
2. Press the [OK] button.
The [Paper Menu] is displayed.
3. Press  or  to select [Paper Details], and then press the [OK] button.
4. Press  or  to select the type of paper, and then press the [OK] button.
NOTE
- When [Head Height] is set to [Automatic], the setting value selected for the previous print job is displayed (to the right of [Automatic]) once you select the type of paper currently supplied. However, the value is cleared when the printer is turned off or the paper is replaced.
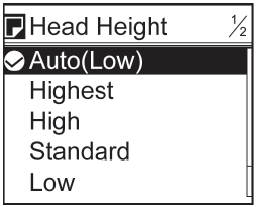
5. Press  or  to select [Head Height], and then press the [OK] button.
6. Press  or to select the desired setting value, and then press the [OK] button.
NOTE
- Using [Automatic] will ensure that the printer adjusts the Printhead height to the optimal level before printing, accounting for the ambient temperature and humidity. When a setting other than [Automatic] is used, that value will always be applied.
- Depending on the type of paper, some setting values may not be available.
|