Resolve Error Codes - PIXMA MP280 Printer

Article ID: ART109210 | Date published: 05/11/2015 | Date last updated: 03/13/2020
 

Description

Understand and resolve the LED error codes on your PIXMA MP280.

Solution

When an error occurs you will see flashing lights and the error code displayed on the LED. Depending on the error, a support code and message may also display on your computer screen.

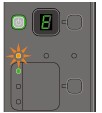
  • When a machine error occurs, the Alarm lamp is lit orange and the error code is displayed on the LED. Check the error code displayed on the LED and take the appropriate action to correct the error.

  • When the power and alarm lamps flash alternately green and orange as shown below, and the error code is displayed on the LED.


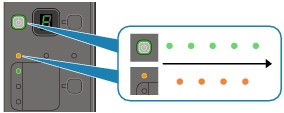
Table 1: Alarm lamp is Orange

Error Codes Cause Action

E, 0, 2

figure: LED

(LED display)

  • The machine is out of paper.

  • Paper does not feed.

  • Reload the paper in the rear tray and select Black or Color.

E, 0, 3

figure: LED

(LED display)

  • Paper Output Tray is closed.

  • Paper jam.

  • If the Paper Output Tray is closed, open it. The machine will start to print.

  • If this does not resolve the problem, or if the tray was open to begin with, the paper may be jammed. Remove the jammed paper, and select Black or Color to resume.

E, 0, 4

E, 0, 5

figure: LED figure: LED

(LED display)

  • The ink cartridge cannot be recognized.

E, 0, 7

figure: LED

(LED display)

  • Ink cartridge is not installed in the correct position.

E, 0, 8

figure: LED

(LED display)

  • Ink absorber is almost full.

  • Select the Black or Color button to continue printing. Service will soon be required.


If your product issue was not resolved after following the steps above, or if you require additional help, please create or log in to your Canon Account to see your technical support options.

Or if you still need help, visit our Canon Community by clicking the button below to get answers:

Link to Canon Community Forum


____________________________________________________________________________________________

E, 1, 3

figure: LED

(LED display)

  • The remaining ink level cannot be detected.

  • The ink may have run out.

  • The function for detecting the remaining ink level will be disabled since the ink level cannot be correctly detected.

  • If you want to continue printing without this function, press the machine's Stop (Reset) button for at least 5 seconds.

  • Canon recommends to use new genuine Canon cartridges in order to obtain optimum qualities.

cautionPlease be advised that Canon shall not be liable for any malfunction or trouble caused by continuation of printing under the ink out condition.

E, 1, 4

figure: LED

(LED display)

  • The ink cartridge cannot be recognized.

E, 1, 5

figure: LED

(LED display)

  • The ink cartridge cannot be recognized.

E, 1, 6

figure: LED

(LED display)

  • The ink has run out.

  • Replace the cartridge and close the scan unit cover.

  • If you want to continue printing, Press Stop (Reset) for at least 5 seconds with the cartridge installed. You can continue to print under the ink out condition. The function for detecting the remaining ink level will be disabled.

  • Replace the empty ink cartridge immediately after the printing. The resulting print quality may not satisfactory, if you print under the ink out condition.

E, 3, 0

figure: LED

(LED display)

  • The size of the original cannot be correctly detected or the document is too small when the Fit-to-Page copying is selected.

  • Make sure that the original meets the requirements and is correctly loaded on the scanner glass (known as the platen glass).

  • Check the position and direction of the original loaded on the scanner glass.

E, 3, 1

figure: LED

(LED display)

  • The machine is not connected with the computer.

  • Connect the machine and the computer with a USB cable.

E, 5, 0

figure: LED

(LED display)

  • Scanning the print head alignment sheet has failed.

 
  • Tap Stop/Reset to dismiss the error, then take the actions described below.
     
  • Make sure that the print head alignment sheet is set in the correct position and orientation on the glass.

  • Make sure the glass and the print head alignment sheet are not dirty.

  • Make sure the paper type and size is correct for Automatic Print Head Alignment.

    • For Automatic Print Head Alignment, always load one sheet of A4 or letter-sized plain paper.

  • Make sure if Print Head nozzles are clogged.

    • Print the nozzle check pattern to check the status of the Print Head.

    • Nozzle Check

  • If the error is not resolved, connect the machine to the computer and align the Print Head on the printer driver.


Table 2: Power lamp flashes green and alarm lamp flashes orange

Error Code Action

P, 0, 2

figure: LED

(LED display)

  • Cancel printing, turn off the machine. Then clear the jammed paper or protective material that is preventing the ink cartridge holder from moving, and turn on the machine again.

 Be careful not to touch the components inside the machine. The machine may not print out properly if you touch it.

P, 1, 0

figure: LED

(LED display)

  • Turn off the machine, and unplug the power cord of the machine from the power supply.

In cases other than the above:


  • Turn off the machine, and unplug the power cord of the machine from the power supply.
     
  • Plug the machine back in and turn the machine on.


If your product issue was not resolved after following the steps above, or if you require additional help, please create or log in to your Canon Account to see your technical support options.

Or if you still need help, visit our Canon Community by clicking the button below to get answers:

Link to Canon Community Forum


____________________________________________________________________________________________

SIMS Doc Id

0

Rate this Article
Was this article helpful?
Yes, This document is helpful
No, This document needs a clearer explanation
 
Please provide your comments