Manually adjust color from the driver (Windows) iP6700D
| Article ID: ART126759 |
| |
Date published: 05/12/2015 |
| |
Date last updated: 08/14/2015 |
Description
Manually adjust color from the driver
Solution
Manual Color Adjustment
Follow the steps below to make fine adjustments to the color hue for the printed output. These settings will only make minor color adjustments. If more drastic color adjustment is necessary, use an image editing application.
- Select the command you use to perform printing from the program you are using. (In general, select 'Print' on the File menu to open the Print dialog box.)
- Select your model name and click 'Preferences' (or 'Properties'). The printer driver setup window appears.
- On the Main tab, select 'Manual' for 'Color Adjustment.'

-
Select the best 'Color Correction' mode for type of image you are printing.
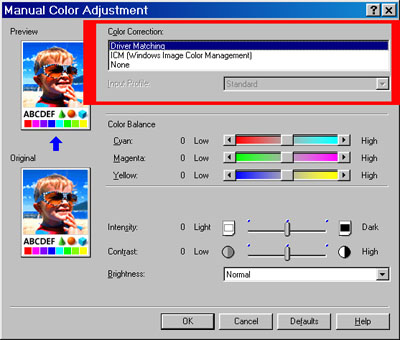
Driver Matching
Correct colors inside the printer driver.
ICM (Windows Image Color Management)
Correct colors using the Windows color management.
None
Do not correct colors. Use this when managing color from an application.
(Default setting: Driver Matching )
- On the Manual Color Adjustment screen, you can adjust each color individually to achieve the desired effect. These are only slight adjustments. If major color adjustments are required, edit the image in a photo editing application.

