Perform print head cleaning (Windows) i250 / i320 / i350
Article ID: ART125079
|
Date published: 05/12/2015
|
Date last updated: 08/14/2015
Description
Perform print head cleaning i250 / i320 / i350
Solution
Perform Print Head Cleaning
After confirming that the cable is connected and the printer is powered on, perform the following:
Open the Printers folder.
For Windows 7
Click the 'Start' button from the bottom left of the Windows screen, and then click on 'Devices and Printers'.
Click your right mouse button on the listing for your printer, and then select 'Printing Preferences' from the menu that appears.
For Windows Vista
Click / Select the 'Start' from the bottom left of the Windows screen, 'Control Panel', 'Hardware and Sound', and then click on 'Printers'. Note: If you are in 'Classic' view, click 'Printers' directly from the 'Control Panel'.
Click your right mouse button on the listing for your printer, and then select 'Preferences' from the menu that appears.
For Windows XP Home Edition
Click / Select the 'Start' button from the bottom left of the Windows screen, 'Control Panel,' 'Printers and Other Hardware,' and 'Printers and Faxes.'
Click your right mouse button on the listing for your printer, and then select 'Preferences' from the menu that appears.
For Windows XP Professional Edition
Click 'Start' from the bottom left of the Windows screen, and 'Printers and Faxes.'
Click your right mouse button on the listing for your printer, and then select 'Preferences' from the menu that appears.
For Windows 2000
Click / Select 'Start' from the bottom left of the Windows screen, and 'Settings,' then 'Printers.'
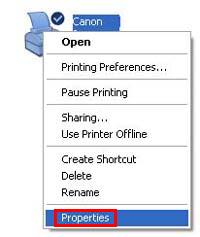
Click your right mouse button on the listing for your printer, and then select 'Properties' from the menu that appears.
Right-click the printer icon and select 'Properties'.
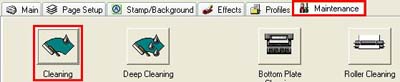
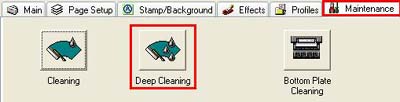
Click the Maintenance tab, and then click the 'Cleaning' icon.
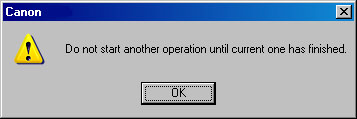
Click 'OK' to continue with the print head cleaning. The power lamp will flash and print head cleaning will start. Do not perform any other operations until print head cleaning completes.
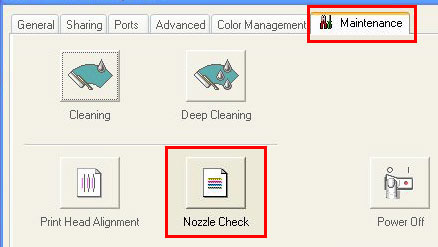
To determine if further cleaning is necessary, print a nozzle check pattern by clicking on the 'Nozzle Check' button on the Maintenance tab. This will require paper to be loaded into the printer.
Confirm the next message to start the print test.
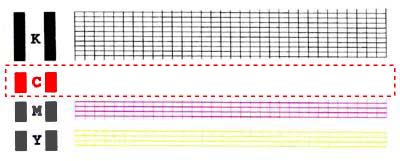
Once the page has printed examine the nozzle check pattern. If the pattern is good, no further action is required.
Example of a good pattern:
If the if colors or lines are missing in the grids, return to the Maintenance tab to perform Deep Print Head Cleaning.
Click the 'Deep Cleaning' icon.
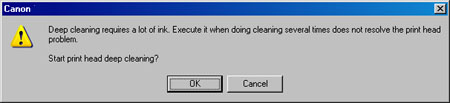
Deep cleaning uses a lot of ink. Only perform deep cleaning when necessary. Confirm the message, and then click the 'OK' button.
Confirm the next message to start the deep cleaning.
The Power lamp will blink and print head deep cleaning will start. Deep cleaning completes when the Power lamp stops blinking and lights. (It will take about a minute for the Power lamp to stop blinking and light solid.)
Print another nozzle test pattern. If the pattern still does not print correctly, replace any ink tank that may be low, and then perform another deep print head cleaning.
If printing is still not satisfactory after replacing the ink tanks and deep cleaning the print head, there may be a problem with the print head.