|
|
Borderless copying MP210
| Article ID: ART118168 |
| |
Date published: 05/12/2015 |
| |
Date last updated: 08/17/2015 |
Description
Borderless copying on the printer.
Solution
Borderless Copying
There are two ways (normal / high speed) to make copies.
"Fit to Page" function allows you to make borderless copies of photos.
Normal copies
Use Normal copying for photo copy quality or documents that contain text and photos.
- Confirm that the printer is powered on. If the printer is not on, press the ON/OFF button.
- Open the Paper Support, then pull out the Paper Support Extension.
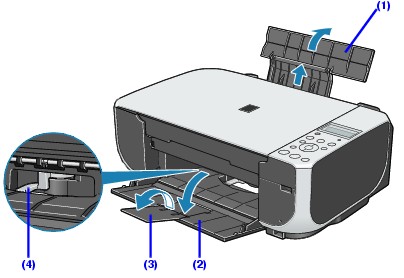
- Load paper in the Rear Tray, print side facing up with the short-side down.
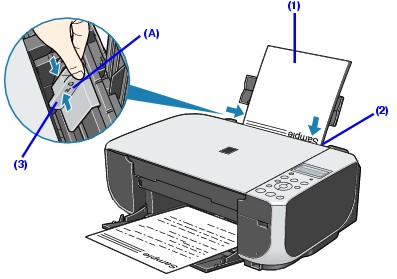
Note: Load the exact number of pages in the Rear Tray to make 10 to 19 copies.
- Lift the document cover and place a document on the platen glass.
Note:
* Regardless of the document size, place it with the long-side toward you.
* Place the document face down on the platen glass.
* Align the document with the alignment mark (shown as the arrow) on the top right corner of the platen glass.
* The machine cannot scan the area within approximately 3 mm of the front and right edges of the platen glass.
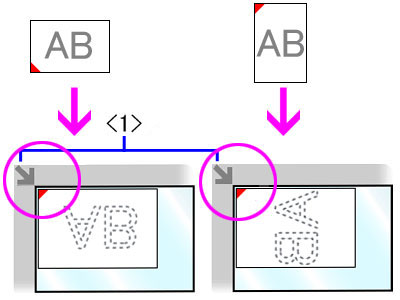
< 1 > Alignment Mark
- Gently close the document cover.
- Press the <Paper> button repeatedly until the preferred paper size and type is illuminated. The options are as follows:
8.5" x 11"
Plain Paper
8.5" x 11"
Photo Paper
4" x 6"
Photo Paper
-
Press the <+> button repeatedly to select the number of copies. (The maximum number of copies is 20.)
- When making 20 copies, press the <+> button repeatedly to select [F]. The letter F will display after number 9.
- When making 10 to 19 copies, press the <+> button repeatedly to select [F] and then load the exact number of pages in the Rear Tray.
For example, to make 15 copies, load 15 blank pages in the Rear Tray.
Note: The number of copies can be set from 1 to 9 and 20 (F is the selection). So, it is important to load the exact number of sheets in the Rear Tray when making 10 to 19 copies.
- After copies from 10 to 19 are completed, the below error will appear <E> and then <2>. This is a normal function for this printer when making this number of copies. Press the Stop/Reset button to clear the error.
The above illustration is of a PIXMA MP160.
- To start copying, press the <Color> or <Black> button.
- To cancel copying, press the <Stop/Reset> button.
High speed copies
High speed copying is suitable for text-only documents.
- Confirm that the printer is powered on. If the printer is not on, press the ON/OFF button.
- Open the Paper Support, then pull out the Paper Support Extension.
- Load paper in the Rear Tray, print side facing up with the short-side down.
Note: Load the exact number of pages in the Rear Tray to make 10 to 19 copies.
- Lift the document cover and place a document on the platen glass.
Note:
* Regardless of the document size, place it with the long-side toward you.
* Place the document face down on the platen glass.
* Align the document with the alignment mark (shown as the arrow) on the top right corner of the platen glass.
* The machine cannot scan the area within approximately 3 mm of the front and right edges of the platen glass.
< 1 > Alignment Mark
- Gently close the document cover.
- Press the <Paper> button to select [8.5" x 11" Plain Paper].
-
Press the <+> button repeatedly to select the number of copies. (The maximum number of copies is 20.)
- When making 20 copies, press the <+> button repeatedly to select [F]. The letter F will display after number 9.
- When making 10 to 19 copies, press the <+> button repeatedly to select [F] and then load the exact number of pages in the Rear Tray.
For example, to make 15 copies, load 15 blank pages in the Rear Tray.
Note: The number of copies can be set from 1 to 9 and 20 (F is the selection). So, it is important to load the exact number of sheets in the Rear Tray when making 10 to 19 copies.
- After copies from 10 to 19 are completed, the below error will appear. This is a normal function for this printer when making this number of copies. Press the Stop/Reset button to clear the error.
The above illustration is of a PIXMA MP160.
- Press and hold down the <Color> or <Black> button for 2 seconds.
- When the number of copies in the LED disappears and reappears, release the button. The machine starts high speed copying.
- To cancel copying, press the <Stop/Reset> button.
Fit-to-Page
This feature enables you to copy images in the size you set by reducing or enlarging them automatically. The size may not be detected properly dependent on the document type. In this case, make a copy through the software using MP Navigator EX.
- Confirm that the printer is powered on. If the printer is not on, press the ON/OFF button.
- Open the Paper Support, then pull out the Paper Support Extension.
- Load paper in the Rear Tray, print side facing up with the short-side down.
Note: Load the exact number of pages in the Rear Tray to make 10 to 19 copies.
- Lift the document cover and place a document on the platen glass.
Note:
* Regardless of the document size, place it with the long-side toward you.
* Place the document face down on the platen glass.
* Align the document with the alignment mark (shown as the arrow) on the top right corner of the platen glass.
* The machine cannot scan the area within approximately 3 mm of the front and right edges of the platen glass.
< 1 > Alignment Mark
- Gently close the document cover.
- Press the <Paper> button to select [8.5" x 11" Photo Paper] or [4" x 6" Photo Paper].
Note:
* If you select Photo Paper, the machine copies the entire image without borders. Some cropping may occur.
* If you select 8.5" x 11" Plain Paper, making high speed copies is possible.
-
Press the <+> button repeatedly to select the number of copies. (The maximum number of copies is 20.)
- When making 20 copies, press the <+> button repeatedly to select [F]. The letter F will display after number 9.
- When making 10 to 19 copies, press the <+> button repeatedly to select [F] and then load the exact number of pages in the Rear Tray.
For example, to make 15 copies, load 15 blank pages in the Rear Tray.
Note: The number of copies can be set from 1 to 9 and 20 (F is the selection). So, it is important to load the exact number of sheets in the Rear Tray when making 10 to 19 copies.
- After copies from 10 to 19 are completed, the below error will appear. This is a normal function for this printer when making this number of copies. Press the Stop/Reset button to clear the error.
The above illustration is of a PIXMA MP160.
- Press the <Fit to Page> button to light the Fit-to-Page lamp.
Note: To cancel the Fit-to-Page copying, press the Fit to Page button again.
- To start Fit-to-Page copying, press the <Color> or <Black> button.
- To cancel copying, press the <Stop/Rest> button.
|
