Untitled Document
How to perform the Print Head Alignment (Windows)
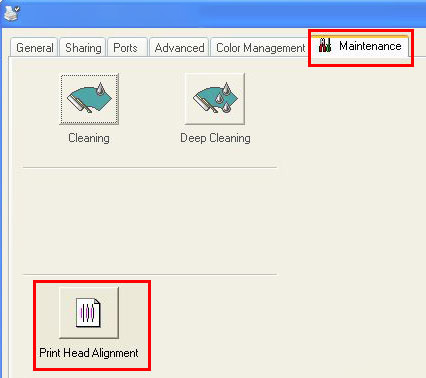
1. Right-click the printer icon, and then click [Properties].
2. Click the [Maintenance] tab, and then click [Print Head Alignment].
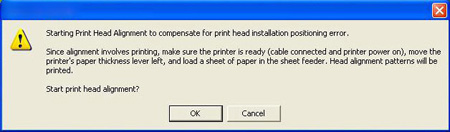
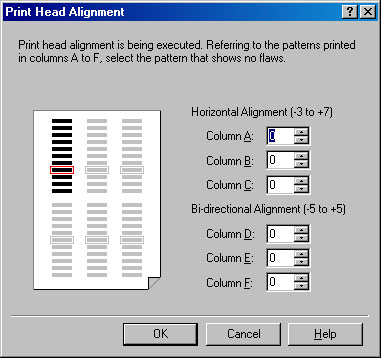
3. The dialog box shown below is displayed. Check the following, and then click [OK].
- Is the printer on?
- Is Letter size plain paper loaded in the printer?
4. Click 'OK' to the next message.
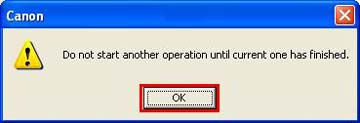
5. Print head cleaning begins. During cleaning, the power lamp blinks. Do not perform any other operations while the power lamp is blinking. When cleaning is completed, the head alignment pattern is printed.
6. The dialog box shown below is displayed. After printing has finished, click [Yes].

7. Refer to the printout and enter the appropriate numbers on the next screen.
7-1. Select the pattern with the least number of visible vertical stripes in column A.
7-2. Enter the number of the selected pattern in the box for column A.
7-3. Select the patterns with the least number of visible vertical stripes in each column from B to F, and then enter the corresponding numbers in the boxes for columns B to F.
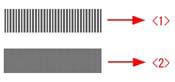
<1> Pattern with the greatest number of visible vertical stripes.
<2> Pattern with the least number of visible vertical stripes.
7-4. When you have entered a number in each box, click [OK].
8. The dialog box shown below is displayed.
8-1. If no visible vertical stripes are printed the first time you use the printer, or if there are no visible vertical stripes in your printouts at present, click [Cancel] to complete print head alignment.
8-2. If there are visible vertical stripes in your printouts, make sure that the paper is loaded in the auto sheet feeder properly, and then click [OK]. A new head alignment pattern is printed.
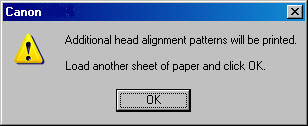
9. When the next dialog box is displayed, click [OK].
10. Refer to the printout and enter the appropriate numbers on the next screen.
10-1. Select the pattern with the least number of visible horizontal stripes in the G column. If all patterns look the same, leave the number in the box for column G as "0".
10-2. Enter the number of the selected pattern in the box for column G.
10-3. Enter the number of the selected pattern in the box for column H.
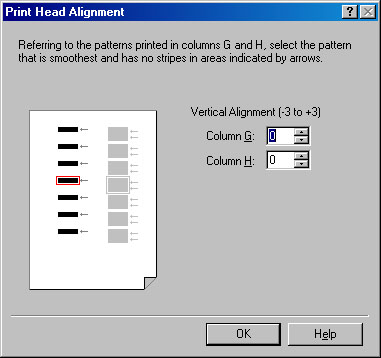
10-4. When you have entered a number in each box, click [OK].
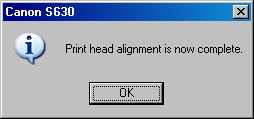
11. Click [OK] to the 'alignment complete' dialog box.