Depending on your printer, certain settings might be different or might not be available. For details, refer to your printer's instruction manual.
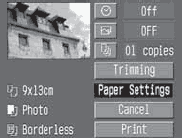
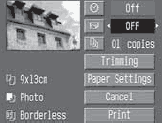
 Setting the Paper Size Setting the Paper Size |
 |
- Select the size of the paper to be loaded in the printer.
|
 Setting the Paper Type Setting the Paper Type |
 |
- Select the type of paper to be loaded in the printer.
|
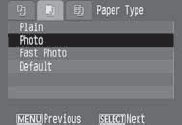
About the Paper Type
If you are using a Canon printer with Canon paper, set the respective paper type as follows:
| Photo |
Photo Paper Plus Glossy |
| Fast Photo |
Photo Paper Pro |
| Default |
Photo Paper Plus Glossy |
If you are using a non-Canon printer, refer to the printer's instruction manual for the recommended paper type settings.
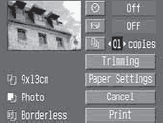
 Setting the Page Layout Setting the Page Layout |
 |
- Select the desired layout.
- The print settings screen will reappear.
|
About Page Layout
| Bordered |
The print will have a white border along the edges. |
| Borderless |
The print will have no white borders.
If your printer cannot print borderless prints, the print will have borders. |
| 8-UP |
Eight copies of the same image will be printed on a single sheet. |
| Default |
With a Canon printer, the print will be borderless. |
| - |
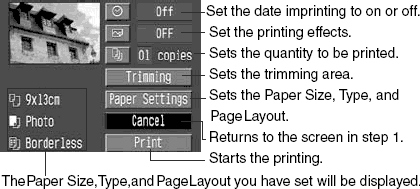
4. Set the other options.
- If desired, also set the <
 > date imprinting, < > date imprinting, < > printing effects, and < > printing effects, and < > number of copies. > number of copies.
|
|
[Date imprinting]

[Printing effects]
[Number of copies]
|
| - |
- Depending on the BJ printer, the <> Printing effects setting may enable you to select the [VIVID] (for vivid greens and blue sky), [NR] (noise reduction), or [VIVID+NR] setting.
|
 |
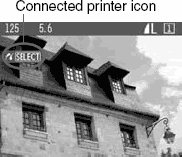
5. Print the image.
- Select [Print].
- The printing will start.
- When the printing ends, the screen will return to step 1.
- To stop printing, press the <SELECT> button while [Stop] is displayed, then select [OK].
|
- Depending on the image's size and recording quality, it may take some time for the printing to start after you select [Print].
- The [Default] setting for printing effects and other options are the printer's own default settings as set by the printer's manufacturer. See the printer's instruction manual to find out what the default settings are.
Handling Printer Errors
If you resolve a printer error (no ink, no paper, etc.) and select [Continue] to resume printing but it does not resume, operate the printer to resume printing. For details, see the printer's instruction manual.
Error Messages
If a problem occurs during printing, an error message will appear on the camera's LCD monitor. Press the <SELECT> button to stop printing. After resolving the problem, resume printing. For details on how to resolve a printing problem, refer to the printer's instruction manual.
Paper Error
Check whether the paper is properly loaded in the printer.
Ink Error
The printer has run out of ink or the waste ink tank is full.
Hardware Error
Check for any printer problems other than paper and ink problems.
File Error
You attempted to print an image that cannot be printed with PictBridge. Images taken with a different camera or images edited with a computer might not be printable.
|