Changing the resolution and compression on PowerShot S5 IS.
You can change the resolution and compression (excluding movies) settings to suit the purpose of the image you are about to shoot.
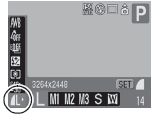
Changing the Resolution and Compression (Still Images)
|
Resolution
|
Purpose
|
|
L (Large) 3264 x 2448 pixels
|
- Print larger than A3 size* prints 297 x 420 mm (11.7 x 16.5 in.)
|
|
M1 (Medium 1) 2592 x 1944 pixels
|
- Print A3 size prints* 297 x 420 mm (11.7 x 16.5 in.)
|
|
M2 (Medium 2) 2048 x 1536 pixels
|
- Print A4 size* prints 210 x 297 mm (8.3 x 11.7 in.)
- Print letter size* prints 216 x 279 mm (8.5 x 11 in.)
|
| M3 (Medium 3) 1600 x 1200 pixels |
- Print L size prints 89 x 119 mm (3.5 x 4.7 in.)
|
|
S (Small) 640 X 480 pixels
|
- Send images as e-mail attachments
- Shoot more images
|
 (Widescreen) 3264 x 1832 pixels (Widescreen) 3264 x 1832 pixels |
|
* Paper sizes vary according to region.
|
Compression
|
Purpose
|
 Superfine Superfine |
Shoot higher quality images |
 Fine Fine |
Shoot normal quality images |
 Normal Normal |
Shoot more images |

 (Fine) is the default).