
Recording Still Images on a Memory Card Elura 40MC and Elura 50
| Article ID: ART154473 | | | Date published: 06/09/2015 | | | Date last updated: 08/17/2015 |
Description
Solution
Recording Still Images on a Memory Card Elura 40MC and Elura 50
You can record still images with the camcorder, from a tape in the camcorder or from devices connected via the DV terminal or AV terminal.
Contents:
Using the Camcorder as a Digital Still Camera
Recording from a Tape in the Camcorder
Recording from Other Video Devices
The indicators that appear in the display when recording to a memory card
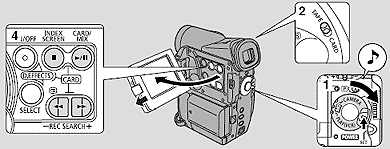
Using the Camcorder as a Digital Still Camera
-
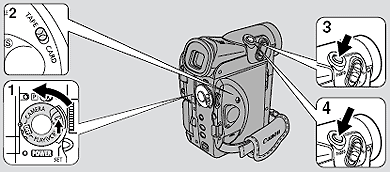
Press and hold the small button on the POWER switch and turn the POWER switch to CAMERA.
-
Move the TAPE/CARD switch to CARD.
- The number of images that can still be recorded on the memory card, and other information appear in the display.
- The camcorder will turn itself off if you are using a battery and do not operate the camcorder for more than 5 minutes. Set the POWER switch to OFF and then back to CAMERA. -
Press the <PHOTO> button halfway and hold it.
- Exposure is locked.
- During autofocus, flashes white in the display as the camcorder adjusts the focus, and it is displayed continuously as a green mark when the camcorder is ready to take the still image.
- The picture may appear out of focus for a moment while the camcorder is focusing. -
Press the <PHOTO> button fully.
- disappears from the display. The shutter sound sounds and simultaneously the display appears to close for an instant as if it were a shutter releasing.
- The card access indicator flashes and the card access display appears.
- The still image shown on the screen will be recorded on the memory card.
|
|
Recording from a Tape in the Camcorder
Recording Still Images from a Movie on the Tape
Record an image from a tape onto a memory card as still images. To automatically record multiple still images from a tape to a memory card, refer to Copying Still Images from Tape to Memory Card.
- Play back the tape.
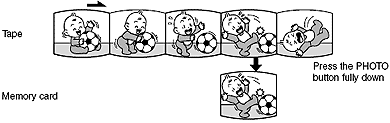
- When the image you want to record appears in the still display, press the <PHOTO> button halfway down and hold it.
- The tape is set to playback pause mode and the number of images that can still be recorded on the memory card appears in the display. - Press the <PHOTO> button fully down to record the still image to the memory card.
- The card access indicator flashes.
|
Copying Still Images that were Recorded on a Tape to the Memory Card
Copies multiple still images from a tape to the memory card, using the Photo Search function.
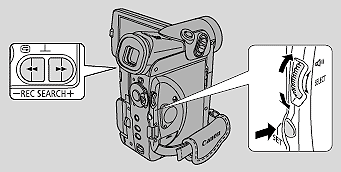
- Play back the tape.
- Locate the first still image on the tape that you want to copy and stop the tape at a point before that image.
- All the still images on the tape after that point will be copied onto the memory card.
- If you want to copy all the images on a tape, rewind the tape to the beginning. -
Open the menu and select CARD OPER.
-
Select
 .
.
- CANCEL and EXECUTE settings appear. -
Select EXECUTE and press the <SET> button.
- Select CANCEL to stop copying.
- Tape and card information appear in the display and copying starts.
- NOW COPYING appears in the display.
- The camcorder automatically performs the Photo Search function to locate still images and copying starts. The currently copying image appears in the display.
- Copying stops when the tape is finished or the memory card is full. When the memory card is full, CARD FULL will appear in the display. -
Press the
 (stop) button when your desired images have finished copying.
Recording from Other Video Devices
You can record images from a VCR or TV connected through the S-terminal or AV terminal (analog line-in), as well as images from other digital camcorders connected through the DV terminal onto the memory card as still images.

- Connect the camcorder to the other device.
- Prepare the other device.
- Insert a memory card into the camcorder.
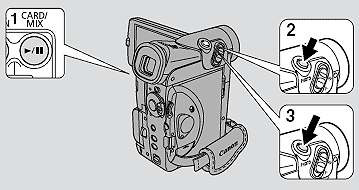
- Turn the camcorder's POWER switch to PLAY (VCR) and move the TAPE/CARD switch to TAPE.
- There is no need to load a cassette if you only record still images onto a memory card. If a cassette is inserted, make sure the cassette is in stop mode. - Start playback on the other device.
- When the image you want to record appears in the display, press the <PHOTO> button halfway down and hold it.
- The image appears as a still image in the display.
- The number of images that can still be recorded on the memory card appears in the display. - Press the <PHOTO> button fully down to record the image to the memory card.
- The card access indicator flashes.
|
Additional Information
Playing back a tape
You can use the LCD screen for instant, on-the-spot playback. The camcorder also plays back the sound track via the built-in speaker.
- When you play back a tape, you can also close the LCD panel with its screen side facing up.
- When you're using the viewfinder to view playback, close the LCD panel.
- To avoid accidental recording, make sure that you slide the tab on the cassette so that it exposes the hole (the switch position is usually labeled SAVE or ERASE OFF).
- Attach a power source and turn the POWER switch to PLAY (VCR).
- The power indicator lights up. - Make sure the TAPE/CARD switch is set to TAPE.
- Load the cassette.
- Press the
 (play) button to start playback.
- To end playback, press the (stop) button.
- To wind the tape forwards, stop playback and press the (fast forward) button.
- To wind the tape backwards, stop playback and press the (rewind) button.
- If the playback picture is rough (mosaic-like noise), clean the video heads using a Canon DVM-CL Digital Video Head Cleaning Cassette or a commercially available digital video head cleaning cassette.
The indicators that appear in the display when recording to a memory card:
