This article provides an overview of the basic setting items that are the minimum requirements when configuring the scanner settings.
Confirming Basic Conditions for Scanning
When you scan a document, make sure you confirm the [Color mode], [Page Size], [Dots per inch], and [Scanning Side] basic conditions in the Basic settings dialog box.
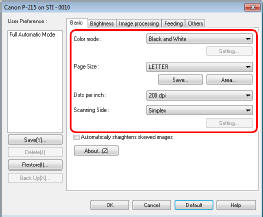
Color mode
Select the scanning mode.
- [Advanced Text Enhancement II] removes or processes the background color and background surrounding text to enhance the text for easy reading. If necessary, you can make the text in scanned images easier to read by adjusting the contrast on the [Brightness] tab.
- [Detect automatically] detects whether the document is in color, grayscale, or black and white. You can configure advanced settings related to the detection method by clicking [Setting]. For details, see the Help.
Page Size
Select the page size that matches the document to be scanned.

If [Match original size] is selected, the edges of the document are detected and images that match the size of the document are saved.
Dots per inch
Select the scanning resolution.

- Higher resolutions provide clearer images but result in larger file sizes and slower scanning.
- When [Detect automatically] is specified, the resolution is detected automatically from the content printed in the document.
Scanning Side
Select which of the sides of the document to scan.

If the scanning side is set to [Skip blank page], the images of blank pages are deleted when images are saved.
Scanning Documents of Unregistered Page Sizes
Configuring the following settings allows you to scan a document of an unregistered page size.
You can register a non-standard page size that has not been registered as a page size by naming and registering it as a custom page size in the Custom Paper Size dialog box, which is opened from the [Save] button on the [Basic] tab.

Specifying the Scan Area
Configure the following settings when you want to specify the area of the document to be scanned.
Specifying an area
Specify the area of the document to be scanned in the Scan Area dialog box, which is opened from the [Area] button on the [Basic] tab.

Configuring Scanner Settings According to Purpose
Set the scanning conditions according to the scanning purpose.
When you want to delete the images of the blank pages in two-sided documents
Set the scanning side setting to [Skip blank page] on the [Basic] tab to delete the images of the blank pages in the document.

If [Skip blank page] is selected, the [Setting] button is enabled, and you can adjust the level for judging whether pages are blank.

When you do not want to scan colored lines and text
Specify the color (red, blue, green or Color Elimination) to be ignored (dropped out) in the color drop-out settings on the [Image processing] tab, and that color will not be scanned.

When you want to enhance the color red
Specify [Red Enhance] for [Color drop-out] on the [Image processing] tab to enhance the color red in the document.

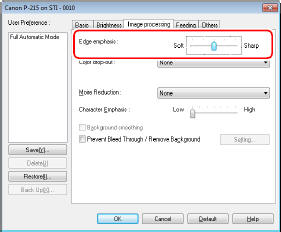
When you want to enhance contours in images
Adjust the edge emphasis setting on the [Image processing] tab.
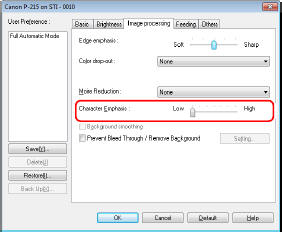
When you want to make lines or characters in the scanned images thicker
Drag the slider for [Character Emphasis] on the [Image processing] tab to make the lines and characters that appear in the scanned image thicker.
When you want to enhance text that is difficult to read because of factors such as the background of the scanned document
Select [Advanced Text Enhancement II] in the color mode setting on the [Basic] tab. The background behind the text is removed or processed so that the text is emphasized for better readability.

Advanced Text Enhancement II is suitable for scanning a document with a uniform background color and light text and background. If the background is non-uniform, such as a pattern, the background may not be able to be completely removed and the text may become difficult to read. If necessary, you can make the text in scanned images easier to read by adjusting the contrast on the [Brightness] tab.
When you want to detect multiple pages fed at the same time
Select the [Detect by Length] check box under the [Double Feed Detection] on the [Feeding] tab.

When you want to match the orientation of images to the text when scanning a mixture of pages with different text orientations
Select [Text orientation recognition] in [Document Orientation] on the [Others] tab. The text orientation on each page is detected, and the scanned image is rotated in 90-degree increments to correct the orientation.
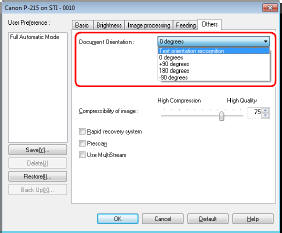
When you want to rotate the images of a document placed horizontally to correct the orientation
Specify the rotation angle in [Document Orientation] on the [Others] tab.

When you want to set the scanner conditions automatically
Set [Full Automatic Mode] in [User Preference] to scan with scanning conditions that match the document.


When [Full Automatic Mode] is selected, [Color mode], [Page Size], and [Dots per inch] are all detected automatically. In addition, the [Scanning Side] setting becomes [Skip blank page] and [Document Orientation] becomes [Text orientation recognition].
When you want to use multistream settings for scanning
Multistream settings allow you to output multiple different scanned images with a single scan operation, and output scanned images with different scanning conditions for each of the front and back pages.

- The multistream settings can only be used in Windows.
- Depending on the application program, these settings may not appear.
When you want to use the multistream settings for scanning, select the [Use MultiStream] checkbox on the [Others] tab to display the setting items related to multistream, and then configure the setting items in the following order.

- When you want to specify different scanning conditions for the front and back pages of a document, select [Skip blank page] or [Duplex] for [Scanning Side] on the [Basic] tab in advance.
- Specify the number of scanning conditions to apply in [Stream count of Front]. Up to three can be specified.
- Select [Front 1st], and then open the other tabs and set the scanning conditions. Depending on the value specified for [Stream count of Front], configure the remaining [Front 2nd] and [Front 3rd] in the same way.
- When specifying the scanning conditions of the back, configure the settings in the same way as described in B to C. In this case, specify [Stream count of Back], and then set the scanning conditions for each of [Back 1st] to [Back 3rd].

The following shows the setting conditions that can be set in the multistream settings.
| Tab | Items that can be set |
| [Basic] tab | [Color mode] and [Dots per inch] (excluding [Auto-detection] for ) |
| [Brightness] tab | [Brightness] and [Contrast] |
| [Image processing] tab | [Edge emphasis] and [Color drop-out] |
| [Feeding] Tab | None (all disabled) |
| [Others] Tab | None (only [Use MultiStream] is enabled) |
When you want to save a scanner driver setting
When you finish configuring a setting, click the [Save] button of [User Preference] to save the setting.

The saved setting is registered to the list. You can delete a setting from the list with the [Delete] button, and save or load a configuration file with the [Back Up] or [Restore] button.

The preregistered [Full Automatic Mode] cannot be deleted from [User Preference].
