Perform print head deep cleaning (Windows) S200
| Article ID: ART126946 |
| |
Date published: 05/12/2015 |
| |
Date last updated: 08/14/2015 |
Description
Perform print head deep cleaning
Solution
Perform Print Head Cleaning
After confirming that the cable is connected and the printer is powered on, perform the following:
-
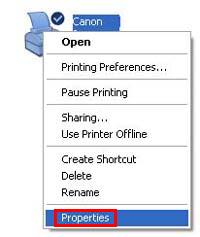
Open the Printers folder.
- For Windows XP select 'Start', 'Control Panel', 'Printers and Other Hardware', and 'Printers and Faxes'.
- For Windows versions other than Windows XP select 'Start', 'Settings', and 'Printers'.
- Right-click the printer icon and select 'Properties'.
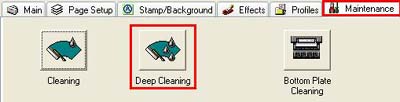
- Click the Maintenance tab, then click the 'Deep Cleaning' icon.
- Deep cleaning uses a lot of ink. Only perform deep cleaning when necessary. Confirm the message, and then click the 'OK' button.
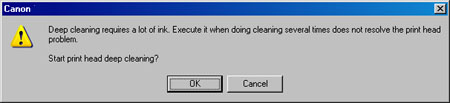
- Confirm the next message to start the deep cleaning.
- The print head deep cleaning will start. Deep cleaning completes when the printer stops. (It will take about two minutes.)
- Print another nozzle test pattern. If the pattern still does not print correctly, replace any ink tank that may be low, and then perform another deep print head cleaning.
- If printing is still not satisfactory after replacing the ink tanks and deep cleaning the print head, there may be a problem with the print head.
