Scanning with the Toolbox MP700 / MP730
| Article ID: ART159154 |
| |
Date published: 06/09/2015 |
| |
Date last updated: 08/18/2015 |
Description
Scanning with the Toolbox MP730
Solution
Untitled Document
Scanning with the MP Toolbox
You can scan a document using the buttons on the MP Toolbox.
- Place the document face-down on the platen glass.
- On the Windows desktop, double-click 'Canon MP Toolbox 4.1'. Alternatively, on the Windows desktop, click 'Start', point to '(All) programs', 'Canon', then 'MP Toolbox 4.1'. Then click 'Toolbox 4.1'. The MP Toolbox will open.
-
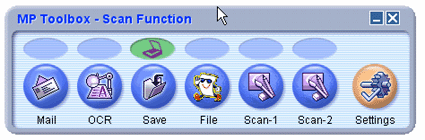
Click one of the scanning buttons below.
- 'Mail': The document will be scanned and attached to an e-mail message in your e-mail application.
- 'OCR': The text will be scanned and read by the OCR software.
- 'Save': The document will be scanned and saved.
- 'File': The text will be scanned and saved as a PDF.
- 'Scan-1', 'Scan-2': The text will be scanned and appear in the registered application. You can change the button name by directly entering a new name over the button name. The name can be up to 8 characters long. A dialog box will appear for each of the buttons.

- Adjust the settings. If you clicked a button other than 'Save' or 'File' and no application appears in 'Link scanned image to', select an application. If you want to keep the same settings for future scans, click 'Apply' before clicking 'Scan'.
- Click 'Scan'. If you clicked 'Use the scanner driver to make advanced settings' in Step 4, ScanGear MP will appear. Adjust the settings, then click 'Scan'. Scanning will begin.
- If you clicked 'Save' or 'File' in step 3, a folder with the scanning date will be created in the 'My Pictures' folder in the 'My Documents' folder, and your document will be saved in this folder. If there is no 'My Pictures' folder, the folder with the scanning date will be created in the 'My Documents' folder and your document saved in this folder.
- If you clicked 'Mail', 'OCR', 'File' or 'Scan-1' in step 3, the scanned image will be displayed in the application after scanning. Send the e-mail message or perform OCR conversion. (The scanned image will not be displayed if you have not installed the applications on the MP730/700 Setup CDROM or if you have not set the 'Link scanned images to' setting.)
-
When the applications in the MP730/700 Setup CD-ROM are installed, one part will be registered in the MP Toolbox buttons.
- For 'OCR': ScanSoft OmniPage
- For 'File': Presto! PageManager
