Replace the Ink Tank(s)
important:
- To maintain optimal print quality, we recommend the use of specified Canon brand ink tanks. Refilling the ink is not recommended.
- If you remove an ink tank, replace it immediately. Do not leave the printer with ink tanks removed.
- Use new ink tanks for replacement. Installing used ink tanks may cause the nozzles to clog. Furthermore, with such ink tanks, the printer will not be able to inform you when to replace the ink tanks properly.
- Once an ink tank has been installed, do not remove it from the printer and leave it out in the open. This will cause the ink tank to dry out, and the printer may not operate properly when it is reinstalled. To maintain optimal printing quality, use an ink tank within six months of first use.
note:
- Color ink may be consumed even when printing a black-and-white document or when black-and-white printing is specified. Every ink is also consumed in the standard cleaning and deep cleaning of the Print Head, which may be necessary to maintain the printer's performance. When an ink tank is out of ink, replace it immediately with a new one.
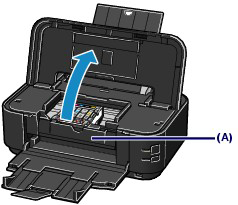
1. Make sure that the power is turned on, and open the Paper Output Tray gently.
2. Open the Top Cover.
The Print Head Holder moves to the replacement position.
attention:
- Do not hold the Print Head Holder to stop or move it forcibly. Do not touch the Print Head Holder until it stops completely.
important:
- Do not place any object on the Top Cover. It will fall into the Rear Tray when the Top Cover is opened and cause the printer to malfunction.
- Do not touch the metallic parts or other parts inside the printer.
- If the Top Cover is left open, the Print Head Holder moves to the right. In this case, close and reopen the Top Cover.
- Do not open the Inner Cover (A) when replacing the ink tank. If the Inner Cover (A) is open after replacing the ink tank, be sure to close it.
note:
- The printer may make operating noise when the Print Head Holder moves to the replacement position.
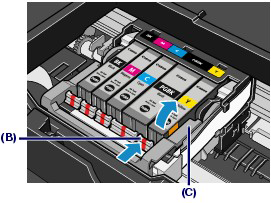
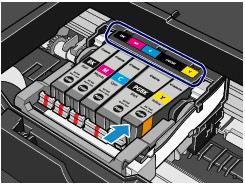
3. Remove the ink tank with the lamp flashing fast.
Push the tab (B) and lift the ink tank to remove.
Do no touch the Print Head Lock Lever (C).
important:
- Handle the ink tank carefully to avoid staining of clothing or the surrounding area.
- Discard the empty ink tank according to the local laws and regulations regarding disposal of consumables.
note:
Do not remove two or more ink tanks at the same time. Be sure to replace ink tanks one by one when replacing two or more ink tanks.
4. Prepare the new ink tank.
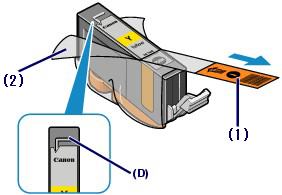
(1) Take a new ink tank out of its package, pull the orange tape (1) in the direction of the arrow to peel it off, then remove the film (2).
important:
- Make sure that the film is completely removed from the air hole (D). If the air hole is blocked with the remaining film, ink may leak out or may not eject properly.
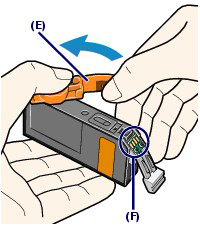
(2) Hold the orange protective cap (E) as indicated in the figure below, then twist and remove it from the bottom of the ink tank.
Remove the protective cap while holding it to prevent the ink from staining your fingers.
Discard the protective cap once it is removed.
important:
- Do not touch the electrical contacts (F) on the ink tank. It can cause the printer to malfunction or become unable to print.
important:
- If you shake the ink tank, the ink may spill out and stain your hands and the surrounding area. Be careful to handle the ink tank.
- Do not squeeze the side of ink tanks as this may cause the ink to leak out.
- Be careful not to stain your hands and the surrounding area with ink on the removed protective cap.
- Do not reattach the protective cap once you have removed it. Discard it according to the local laws and regulations regarding disposal of consumables.
- Do not touch the open ink port once the protective cap is removed, as this may prevent the ink from being ejected properly.
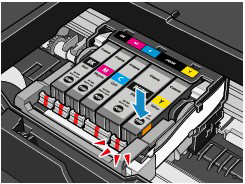
5. Install the new ink tank.
(1) Insert the front end of ink tank into the Print Head at a slant.
Make sure that the position of the ink tank matches the label.
(2) Press the mark  (Push) on the ink tank until the ink tank snaps firmly into place.
Make sure that the ink lamp lights up red.
important:
- You cannot print if the ink tank is installed in the wrong position. Be sure to install the ink tank in the correct position according to the label on the Print Head Holder.
- You cannot print unless all the ink tanks are installed. Be sure to install all the ink tanks.
6. Close the Top Cover.
note:
- When you start printing after replacing the ink tank, the printer starts cleaning the Print Head automatically. Do not perform any other operations until the printer completes the cleaning of the Print Head. The Power lamp flashes green while cleaning.
- The printer may make noise during operation.
