From the Advanced Mode tab on the Scan dialog menu, you can manage a number of image settings, including output settings. Learn more about output settings in the article below.
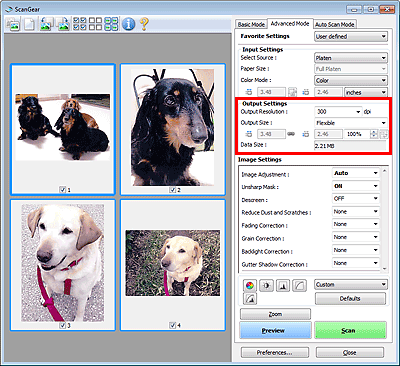
Output Resolution
You can choose how much detail you want to see in an image.
-
The higher the resolution number, the more detail you'll see.
-
Select a preset resolution or customize the dpi setting.
Output size
You can choose the output resolution and scale, and adjust the cropping frame.
- In thumbnail view
-
Drag the mouse over a thumbnail image to display a cropping frame, and only the part inside the frame scans.
-
Don't choose a cropping frame and images scan individually.
- In whole image view
-
Drag the mouse over a thumbnail image to display a cropping frame, and only the part inside the frame scans.
-
Don't choose a cropping frame and the entire Preview area scans.
-
Enter width and height values to reduce / enlarge images.
-
Specify the output resolution (maximum 19200 dpi).
- Paper size
-
Drag the cropping frame to enlarge, reduce, or move the image without losing the aspect ratio.
-
Crop the preview image to fit paper size and the image scans at the selected paper (or monitor) size.
-
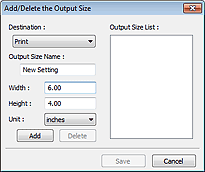
Add/Delete...
This opens the Output Size dialog box, which allows you to set custom output sizes.
-
Specify multiple output sizes and save them at one time.
-
Save up to 10 items for each destination in the Output Size List
-
Select an item from the Output Size List and quickly delete it..
-
Set custom sizes or select a size for print or display and save it as a new output size option.
 Switch Aspect Ratio
Data Size
-
See the file size of the image that displays in preview.
-
If the file size exceeds a certain level, this will appear in red. If this happens, a warning message will appear when you click Scan. You may want to adjust the settings to reduce the Data Size
 Every time the Output Resolution is doubled, the Data Size is quadrupled.
