➤
Home
Articles
FAQs
Ask a Question
Search
Models related to this article
MultiPASS MP370
MultiPASS MP360
MultiPASS MP390
Home
Articles
Articles Detail
Replace ink tank(s) MP360 / MP370 / MP390
Article ID: ART160704
|
Date published: 06/09/2015
|
Date last updated: 09/29/2015
Description
Replace any ink tanks that are empty.
Solution
Replacing an Ink Tank
If replacing ink tanks, remove and replace each one individually.
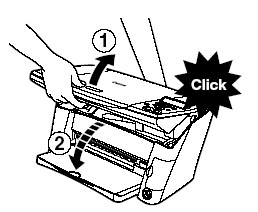
Make sure the device is powered on.
Lift the scan unit until it locks into place. When the machine is ON and the scan unit is lifted, the paper output tray automatically opens.
Open the inner cover.
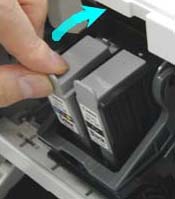
Hold the tab and pull it forward to release the ink tank.
Lift out the ink tank.
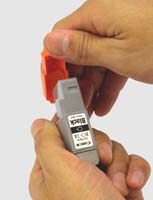
Remove the new ink tank from its packaging.
Hold the ink tank and remove the protective cap.
Insert the ink tank into the empty slot on the print head.
If you need to replace the other ink tank, repeat steps 4 to 8.
Close the inner cover.
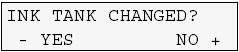
Return the scan unit to its original position. The LCD displays a message asking if you replaced an ink tank.
Press [<] to select <YES>.
The LCD displays a message asking if you replaced the black ink tank.
If you replaced the black ink tank, press [<]. If you did not, press [>].
The LCD displays a message asking if you replaced the color ink tank.
If you replaced the color ink tank, press [<]. If you did not, press [>].
The ink counter is now reset.
If additional ink tanks need to be replaced, replace them now.
SIMS Doc Id
0
Rate this Article
Was this article helpful?
Yes, This document is helpful
No, This document needs a clearer explanation
Please provide your comments
Rate Article