Print Head Cleaning
Clean the Print Head if lines are missing or if horizontal white streaks are present in the printed nozzle check pattern. Cleaning unclogs the nozzles and restores the print head condition. Cleaning the Print Head consumes ink, so clean the Print Head only when necessary.
- Make sure that the printer is powered on (1), and load a sheet of A4 or Letter-sized plain paper in the Rear Tray (2).
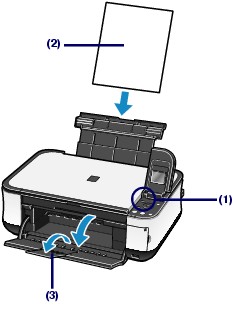
- Open the Paper Output Tray gently, and open the Output Tray Extension (3).
-
Clean the Print Head.
- Press the <Menu> button.
- At the Top menu screen, use the
 (Up) or
  (Down) arrow to select [Maintenance], and press the <OK> button.

- Use the (Up) or (Down) arrow to select [Cleaning], and press the <OK> button.

- At the screen to start cleaning, use the (Up) or (Down) arrow to select [Yes], and press the <OK> button.
The machine starts cleaning the Print Head.
Do not perform any other operations until the machine completes the cleaning of the Print Head. This takes about 1 to 2 minutes.
- At the screen to print the nozzle check pattern, press the (Up) or (Down) arrow to select [Yes], and press the <OK> button.
The nozzle check pattern will be printed.
- At the screen Select the color patterns which are closer, press the <OK> button.
- Examine the nozzle check pattern.
Examining the Nozzle Check Pattern
Examine the nozzle check pattern, and clean the Print Head if necessary.
- Confirm there are no missing lines in the grid (1) or no horizontal white streaks in the pattern (2).

(A) No missing lines/No horizontal white streaks
(B) Lines are missing/Horizontal white streaks are present
-
Select the pattern that is closest to the printed nozzle check pattern on the Check patterns screen.

Note: The above screens will alternately display
- For (A) (no missing lines or no horizontal white streaks) in (1) and (2):
Use the (Up) or (Down) arrow to select [All A] and then press the <OK> button.
The cleaning is not required.
The screen returns to the Maintenance screen.
- For (B) (lines are missing or horizontal white streaks are present) in (1) or (2):
Use the (Up) or (Down) arrow to select [Also B] and then press the <OK> button.
Clean the Print Head. The cleaning confirmation screen appears.
- At the Nozzle clogged screen, use the (Up) or (Down) arrow to select [Yes] and then press <OK>.
The machine starts cleaning the Print Head.
- At the screen to print a nozzle check pattern, use the (Up) or (Down) arrow to select [Yes] and then press <OK>.
- At the screen Select the color patterns which are closer, press the <OK> button.
- Return to step 1 of Examing the Nozzle Check Pattern.
