|
The procedure for wirelessly printing images saved to Wi-Fi*1-compatible cameras is described below.
*1 Wi-Fi is a brand name that indicates interoperability certification of wireless LAN devices.
- This printer is a Wi-Fi certified product. You can wirelessly print images from Wi-Fi-supporting smartphones*2, tablets*2, cameras and computers.
*2 Devices must be compatible with DPS over IP, the PictBridge standard for Wi-Fi connections.
IMPORTANT
- Before using Wi-Fi, be sure to read "Wi-Fi (Wireless LAN) Precautions" in the Printer User Guide.
- Some features are not available when printing via Wi-Fi.
NOTE
- In the following explanation, camera setting procedures are indicated by the
 icon, and printer setting procedures are indicated by the icon, and printer setting procedures are indicated by the  icon. icon.
- The example procedures in the following sections are shown on the PowerShot G16, and may differ depending on the model you use. In this case, please refer to your camera User Manual for more information on settings for your camera.
Connecting a camera with Selphy via Wi-Fi
1. Prepare SELPHY.
Remove any inserted memory cards or USB flash drives.
Insert a loaded paper cassette and an ink cassette in SELPHY.
2. Access the setting screen.
Press the MENU button <  >. Press the <  ><  > buttons to select [Wi-Fi Settings], and then press the <OK> button. Press the < >< > buttons to select [Connection Settings], and then press the <OK> button.
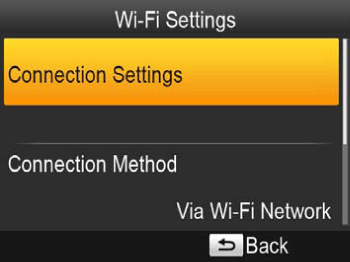
3. Check the printer name.
Check the displayed printer name and press the <OK> button.
When you connect devices via Wi-Fi, this name will be displayed on the target device to identify the printer.
You can change the printer name by pressing the EDIT button.

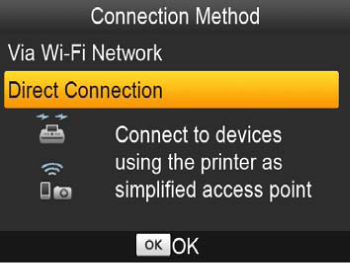
4. Choose the connection method.
Press the < >< > buttons to select [Direct Connection], and then press the <OK> button.
5. The screen below is displayed.
You can change the password by pressing the EDIT button

6. Press the <Playback> (  ) button on the camera to turn it on.
7. Press the <Wi-Fi> (  ) button.

NOTE
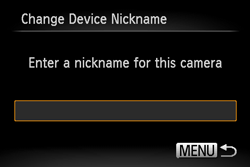
When making the settings for a wireless LAN for the first time, a screen will appear for you to register a nickname for the camera.
This nickname will appear on other devices on the wireless LAN when connecting from them.
Press the <FUNC./SET> (  ) button, enter a nickname using the keyboard.
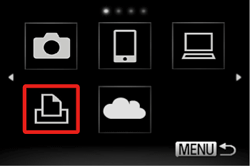
8. Press the < >< ><  ><  > buttons to choose [  ], and then press the <FUNC./SET> (  ) button.

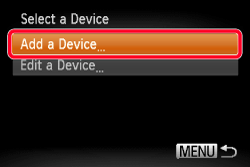
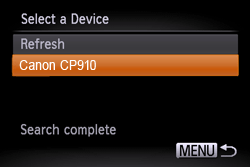
9. Press the < >< > buttons to choose [Add a Device], and then press the <FUNC./SET> ( ) button.
NOTE
- When connecting to a printer you have connected to before, you can make subsequent connections by choosing the device from the [Select a Device] screen in step 9.
- Once you have connected to devices via Wi-Fi, recent destinations willbe listed first when you access the Wi-Fi menu by pressing the < >button. You can easily connect again by pressing the < >< > buttons to choose the device name. To add a new device, display the device selection screen by pressing the < >< > buttons, and then configure the setting. If you prefer not to display recent target devices, press the <MENU > button, and on the
 ] tab, choose [Wi-Fi Settings] > [Target History] > [Off]. ] tab, choose [Wi-Fi Settings] > [Target History] > [Off].
10. Press the < >< > buttons to select the SSID (network name) displayed on the printer from the list of networks displayed on the camera's screen, and then press the < FUNC./SET > ( ) button.

11.  In the password field, press the < FUNC./SET> ( ) button and use the displayed keyboard to enter the password displayed on the printer.  Choose [Next] and press the <FUNC./SET > ( ) button.

NOTE
- The encryption key (network key) is the key used when encrypting data during wireless transmission.
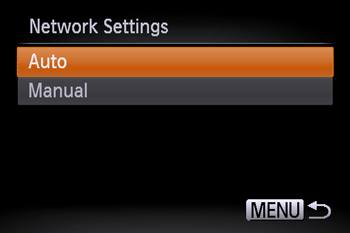
12. Press the < >< > buttons to choose [Automatic] and press the <FUNC./SET> ( ) button.
13.Press the < >< > buttons to choose the name of the Selphy printer displayed on the screen in step 3, and then press the <FUNC./SET> ( ) button.
14.The camera and printer are connected, and the camera returns to the Playback screen.
Choosing and Printing Images
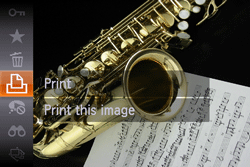
1. Press the < >< > buttons to choose an image.
2. After pressing the <FUNC./SET> ( ) button, press the < >< > buttons to choose [  ] and press the <FUNC./SET> ( ) button again to access the print screen.
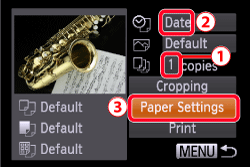
3. The screen for specifying the print settings appears.
-
 Press the <><> buttons to choose the number of prints. Press the <><> buttons to choose the number of prints.
If you want to print the shooting date, press the  < >< > buttons to set the date. Then, choose  [Paper Settings].
4. The screen for setting the paper size appears.
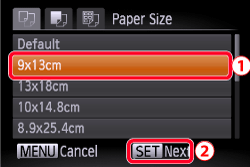
- Press the <><> buttons to choose the paper size, and then press the <FUNC./SET> () button with [Next] selected.
([9x13cm] has been selected in the example image above.)
5. The screen for setting the paper type appears.
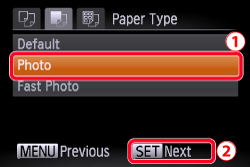
Press the < >< > buttons to choose the paper type, and then press the <FUNC./SET> ( ) button with [Next] selected.
.
([Photo] has been selected in the example image above.)
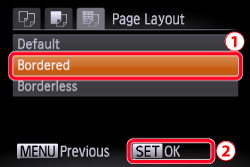
6. The layout (border) settings screen appears.
-
Press the <><> buttons to choose a layout, and then press the <FUNC./SET> () button with [OK] selected.
.
([Bordered] has been selected in the example image above.)
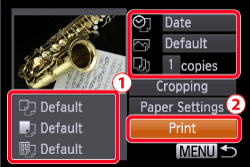
7. The camera returns to the print setting screen.
-
Make sure that the settings are correct.
Press the <FUNC./SET> ( ) with [Print] selected to begin printing.
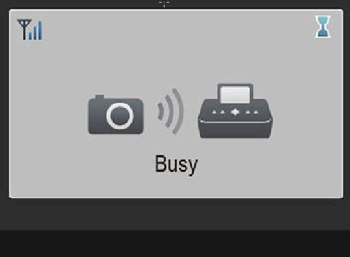
Once printing begins, the following screen is displayed.
Do not disconnect the devices or close the application while this screen is displayed. Images may not be printed correctly or completely.
NOTE
Printing in progress cannot be canceled from SELPHY by using the <  > button. Use the camera to stop printing.
The standby screen below is displayed when printing is finished.

NOTE
- The printer does not enable communication between the devices connected to it.
REFERENCE
Subsequent Printing
- Once you have completed the connection settings, the second, standby screen is displayed automatically when you turn on the printer. To print, after the standby screen is displayed, simply use the camera as described from step 6 of 'Connecting a camera with Selphy via Wi-Fi'.
- During standby-screen display, you can view the SSID and password by pressing the <OK> button. You can also change the password on the screen displayed by pressing the EDIT button.
- Even during standby, you can print images on a memory card by inserting the card to access the image display screen.
|