Reseat the toner cartridge(s)
| Article ID: ART126010 |
| |
Date published: 05/12/2015 |
| |
Date last updated: 08/14/2015 |
Description
Reseat the toner cartridge(s).
Solution
Reseat the toner cartridge(s).
- Press <Menu>.
- Press <
 > or <
 > to select [MAINTENANCE], then press <Set>.
- Press <> or <> to select [CHANGE CARTRIDGE], then press <Set>.
- Press <> or <> to select the cartridge to be replaced, then press <Set>.
You can select from the following:
-[BLACK]
-[CYAN]
-[MAGENTA]
-[YELLOW]
-[ALL COLORS]
- Lift the scanning platform and open the cartridge cover when the sound of machine operation stop.

- Make sure that the toner cartridge you want to replace is at the position for replacing.

If the spent toner cartridge is not in the replacement position, close the cover, then open it again when the sound of machine stops. Repeat this process until the cartridge you want to replace is in the correct position.
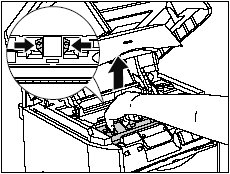
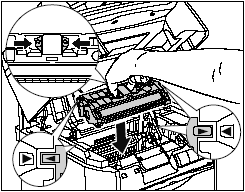
- Remove the toner cartridge from the machine.
Hold the grip on the toner cartridge and lift it straight up.
-
Confirm the color of the label on the toner cartridge holder, then take out a toner cartridge of the same color from the protective bag.
Open the protective bag with scissors, so as not to damage the cartridge.


- Keep the protective bag in which the cartridge came in. It may be required when taking out the toner cartridge for machine maintenance.
- Be careful not to hold or touch the prohibited portions such as the sensor or electrical contacts. It may result in damage to the machine.

-
Hold the toner cartridge as shown in the figure, shake it gently 5 or 6 times from side to side (1), then back and forth (2) to evenly distribute the toner inside.
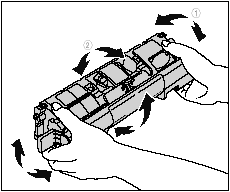
- If toner is not distributed evenly, it may result in a deterioration of the print quality. Be sure to carry out this procedure properly.
- Be sure to shake the toner cartridge gently. Toner may spill if the cartridge is handled without caution.
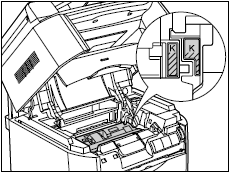
-
Remove the protective cover. Hold the protective cover and remove it as shown in the figure.
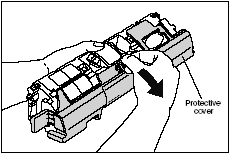

It may be a little snug, but it will pull off.
- Do not touch or hold the developing roller. The image quality may deteriorate if you do. Do not apply shock to the toner cartridge memory or bring it near magnetic waves as this may result in damage to the machine.

- Keep the protective cover with which the cartridge from removed. It may be required when taking out the toner cartridge for machine maintenance.
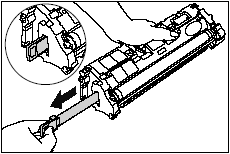
-
Place the toner cartridge on a flat surface, then pull out the sealing tape (Approx. 45 cm (17.72") in length) while supporting the toner cartridge.
Hold the tab on the sealing tape and pull it straight out.

If the sealing tape is pulled out forcefully or stopped at midpoint, toner may spill. If toner gets into your eyes or mouth, wash it away immediately and consult a physician.
- Do not pull the sealing tape diagonally, upwards, or downwards. If the tape is severed, it may become difficult to pull it out completely.

- Pull out the sealing tape completely from the toner cartridge. If the sealing tape remains in the toner cartridge, it may result in a deterioration in print quality.
- Dispose of the sealing tape according to local regulations.
- Hold the grip on the toner cartridge and install it in the machine.
Position the triangular mark on the toner cartridge with the triangular mark on the machine and instlal the toner cartridge.
When the toner cartridge is installed properly, the label on the cartridge and on the toner cartridge holder will be aligned as shown in the figure.
- Close the cartridge cover and lower the scanning platform.

The toner cartridge holder will rotate automatically.
