Shooting Remotely from the Web Browser of a Smartphone or Tablet Device Using Wi-Fi (Browser Remote) (XF200 / XF205)
| Article ID: ART116599 | | | Date published: 05/12/2015 | | | Date last updated: 12/09/2015 |
Description
Solution
| Shooting Remotely from the Web Browser of a Smartphone or Tablet Device Using Wi-Fi (Browser Remote) (XF200 / XF205) ID : 8202112300 _ EN _ 1 | |||||||||||||||||||||||||||||||||||||||||||||||||||||||||||||||||||||||||||||||||||||||||
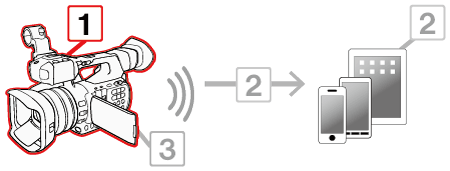
| Solution | After connecting the camcorder to a network (Wi-Fi or using the LAN terminal), you can control the camcorder remotely from the Web browser of a connected Smartphone or Tablet Device * using the Browser Remote application. Browser Remote lets you monitor the image through live view, start and stop recording and remotely control the shutter speed, gain and other settings. You can also create, edit and transfer a metadata profile** and check the recording media, remaining recording time, time code, etc. The procedure for making the settings necessary to use Browser Remote are explained in the following three steps. Please proceed in order from step 1. *1. For details about compatible devices, operating systems, Web browsers, etc., please refer to Operating Systems and Devices Verified for Use with Browser Remote (XF200 / XF205). *2. Settings that can be controlled include, white balance, gain, shutter speed, Aperture, focus, and zoom. *3. MXF clips only.  Step 1: Performing Camcorder Settings Step 1: Performing Camcorder Settings Step2: Connecting a Smartphone or Tablet Device and Recording Step2: Connecting a Smartphone or Tablet Device and Recording Step 3: Ending Browser Remote Step 3: Ending Browser Remote
Step 1: Performing Camcorder Settings You can set a unique camcorder identification code and designate the port that the Browser Remote application should use when accessing the camcorder through a network. The port number (HTTP protocol) used by Browser Remote is usually set to port 80, but you can change it if necessary. The camcorder ID will appear on the Browser Remote screen, making it easy to identify which camcorder the application is controlling in case of a multi-camera shooting setup. 1. Hold down the button on the <POWER> switch and slide the switch to <CAMERA>.  2. Press the <MENU> button. 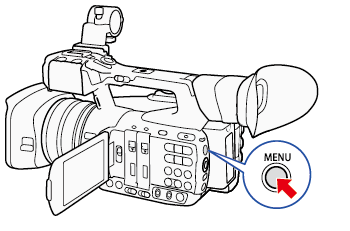 3. Push the joystick up/down to select [  Other Functions] -> [Network Settings] -> [Remote Settings] then press <SET>. Other Functions] -> [Network Settings] -> [Remote Settings] then press <SET>.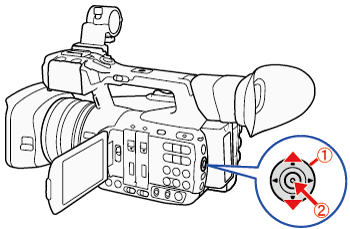  : Joystick : Joystick : In the following procedures, 'Press <SET>' refers to the action of pressing the joystick straight down to select the desired setting. : In the following procedures, 'Press <SET>' refers to the action of pressing the joystick straight down to select the desired setting.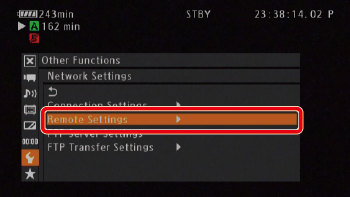 4. Select [Camera Settings] then press <SET>. 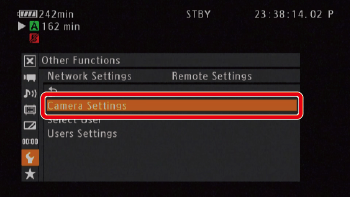 5. Select the port number. The port number is usually set to port 80, but you can change it if necessary. * As port number information will be required when making connections, please write it down if necessary. Push the joystick up/down to select a value for the first digit of the port number and then press <SET> to move to the next digit. 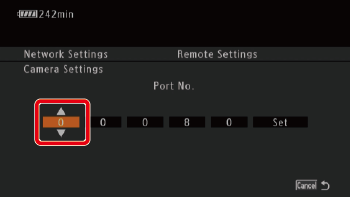 6. After completing all the digits, select [Set] and then press <SET> to confirm the port number. 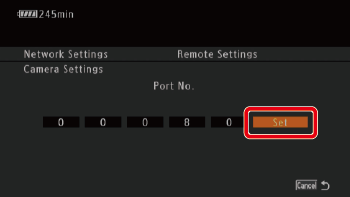 7. Enter the [Camera ID] (up to 8 digits). Select [Input] and then press <SET>.  After you have entered the camera ID, select [OK] and press <SET>.
8. Select [OK] and then press <SET>. 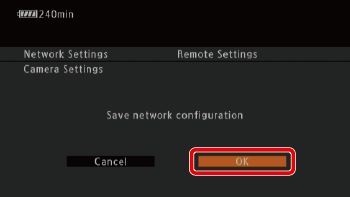 9. Press <SET>. 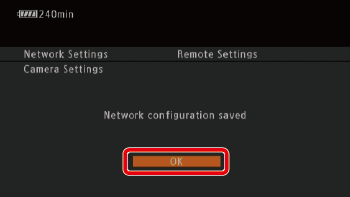 10. A user name and password are required before the Browser Remote application can access and operate the camcorder. You can set up to three different users and select whether you want to allow single-user operation (full control) or two-user operation (one controlling camcorder functions and another in charge of metadata input for MXF clips).
* The username and password setting will be required when making connections from network devices and accessing Browser Remote. Please write username and password information down if necessary. 11. Open the [Users Settings] submenu. Select [ Other Functions] > [Network Settings] > [Remote Settings] and then press <SET>.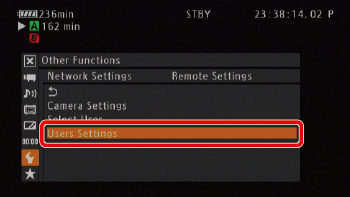 12. To enter the [User Name] for the [Full Control User], select [Input] and then press <SET>. 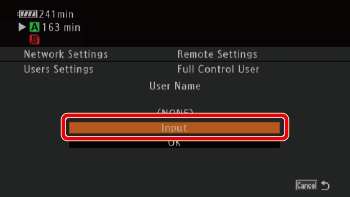 After you have finished, select [OK] and then press <SET>. 13. Enter the [Password] for the [Full Control User] in the same way. 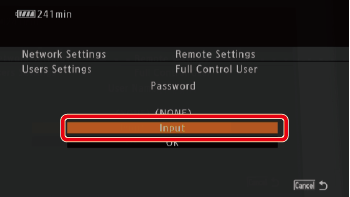 After you have finished, select [OK] and then press <SET>. 14. Repeat steps 12 and 13 to enter the user names and passwords for the [Camera Control User] and [Meta Control User]. 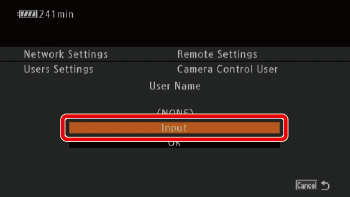 After you have finished, select [OK] and then press <SET>. 15. Select [OK] and then press <SET>. 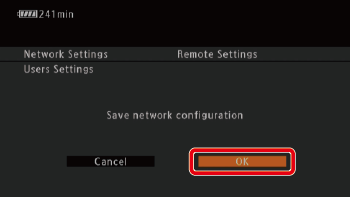 16. Press <SET>. 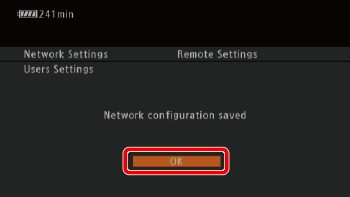 17. Back in the [Remote Settings] submenu, select [Select User] and then press <SET>.  18. Select [One User (Full Control)] or [Two Users (Camera/Meta)] and then press <SET>. [One User (Full Control)] has been selected in the example image below. 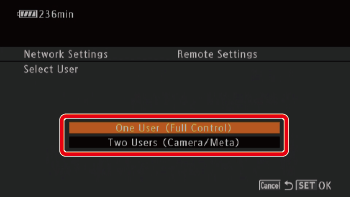 19. Select [OK] and then press <SET>. 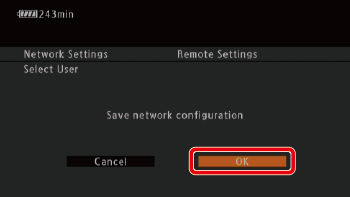 20. Press <SET>. 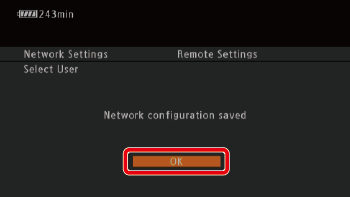 Press the <CANCEL> button to return to the previous menu. ([Network Settings] submenu of [ Other Functions]).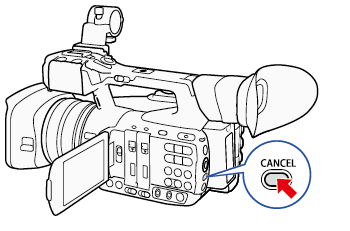 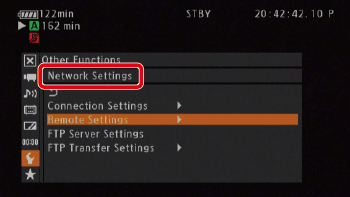 22. Perform Camera Access Point connection settings. Select [ Other Functions] -> [Network Settings] -> [Connection Settings] -> [Set Up New] and then press <SET>.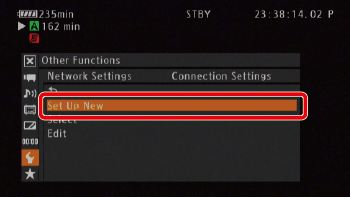 23. Select [WI-Fi] and then press <SET>. 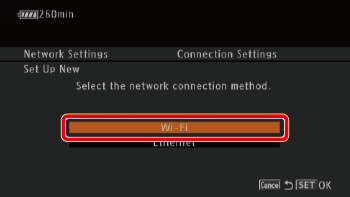 24. Select [Camera Access Point] and press <SET>. 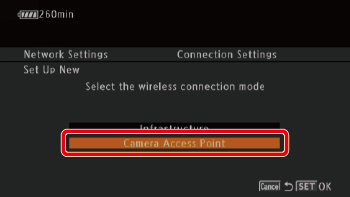 25. Enter the SSID Select [Input] and then press <SET>. 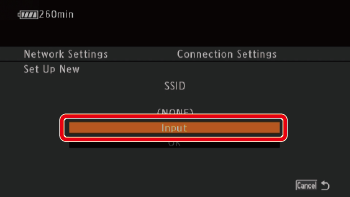 Enter the SSID * This SSID is needed to connect the network device to the camcorder. If necessary, write it down. Select [OK] and press <SET>. 26. Select the wireless connection mode (5 GHz band or 2.4 GHz band) and then press <SET>. 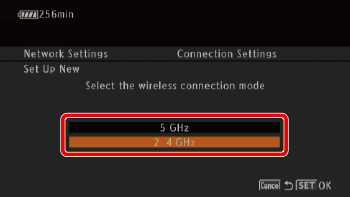 27.Push the joystick up/down to select the channel and then press <SET>. Available channels will be different depending on the wireless connection mode selected in step 26.  28. Select the authentication method and the encryption method. Select [Open/No encryption] or [WPA2-PSK/AES] and press <SET>. If you selected [Open/No encryption], skip to step 30. If you selected [WPA2-PSK/AES], proceed to step 29. 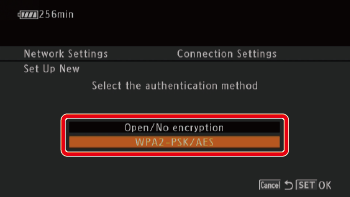 29. Enter the encryption key. Select [Input] and press <SET>. 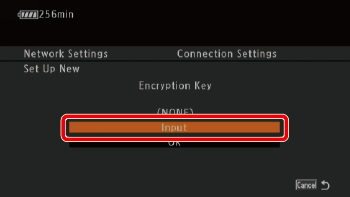 Enter the encryption key. * This encryption key (password) is needed to connect the network device to the camcorder. If necessary, write it down. After entering the desired text, select [OK] then press <SET>. Valid encryption keys vary depending on the encryption method.
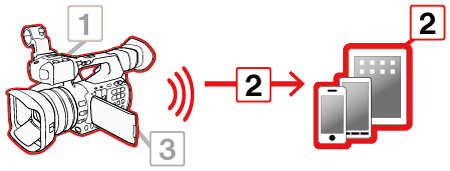
*2: Hexadecimal characters comprise the numbers 0 to 9 and the letters a to f and A to F. *3: Distinction between ASCII and Hexadecimal will be made automatically based on the number of characters entered. 30. Select the method for assigning the IP address: Select [Automatic] or [Manual] and then press <SET>. [Automatic]: IP settings will be assigned automatically. [Manual]: Enter the IP address, Subnet Mask, and Default Gateway assigned to the camcorder manually. If you selected [Manual] please proceed from step 31.  31. Enter the IP address, Subnet Mask, and Default Gateway Push the joystick up/down to select a value for the first field and then press <SET>. 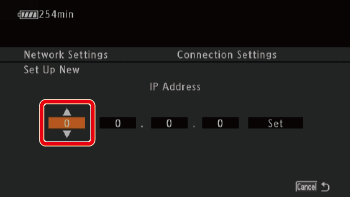 The cursor will move to the next field. Repeat the process for all four fields. 32. Select [Set] and then press <SET> to confirm the address. 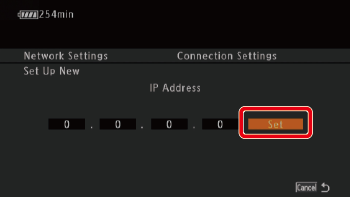 33. Enter the [Subnet Mask] and [Default Gateway] addresses in the same way. 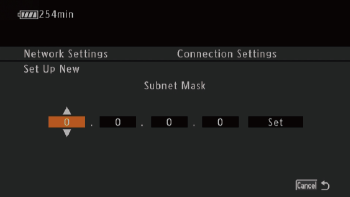 34. Confirm the settings. The first screen shows the access points SSID and the type of connection. Push the joystick up/down to review additional settings before pressing <SET>. 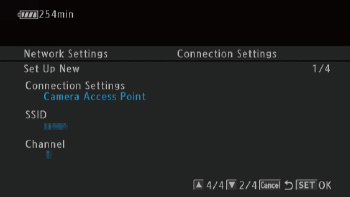 35. Save the settings. Push the joystick up/down to select the desired configuration number and then press <SET>. 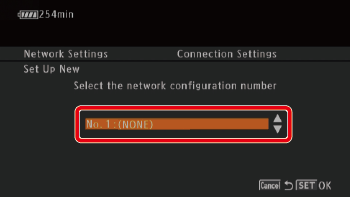 36. If necessary, enter the [Network Configuration Name]. Select [Input] and then press <SET>. 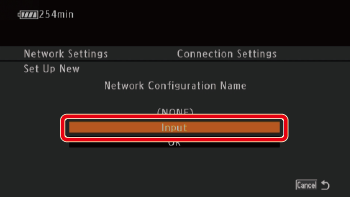 Enter the network configuration name. When you have finished entering the information, select [OK] and then press <SET>. 37. Select [OK] and then press <SET>. 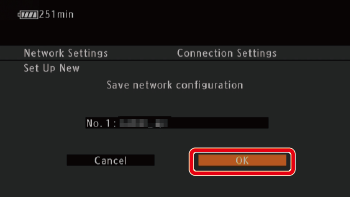 You can save up to 5 different network configuration profiles in the camcorder. If you select a configuration number that was already in use, the previous configuration will be overwritten by the new one. 38. Press <SET>. 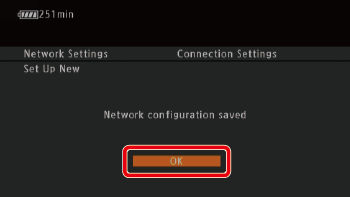 39. Press the [CANCEL] button twice to return to the menu before the previous menu. ( [ Other Settings])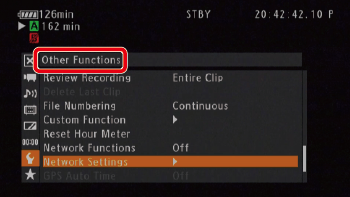 40. Activate Browser Remote on the camcorder. Select [ Other Functions] -> [Network Functions] -> [Browser Remote] and then press <SET>.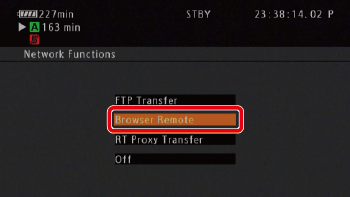 [  ] will appear on the top of the screen, next to the connection type icon. When the icons turn white, the camcorder is ready to accept commands from the Browser Remote application. ] will appear on the top of the screen, next to the connection type icon. When the icons turn white, the camcorder is ready to accept commands from the Browser Remote application.With Camera Access Point connections, you need to actively connect the Wi-Fi enabled device to the camcorder. 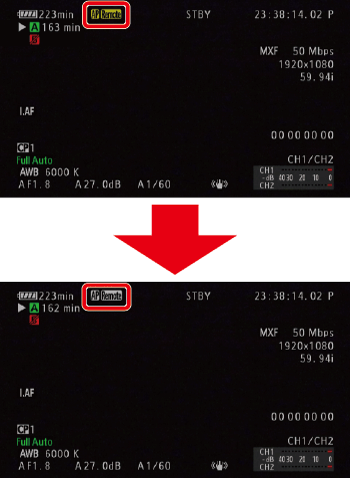 41. Check the camcorders IP address on the status screen. Select [ Other Functions] -> [Assignable Button]. Then, select the desired button (assignable button 5 has been selected in the example image below).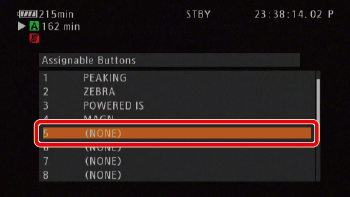 42. Select [STATUS] and then press <SET>. 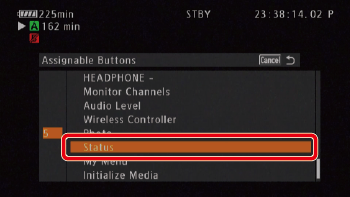 43. Press the assignable button assigned to [STATUS] (assignable button 5 was selected in the previous step). 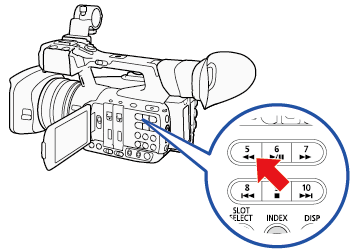 44. Push the joystick up/down to select the [Network Settings 4/10] status screen.  45. Check the IP address assigned to the camcorder ([IP Address]) and, if necessary, write it down. 46. Press the assignable button set to [Status] again to close the status screens. Step 2: Connecting a Smartphone or Tablet Device and Recording After connecting the camcorder to the network, you can start the Browser Remote application on the Web browser* of any smartphone or tablet device connected to the same network. You can check the Browser Remote settings on the status screens
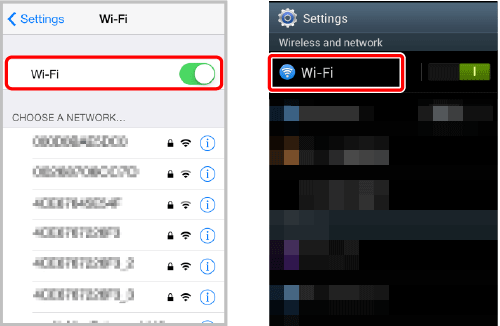
1. Activate Wi-Fi in the settings screen of the smartphone or tablet device. 
 2. Tap the SSID and Wi-Fi network name that you wrote down while performing the previous steps. 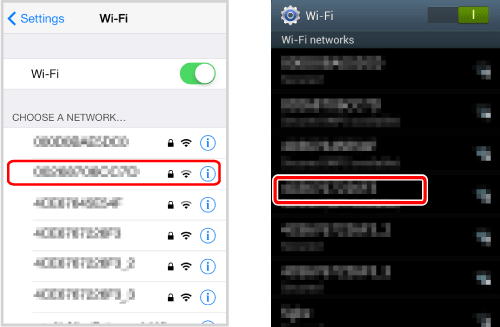 3. Enter the password you wrote down while performing the previous steps. 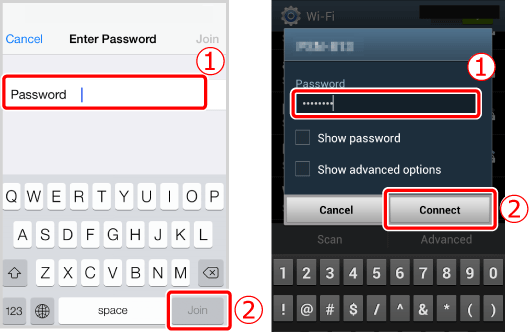 4. Start the Web browser. 5. Enter the camcorders URL. (Please refer to the example below.) 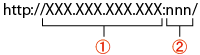 : Enter the IP address you wrote down in step 45 of Step 1 into the Web browsers address bar, adding the prefix "http://".: If the you chose a port other than the default port [80], you can specify it by adding ":nnn" at the end of the URL. For example "http://192.168.0.80:095". : Enter the IP address you wrote down in step 45 of Step 1 into the Web browsers address bar, adding the prefix "http://".: If the you chose a port other than the default port [80], you can specify it by adding ":nnn" at the end of the URL. For example "http://192.168.0.80:095".6. Log in with the user name and password of one of the users that were set on the camcorder during Step 1. 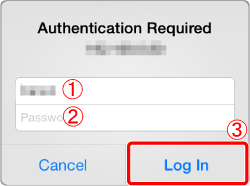 Please note: The below image is an example of the login screen. The screen may differ depending on the Web browser and version used. : Enter the user name you wrote down in step ten of Step 1.: Enter the password you wrote down in step ten of Step 1. : Select [Log in]. : Select [Log in].The Browser Remote screen will appear. The screen displayed will differ depending on the user information used to log in.
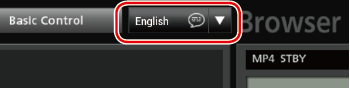
The example image below shows the [Full Control] user screen. 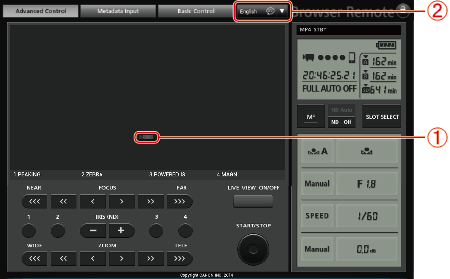 : The camcorders ID.: The language selected for Browser Remote. : The camcorders ID.: The language selected for Browser Remote.7. Confirm the camcorders ID. The camcorders ID ( ) will appear on the Browser Remote screen while live view is not activated. In the [Metadata Input] screen, it appears at the bottom of the screen.8. Select the language for Browser Remote Press the [  ] next to the language button and select the desired language from the list. Most buttons and controls emulate physical controls on the camcorder and are labeled in English only, regardless of the language selected. ] next to the language button and select the desired language from the list. Most buttons and controls emulate physical controls on the camcorder and are labeled in English only, regardless of the language selected.
Overview of the Control Screen Step 3: Ending Browser Remote
1. When you have finished using Browser Remote, on the camcorder set [ Other Functions] -> [Network Functions] to [Off] and the press <SET>.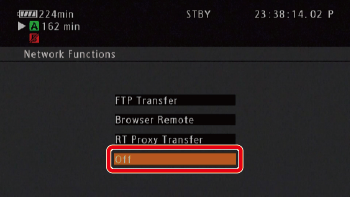 The network icons will turn yellow and then disappear from the camcorders screen and the connection with the application will be terminated. 
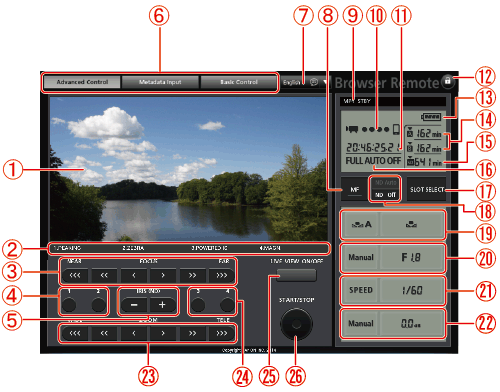
Overview of the Control Screen The [Advanced Control] Screen ([Full Control User]/[Camera Control User] only) The [Advanced Control] Screen ([Full Control User]/[Camera Control User] only) When using a computer, tablet and other devices with larger screens, the [Advanced Control] screen offers all the controls available for operating the camcorder remotely via Browser Remote. For details, refer to the camcorders Instruction Manual.
The [Advanced Control] Screen
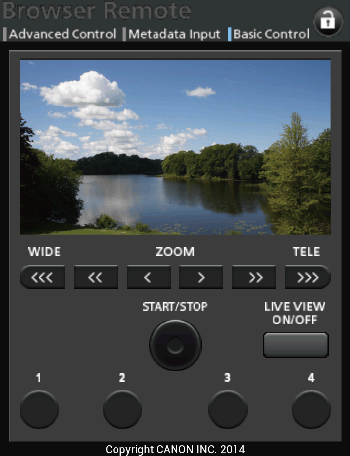
The [Basic Control] Screen ([Full Control User] only) When using a smartphone or other device with a smaller screen, you can use the [Basic Control] screen that offers only the most important shooting controls (START/STOP, live view, zoom and assignable buttons) but will fit in the screen without scrolling. For details, refer to each function's explanation in the camcorders instruction manual. 1. Open the [Basic Control] screen. From the [Advanced Control] screen press the [Basic Control] tab. 
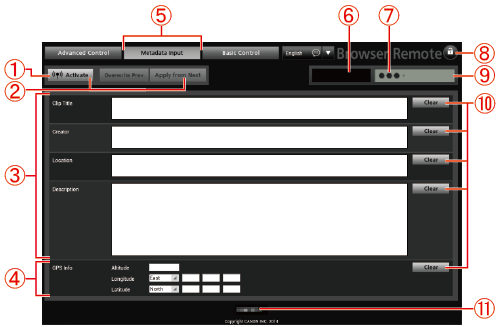
The [Metadata Input] Screen ([Full Control User]/[Meta Control User] only)
1. Open the [Metadata Input] screen.

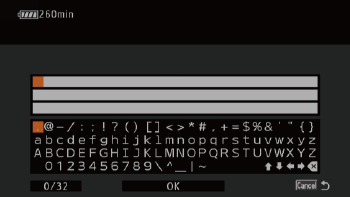
| ||||||||||||||||||||||||||||||||||||||||||||||||||||||||||||||||||||||||||||||||||||||||
 ] / [
] / [  ] / [
] / [  ] / [
] / [  ]) to change the position of the cursor and the backspace character [
  ] to delete the last character entered.