➤
Home
Articles
FAQs
Ask a Question
Search
Models related to this article
PIXMA MP750
PIXMA MP780
Home
Articles
Articles Detail
Replace ink tank(s) MP750 / MP780
Article ID: ART153439
|
Date published: 06/02/2015
|
Date last updated: 08/17/2015
Description
Replace any ink tanks that are empty.
Solution
Replacing an ink tank
Use the following procedure to replace empty ink tanks:
Make sure the device is powered on.
Press the <Open> button (1) to open the Paper Output Tray (2).
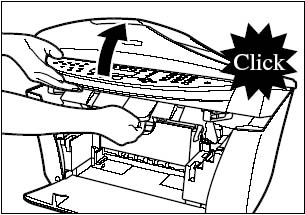
Lift up the scanning unit until it stops. The print head holder automatically moves to the center of the machine.
Open the Inner Cover 1.
Open the Inner Cover 2.
Press the ink tank's tab (1), then remove it from the slot (2).
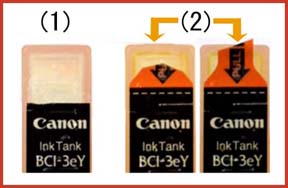
Confirm there is no orange tape across the top of the ink tank.
If the orange tape is as shown in Figure (1), it is properly removed.
If the orange tape is as shown in Figure (2), remove the remaining tape to the level shown in Figure (1).
Insert the ink tank diagonally into the print head.
Press it in firmly until it locks into place.
Make sure each ink tank is snapped in.
Close the two inner covers.
Close the scanning unit until it locks into place.
SIMS Doc Id
0
Rate this Article
Was this article helpful?
Yes, This document is helpful
No, This document needs a clearer explanation
Please provide your comments
Rate Article