Process for installing an exchange machine wirelessly on Windows for imageCLASS MF249dw, MF247dw, MF269dw, MF267dw - Selecting a Wireless Router (Windows) (Video)
Article ID: ART173908
|
Date published: 03/25/2019
|
Date last updated: 02/20/2024
Description
This article provides instructions on how to setup your imageCLASS MF249dw and imageCLASS MF247dw printers after it has been exchanged or replaced
Solution
There are three parts to this article
Part 1 Uninstalling the old MFdrivers
Part 2 Setting up the printer
Part 3 Downloading and installing the latest drivers
Part 1: Uninstalling the old MF Drivers
This explains the procedure for uninstalling the MF driver. Perform this procedure if an MF driver has become unnecessary.
There are two methods for uninstalling: uninstalling from Windows, and using the uninstaller. If you cannot find the MF driver in the Windows screen, you can uninstall using the uninstaller.
Prerequisites
MF driver installation
When starting the computer, log on as a member of Administrators.
[Desktop] screen display (when using Windows 8.1/Server 2012/Server 2012 R2)
(2) Select the driver you want to uninstall →click [Uninstall].
In operating systems other than the above
(1) Display [Control Panel] > [Programs] > [Uninstall a program].
(2) Select the driver you want to uninstall → click [Uninstall/Change].
If you cannot find the MF driver when selecting the driver, uninstall it according to the procedure below labeled To Uninstall Using the Uninstall File
2. When the uninstaller is displayed, click [Uninstall].
3. If the confirm deletion message is displayed, click [Yes].
To Uninstall Using the Uninstall File
Uninstall the driver with the uninstall file in the accompanying DVD-ROM or downloaded driver folder.
1. Double-click one of the following files.
When using the file in the folder of the installed driver
Use the [DelDrv.exe] file corresponding to the driver in the following folder.
<install folder>\Canon\CanonMF
When using the file in the folder of the driver you have acquired
Use the following file in the folder corresponding to the driver and environment.
misc\DelDrv.exe
2. When the uninstaller is displayed, click [Uninstall].
3. If the confirm deletion message is displayed, click [Yes].
Canon imageCLASS Wireless Help Video for a Windows Computer. If you can't see the video please click HERE.
Selecting Wireless LAN
Part 2: Setting Up The Printer
Setting Up Connection by Selecting a Wireless Router
You can search the wireless routers (or access points) available for connection and select one from the display of the machine. For the network key, enter a WEP key or PSK. Before selecting a wireless router, check and write down the required setup information, including the SSID and network key.
1. Tap [Menu] in the [Home] Screen.
2. Tap [Network Settings].
If a screen for entering a PIN is displayed, enter the PIN with the numeric keys and tap [Apply].
3. Tap [Select Wired/Wireless LAN].
4. Tap [Wireless LAN].
5. Tap [Wireless LAN Settings].
If the [Do you want to enable the wireless LAN?] message is displayed, tap [Yes].
If the [Direct Connection will be disabled. Is it OK?] message is displayed, tap [Yes].
6. Read the message that is displayed, and tap [OK].
7. Tap [SSID Settings].
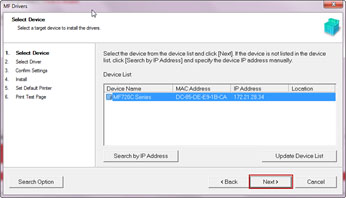
8. Tap [Select Access Point]. The machine starts searching for available wireless routers.
9. Select a wireless LAN router. Select the router whose SSID matches the one that you have written down.
If your wireless router is not found check whether the machine is properly installed and ready to connect to the network.
10. Enter the network key that you have written down.
Enter the network key using the numeric keys, and tap [Apply].
- WEP
- WPA-PSK or WPA2-PSK
11. Tap [Yes].
NOTE
If an error message is displayed during setup
Tap <Close>, check whether the network key is correct, and return to step 5.
12. Check that the Wi-Fi indicator is blinking on the operation panel.
The Wi-Fi indicator blinks when a wireless router is detected.
When the setup is completed, the screen below is displayed, and approximately 2 seconds later, the Wi-Fi indicator lights up.
Wait approximately 2 minutes until the IP address settings of the machine are completed.
Part 3: Downloading and Installing the Computer Software
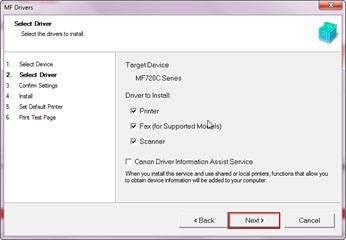
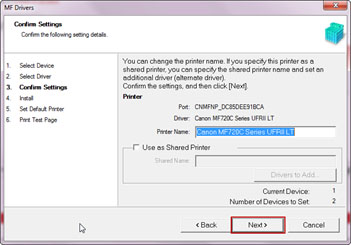
Once your printer has been setup follow the instructions below for downloading and installing your printer, scanner, and fax driver depending on which model you have. In the illustrations below we used the imageCLASS MF729Cdw and Windows 7 64 bit. The screens may vary somewhat based on your selections and the browser you use.
To download drivers and software for your device, please follow the instructions below:
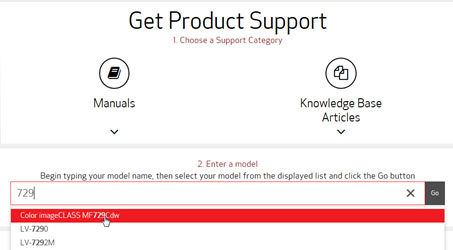
2. Type your model name into the search box and select it from the list that appears.
3. Click the 'GO' button to get to the Drivers & Downloads page for your model.
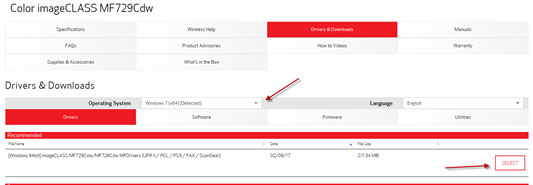
4. From the Drivers & Downloads Tab, Select your Operating System and Version from the provided drop-down menu.
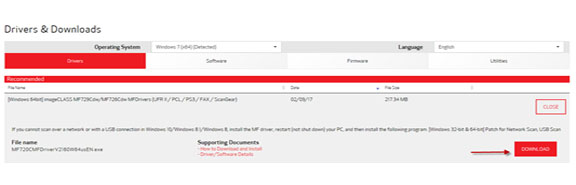
5. The most common driver to use will be listed in the Recommended Section. Click [SELECT] next to the driver you need as shown in the illustration above and then click [DOWNLOAD].
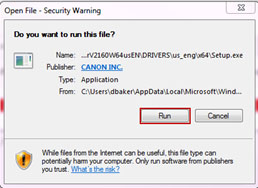
6. Click [Run] to begin downloading and installing the driver software.
7. Click [RUN] to install the software.
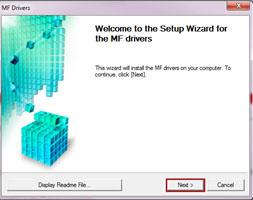
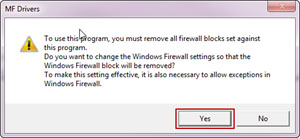
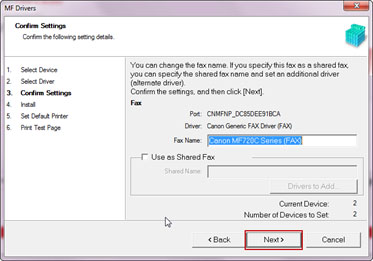
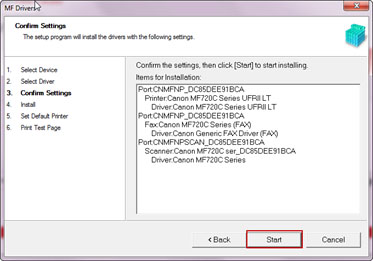
8. Click [Next] on the Welcome to the Setup Wizard for the MF Drivers.