1. Remove the waste toner container.
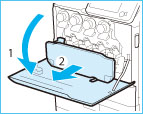
1. Open the front cover of the main unit.
2. Pull out the waste toner container.

Place the removed waste toner container on a level surface. If the waste toner container is tilted too far, toner may spill out.
2. Pull out the drum unit to replace.

1. Grip the handle of the drum unit to replace, and pull it out.
2. Pull the drum unit out of the main unit about halfway, and then pull it out all the way while supporting the indented area with your other hand.
Do not tilt the removed drum unit too far. Doing so may cause toner to spill out.
3. Prepare to insert the new drum unit.

1. Remove the new drum unit from its box.

2. Hold the drum unit horizontally in both hands as shown in the illustration, and tilt it to the left and right approximately 12 times.
Do not remove the orange protective cover until you insert the drum unit into the machine.
 4. Insert the new drum unit.

1. Grip the handle and indented area of the drum unit, and insert the drum unit while aligning the mark on the drum unit with the mark on the slot of the main unit.

2. Remove the protective cover after the drum unit is completely inserted.
When you insert the drum unit into the main unit, the orange protective cover remains. Remove the protective cover after the drum unit is completely inserted.
5. Insert the waste toner container into the main unit.

1. Align the mark on the waste toner container and the mark on the slot of the main unit, and insert the waste toner container.
2. Close the front cover of the main unit.
