Memory Sending
Adjust the fax settings for optimum fax quality.
Caution: When sending a double-sided document, set the document on the Platen Glass. You cannot scan double-sided documents from the ADF.
- Press <ON/OFF> to power on the machine if not powered on already.
- Load the document on the platen glass or the Automatic Document Feeder (ADF).
Platen Glass
-
- When placing the document on the platen glass, lift the document cover.
- Place your document face down on the platen glass. Align the corner of your document with the alignment mark <1> on the upper left corner of the platen glass.
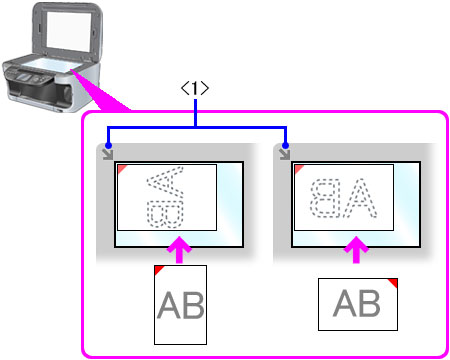
- Gently lower the document cover.
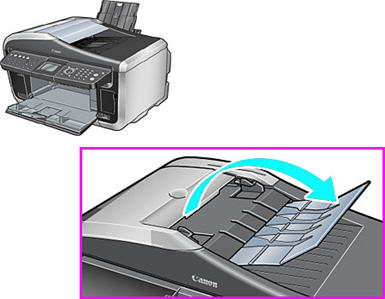
Automatic Document Feeder
- Remove any documents from the platen glass.
- Open the document tray. (See Figure <1>)
- Load the document in the ADF with the side you want to copy facing up. (See Figure <1>)
If it is loaded correctly, you will hear a beeping sound.
Note: When the Alarm volume in the Volume control is off, it does not sound.
Figure <1>
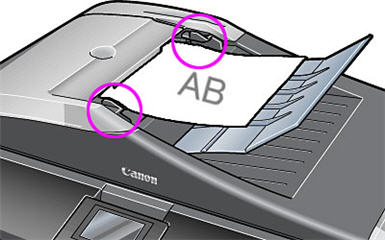
- Align the document guides to sides of the document. (See Figure <2>)
Figure <2>
- Press <FAX> to set the machine to fax mode.
- Adjust fax settings (fax quality or scan contrast) as necessary.
- Start faxing.
-
- Dial the recipient?s number using the Numeric buttons or speed dialing.
- Press <Color> for color sending, or <Black> for black & white sending.
- Sending a fax using the platen glass, a window will appear after the first document is scanned to scan another docuemt (press <Color> or <Black>) or to finish scanning and start sending (press <OK>).
- If additional documents need to be scanned from the platen glass, repeat step 5c until all documents are scanned then press <OK> to start sending.
Adjusting Fax Quality
You can adjust the image quality (fax resolution) of the document you send. The higher the image quality, the better the output quality at the other end, but the slower the transmission speed. Adjust the image quality according to the type of document you are sending.
- Press <FAX>, then press <FAX Quality>.
- On the FAX-Quality screen, press the up or down arrow to select [FAX resolution].
- Press the left or right arrow to select the appropriate resolution, then press <OK>. (See below for the available resolution options.)

[Standard]: Suitable for text-only documents.
[Fine]: Suitable for fine-print documents.
[Photo]: Suitable for photographs.
- The LCD will return to Fax standby mode after <OK> is pressed. Click here to adjust the scan contrast.
- Click here to return to step 4.
Adjusting Scan Contrast
Contrast is the degree of difference between light and dark. Increasing the contrast setting further blackens dark areas and whitens bright areas, whereas decreasing the contrast setting reduces the difference between bright and dark areas. You can adjust the contrast among three contrast levels.
- Press <FAX>, then press <FAX Quality>.
- On the FAX-Quality screen, press the up or down arrow to select [Scan contrast].
- Press the left or right arrow to select the appropriate scan contrast, then press <OK>.
Pressing the left arrow decreases the density and pressing the right arrow increases the density.

- The LCD will return to Fax standby mode after <OK> is pressed.
- Click here to return to step 4.
