|
After connecting a network device to the camcorder via Wi-Fi, you can operate the camcorder remotely using Browser Remote, a Web browser application that can be accessed using the Web browser on network devices*. Using Browser Remote, you can check the camcorderâs live view image and control various recording settings. On the Browser Remote screen, you can also check the remaining recording time on the card, remaining battery charge and the camcorderâs time code.
NOTE
* For details about compatible devices, operating systems, Web browsers, etc., please visit your local Canon website.
Starting Browser Remote After completing the network connection, you can start the Browser Remote application on the Web browser* of any network device** connected to the same network. You can check the Browser Remote settings on the status screen.
* A Web browser that supports JavaScript and is enabled to accept cookies is required.
** For details about compatible devices, operating systems, Web browsers, etc., please visit your local Canon website.
IMPORTANT
 : Wi-Fi antenna
- About the Wi-Fi antenna: When using the camcorderâs Wi-Fi functions, do not cover the Wi-Fi antenna with your hand or other object. Covering it may interfere with wireless signals.
- Do not open the card slot covers while using network functions.
- Do not place cables connected to the SDI terminal or HDMI OUT terminal near the Wi-Fi antenna. Doing so may negatively affect the wireless communication over Wi-Fi.
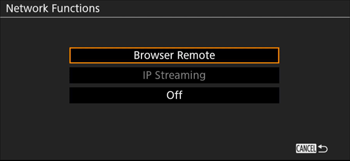
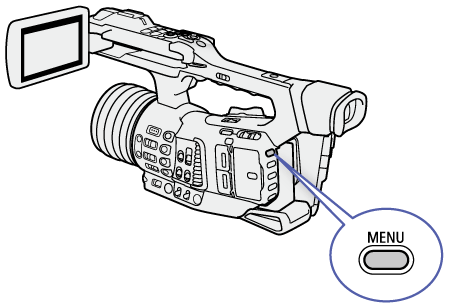
1. Press and hold the button on the POWER switch and set the switch to ON.

2. Press the MENU button.
3. Activate Browser Remote on the camcorder.

 Network Settings -> [ Network Functions ] -> [Browser Remote]
- The camcorder will start functioning as a wireless access point.
-
 will appear at the top of the screen. When the icons turn white, the camcorder is ready to accept commands from the Browser Remote application. will appear at the top of the screen. When the icons turn white, the camcorder is ready to accept commands from the Browser Remote application.
4. If necessary, you can check the network settings while Browser Remote is activated.
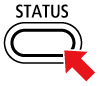
- Press the STATUS button and display the following status screens to check the relevant information.
 ã 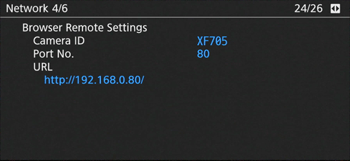
- [Network 1/6] status screen: SSID for Camera Access Point connections
- [Network 4/6] status screen: URL for Browser Remote
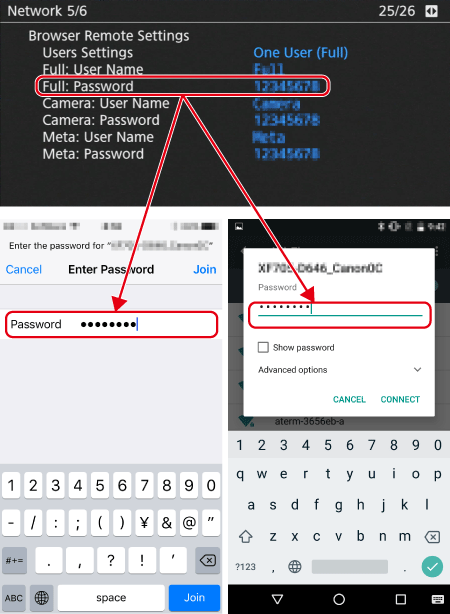
- [Network 5/6] status screen: Browser Remote user names and passwords*
* Only default passwords will be shown.
5. Press the STATUS button to close the status screen.
6. Connect the network device to the camcorder.
Activate Wi-Fi in the settings screen.
- Detected networks appear on the screen.
7. Touch the SSID (network name) that matches the one displayed on the camcorder's screen.

8. Enter the password displayed on the camcorder's screen to establish a connection.
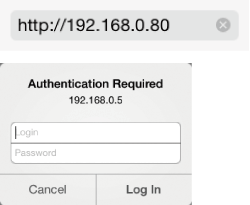
9. Start the Web browser on the Smartphone.
10. Enter the camcorderâs URL exactly as shown on the camcorder's information screen.
- Example of the login screen. The screen may differ depending on the Web browser and version used.
11. Enter the user name and password.
- The Browser Remote screen will appear.
- The Browser Remote screen will appear. The screen displayed may be different depending on the user information used to log in.
- While Browser Remote is correctly connected to the camcorder, the network connection indicatorâs
 ( ( ) will keep turning on and off in a loop. ) will keep turning on and off in a loop.
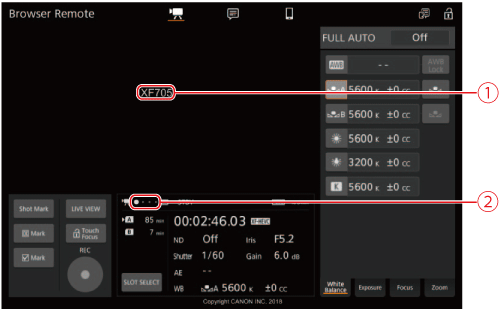
15. If the camcorder's ID ( ) was set, it will appear on the Browser Remote screen while live view is not activated.
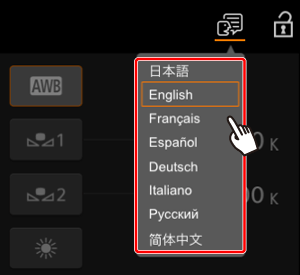
16. Touch  and select the desired language from the list.
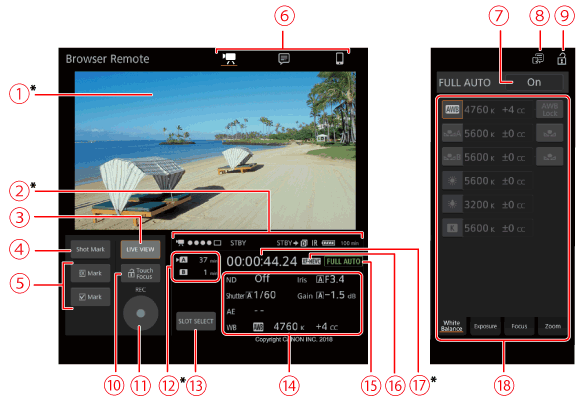
The Main Remote Recording Screen ([Full]/[Camera] user only) The Browser Remote application has 3 screens: [  ] the main screen for controlling the camcorder remotely in recording mode, [  ] the metadata screen, and [  ] a basic screen that allows users only to start/stop recording using a smartphone or other device with a small screen. The screen displayed will differ depending on the user information used to log in.
NOTE
- Browser Remote does not support multi-touch gestures.
- The Main Remote Recording Screen [ ] ([Full]/[Camera] user only)
When using a computer, tablet and other devices with larger screens, this screen offers all the controls available for operating the camcorder remotely via Browser Remote.
* Onscreen display/indication only. The content or value cannot be changed using Browser Remote.
|
| Live view screen
Shows the camcorderâs live view image. When the live view image is not turned on, the camcorder ID will appear here. |

| [
 Touch Focus] button
Touch the button to unlock (enable) the touch focus mode. |
|
| Status indicators
 : Wi-Fi connection indicator. While Browser Remote is correctly connected to the camcorder, the dots will keep turning on and off in a loop.
STBY, etc. : Recording operation (same as on the camcorder).
STBY
 , REC
: Output recording command.
, REC
: Output recording command.
 : Appears during double slot recording.
 : Infrared recording
 , etc. : Remaining battery charge
 |

| [REC] button
Touch the button to start recording. While recording, the center of the button turns red.
Touch the button again to stop recording. |

| [LIVE VIEW] button
Touch the button to display the camcorderâs live view image on the Browser Remote screen. |

| Card selection and approximate remaining recording time
The currently selected SD card is indicated with a
 mark next to the icon.
Remaining recording times are approximate and calculated based on the current video configuration used. |

| [Shot Mark] button
While recording, touch the button to add a shot mark to the clip. When the [Shot Mark] message appears, touch [
 ].
]. |

| [SLOT SELECT] button
Touch the button to select the other SD card when both card slots contain a card. |

| Clip marks buttons
When recording, you can tag important clips by adding clip marks.
To add a clip mark: After recording a clip, touch [
 Mark] to add an
 mark to the clip, or [
 Mark] to add a
 mark to the clip. When the [OK Mark] or [CHECK Mark] message appears, touch [
].
mark to the clip. When the [OK Mark] or [CHECK Mark] message appears, touch [
]. |

| Current camcorder settings
This panel displays an overview of the camcorder settings currently used. You can change camcorder settings with the controls in the detailed camcorder settings panel (18) on the right.
[ND]: ND filter [WB]: White balance
[Shutter]: Shutter speed [Iris]: Aperture value
[AE]: AE shift [Gain]: Gain value |

| Browser Remote screen selection ([Full] user only)
Touch [
] to open the main remote recording screen, [
] to open the metadata screen, or [
] to open the basic screen for devices with a small screen. |

| Full auto mode indicator |

| [FULL AUTO] button
To set the camcorder to full auto mode, touch [Off], select [On] and then touch [
]. |

| Video format |

| Language selection
Changes the language used for controls in the [
] (metadata input) screen and for error messages. Still, most of the applicationâs controls emulate physical buttons on the camcorder and appear in English only, regardless of the language selected. |

| Time code |

| Key lock button
Touch the icon to lock the Browser Remote screens in order to prevent settings from being changed inadvertently. |

| Detailed camcorder settings panel
Touch one of the tabs at the bottom to select the camcorder settings you wish to adjust:
[White Balance]: White balance mode and related settings.
[Exposure]: Exposure related settings; aperture, shutter speed and gain.
[Focus]: Focus related settings.
[Zoom]: Zoom operation. |
NOTE
The live view image will not be displayed in Browser Remote in the following cases.
- While the color bars are displayed.
- When the resolution is 2340x2160, the frame rate is 59.94P or 50.00P and  -> [   System Setup] -> [SDI/HDMI Max Res.] is set to [3840x2160].
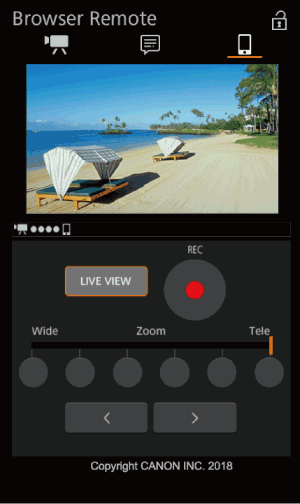
- The Basic Screen [ ] ([Full] user only)
When using a smartphone or other device with a smaller screen, this screen offers only a small live image screen for final confirmation, zoom controls and the [REC] button to start and stop recording.
The Main Remote Recording Screen: Detailed Camcorder Settings The following sections explain how to use the controls in the detailed camcorder settings panel. For detailed information and applicable restrictions about the functions themselves, please refer to each function's explanation.
- To change the white balance
Touch the [White Balance] tab in the detailed camcorder settings panel.
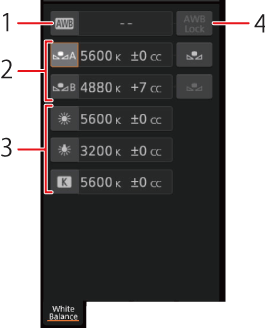
1. Auto white balance button
Touch [  ] to set the camcorder to auto white balance (AWB) mode.
2. Custom white balance buttons
Touch [  A] or [ B].
REFERENCE
To register a custom white balance: Point the camcorder at a gray card or white object with no pattern so it fills the center of the monitoring/live view screen and touch [ ]. Use the same lighting conditions you plan to use when recording. During the procedure, the icon in the button will flash quickly. When it stops flashing, the procedure is completed and the custom white balance will be applied.
3-A. Preset white balance settings
Touch [  ] or [  ].
3-B. Color temperature setting
Touch [  ]. Touch the color temperature button on the right, select the desired value from the list and then touch [ ].
4. [AWB Lock] button
When auto white balance is activated, touch the button to lock the current white balance settings and keep them when you change the subject.
- To adjust the color temperature or color compensation (CC) value
1. Select a white balance setting other than [ ], [ A] or [ B]. 2. Touch the right part of the white balance button (current color temperature and CC value).
3. Touch the [K] tab (color temperature) or [CC] tab (color compensation value), select the desired value from the list and then touch [ ]. If necessary, repeat this step to adjust the other setting.
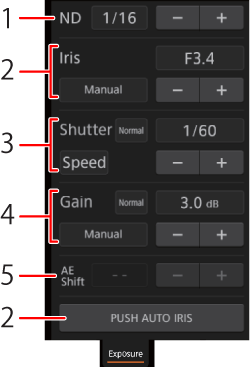
- To change exposure-related settings
Touch the [Exposure] tab in the detailed camcorder settings panel.
1. ND Filter buttons
- Touch [â] or [+] to change the density of the ND filter. You can also touch the current ND filter setting, select the desired setting from the list (or touch [â] / [+]) and then touch [ ].
2. Aperture related buttons
- To let the camcorder adjust the aperture automatically, touch [Manual], select [Automatic] and then touch [ ]. No further settings are necessary. To adjust the aperture manually, select [Manual] and use the aperture controls as described below.
- Touch [â] or [+] to change the aperture value (displayed above the buttons). You can also touch the current aperture value, select the desired value from the list (or touch [â] / [+]) and then touch [ ].
NOTE
During manual aperture adjustment, you can also touch [PUSH AUTO IRIS] to have the camcorder adjust the aperture automatically once. (The manual aperture buttons will not be available at this time.)
3. Shutter speed related buttons
- To change the shutter speed mode, touch [Speed] and select the desired shutter speed mode ([Speed] (standard shutter speed), [Angle], [Clear Scan], [Slow] (slow shutter speeds), [Auto] or [Off]).
- To change the adjustment increment if you selected [Speed], touch [Normal], select the desired shutter increment and then touch [ ].
- Touch [â] or [+] to change the shutter speed (displayed above the buttons). You can also touch the current shutter speed value, select the desired value from the list (or touch [â] / [+]) and then touch [ ].
4. Gain related buttons
- To let the camcorder adjust the gain automatically, touch [Manual], select [Automatic] and then touch [ ]. No further settings are necessary. To adjust the gain manually, select [Manual] and use the gain controls as described below.
- To change the adjustment increment, touch [Normal], select the desired gain increment and then touch [ ].
- Touch [â] or [+] to change the gain value (displayed above the buttons). You can also touch the current gain value, select the desired value from the list (or touch [â] / [+]) and then touch [ ].
5. AE shift buttons
Touch [â] or [+] to change the AE shift level.
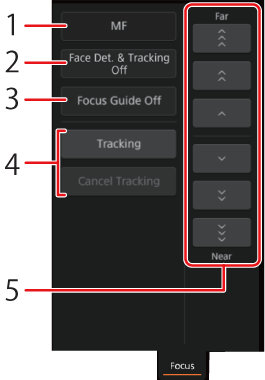
- To adjust the focus and use focus related functions
Touch the [Focus] tab in the detailed camcorder settings panel.
1: Focus mode button
2: [Face Det. & Tracking] button
3: [Focus Guide] (Dual Pixel Focus Guide function) button
4: Tracking buttons
5: Manual focus buttons
1. Touch [AF].
2. Touch [MF] and then touch [ ]. 3. Touch one of the manual focus buttons on the [Near] side to focus closer or one of the controls on the [Far] side to focus farther away. There are three levels of adjustment - [  ]/[  ] is the smallest and [  ]/[  ] the largest.
1. Touch [On] to display the focus guide and then touch [ ].
In autofocus mode, you can touch on a subject that appears in the Browser Remoteâs live view screen in order to select it for focusing.
1. Make sure the touch focus function has been unlocked and the icon appears in the button. 2 Touch the desired subject in the live view screen.
- Depending on the focus mode used, an AF frame may appear on the selected subject.
1. Touch [Face Det. & Tracking].
2. Touch [On] and then touch [ ].
- A face detection frame will appear on the live view screen around all detected faces. The main subject is indicated with arrows (
  ) on the sides. The camcorder will track the main subject as it moves. ) on the sides. The camcorder will track the main subject as it moves.
- Touch on the face of a different subject to select it as the main subject.
3. Focus manually or let the camcorder focus automatically on the main subject's face.
1. Touch [Tracking].
- This step is not necessary when [
 Camera Setup] > [AF Frame] is set to [Automatic]. Camera Setup] > [AF Frame] is set to [Automatic].
2. Touch the live view screen to select the subject you wish to track.
- A tracking frame will appear on the live view screen and the camcorder will track the subject as it moves.
- Touch [Cancel Tracking] to select a different subject.
3. Focus manually or let the camcorder focus automatically on the subject.
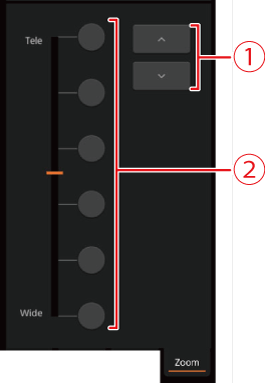
1. Touch the [Zoom] tab in the detailed camcorder settings panel.
: Manual zoom buttons
: Fixed zoom positions
2. Touch one of the fixed zoom position buttons on the [Tele] side to zoom in or one of the buttons on the [Wide] side to zoom out.
REFERENCE
- You can also touch the manual zoom buttons [ ] / [ ].
NOTE
- When using a slow zoom speed, it may take some time until the lens starts moving.
Finished using Browser Remote When you have finished using Browser Remote, turn it off on the camcorder.
1. Press the MENU button.
2. Select [ Network Settings] > [Network Functions] > [Off]
- The network icons will turn yellow and then disappear from the screen and the connection with the application will be terminated.
NOTE
- Depending on the network used and the strength of the Wi-Fi signal, you may notice delays in the refreshing of the live view image and other settings.
- If Browser Remote is set to a language other than the language set on network device, the application may not be displayed correctly.
|