Selecting the appropriate camcorder settings
When connecting the camcorder to another device, you need to select the appropriate camcorder settings.
Make sure that you check the following section before connecting your camcorder to another device.
- Connect the camcorder to a compact power adapter.
Depending on the type of operation, reading and writing may also be possible without connecting the camcorder to a compact power adapter. However, using a compact power adapter is recommended.
- Check the [USB Connection Type] setting from the menu in playback mode.
2-1. Press the < FUNC. > button in movie or photo playback mode.
2-2. Select [USB Connection Type] in either the [  ] or [
  ] menu.
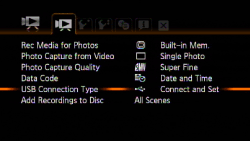
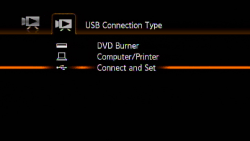
2-3. When connecting the camcorder to the optional DW-100 DVD Burner, check whether the [DVD Burner] setting is selected; and when connecting the camcorder to a computer, printer, recorder, and etc., check whether the [Computer/Printer] setting is selected.
If the [Connect and Set] setting is selected, you can make a selection when connecting a USB cable.
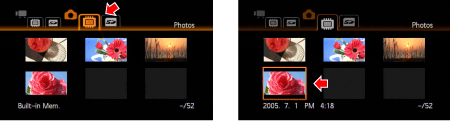
Check the playback screen.
Make sure that the mode that indicates where movies and photos are recorded is displayed.
To read movies, select either the built-in memory or the memory card tab, or select one of the scenes that appears on the LCD monitor.

To read photos, select the built-in memory tab, or select one of the images that appear on the LCD monitor if the photos are saved in the built-in memory. If the photos are recorded on the memory card, select the memory card tab, or select one of the images that appears on the LCD monitor.
Connecting the camcorder to a DVD Burner
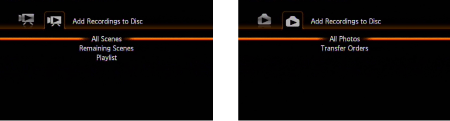
When writing movies or photos using a DVD Burner, use the [Add Recordings to Disc] tab to select one of the following options.
|
File
|
Item to write
|
Detail
|
|
Movies
|
All Scenes*
|
Add all the scenes to the disc(s).
|
|
Remaining Scenes
|
Add only those scenes that have not been previously added to a disc.
|
|
Playlist
|
Add only the scenes included in the playlist.
|
|
Photos
|
All Photos
|
Add all the photos to the slideshow on the disc.
|
|
Transfer Orders
|
Add only photos marked with transfer orders.
|
*If you have recorded scenes in MXP mode, add to the playlist in advance only those scenes recorded in other recording modes and select this option to create the disc.
Connecting the camcorder to a computer
After having selected the appropriate camcorder settings, connect the camcorder to a computer.
If the camcorder cannot be connected to a computer, please refer to the section.
Connecting the camcorder to a recorder
After having selected the appropriate camcorder settings, connect the camcorder to a recorder.
When writing the data that is saved in the built-in memory, remove the memory card from the camcorder, and connect the camcorder to the recorder.
Connecting the camcorder to a printer
By connecting the camcorder to a printer that is compatible with PictBridge, you can make prints by performing easy operations.
When making prints, please make sure that the playback screen displays the photo to be printed, instead of the photo index screen.
