Prepare the Machine
Remove the Protective Material
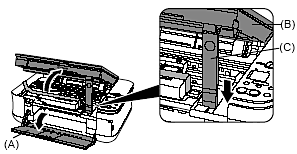
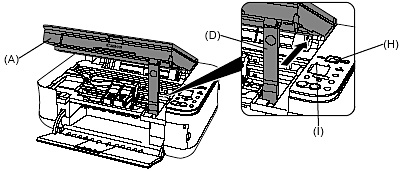
1. Open the Paper Output Tray (A).
2. Lift the Scanning Unit (Cover) (B) until it locks into place.
The Scanning Unit Support (C) is fixed automatically.
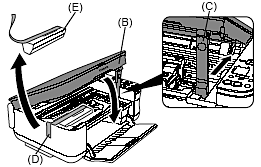
3. Pull the orange protective tape (D) and remove the protective material (E).
Then, lift the Scanning Unit (Cover) (B) slightly and fold the Scanning Unit Support (C), then gently close the Scanning Unit (Cover) (B).
attention:
Before turning on the machine, remove all the orange tapes and the protective sheets.Before turning on the machine, remove all the orange tapes and the protective sheets.
4. Turn the Power On
Plug in the power cord on the left side of the machine and connect the other end to the wall outlet.

important:
Do NOT connect the USB cable at this stage.Do NOT connect the USB cable at this stage.
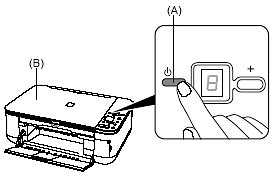
5. Press the ON button (A) to turn on the machine.
important:
Make sure that the Document Cover (B) is closed.Make sure that the Document Cover (B) is closed.
6. Confirm that the POWER lamp (C) lights green.

attention:
Do not store or transport the machine vertically or slanted!Do not store or transport the machine vertically or slanted!
If the machine is stored or transported vertically or slanted, the machine may become damaged or ink may leak from the machine.
Be sure not to store or transport the machine vertically or slanted.

Install the FINE Cartridges


attention:
Do not handle the FINE Cartridges roughly such as applying them excessive pressure or dropping them.Do not handle the FINE Cartridges roughly such as applying them excessive pressure or dropping them.
important:
Be sure to use the supplied FINE Cartridges.Be sure to use the supplied FINE Cartridges.
1. Lift the Scanning Unit (Cover) (A) until it locks into place.
The Scanning Unit Support (D) is fixed automatically. The FINE Cartridge Holder (E) comes out to the center. (This is where you install the cartridges.)

note:
If the FINE Cartridge Holder returns to the right, close the Scanning Unit (Cover) and reopen it.If the FINE Cartridge Holder does not come out to the center, make sure that the power is turned on.If the FINE Cartridge Holder returns to the right, close the Scanning Unit (Cover) and reopen it.If the FINE Cartridge Holder does not come out to the center, make sure that the power is turned on.
2. Open the Ink Cartridge Locking Cover ( ) on the right side.
Pinch (F) firmly and pull up the cover.

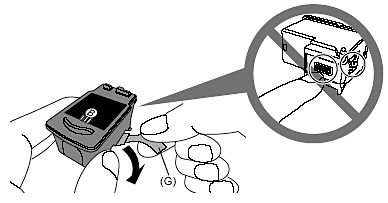
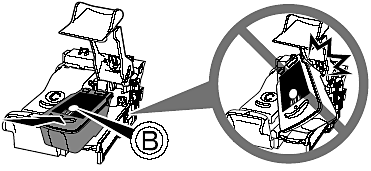
3. After removing the Black FINE Cartridge from its box, pull the orange protective tape (G) in the direction of the arrow and remove it gently.
attention:
Be careful not to stain your hands or surrounding work area with ink on the removed protective tape.Be careful not to stain your hands or surrounding work area with ink on the removed protective tape.
4. Place the Black FINE Cartridge ( ) into the right slot ().
attention:
Do not knock the FINE Cartridge against the sides of the holder.Also be sure to install it in a well-lit environment.Do not knock the FINE Cartridge against the sides of the holder.Also be sure to install it in a well-lit environment.
important:
Install the Black cartridge into the right holder, and the Color one into the left holder.Install the Black cartridge into the right holder, and the Color one into the left holder.
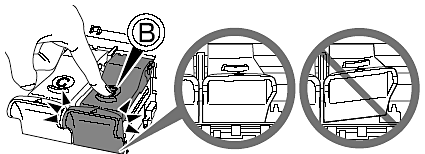
5. Push down () until you hear a click to close the Ink Cartridge Locking Cover () completely. View the Ink Cartridge Cover () straight on and check that it is locked correctly (not at an angle).
Insert the Color FINE Cartridge ( ) into the left slot () in the same way.
6. Lift the Scanning Unit (Cover) (A) slightly and fold the Scanning Unit Support (D), then
gently close the Scanning Unit (Cover) (A).
Wait until " 1 " appears on the LED (H) (about 1 - 2 minutes) and go to the next step. -> "Install the Software".Wait until " 1 " appears on the LED (H) (about 1 - 2 minutes) and go to the next step. -> "".
attention:
Once you have installed the FINE Cartridges , do not remove them unnecessarily.Once you have installed the FINE Cartridges , do not remove them unnecessarily.
note:
If the Alarm lamp (I) lights orange, make sure that the FINE Cartridges are correctly installed.If the Alarm lamp (I) lights orange, make sure that the FINE Cartridges are correctly installed.
