
Press Stop/Reset button to clear error E, 3, 1 - MP495 / MP499 (Windows)
| Article ID: ART110267 | | | Date published: 05/11/2015 | | | Date last updated: 08/17/2015 |
Description
Solution
LED Error E, 3, 1
LED error E, 3, 1 will flash on the printer if the SCAN button is pressed and the printer is connected wireless. Or, the printer and computer are not connected with a USB cable when communication is supposed to be via a USB method.
Press the Black, Color or Stop/Reset button to clear the error and then click on the link that best matches your scenario
I am attempting to scan and my printer is connected to my computer via a wireless method.
I am attempting to scan and my printer is connected to my computer via a USB method.
I am not attempting to scan, simply press the Black, Color or Stop/Reset button to clear the error.
Scanning Via a Wireless Connection
 Important:
In a wireless connection, you cannot scan using the printer's operation panel. Open MP Navigator EX to scan using the bundled application.
-
Place the document face-down on the platen glass.
-
Launch MP Navigator EX.
-
On the Windows desktop, double-click the MP Navigator EX icon.
-
Alternatively, in the Windows taskbar, click Start, click (All) Programs, Canon Utilities, MP Navigator EX folder, then MP Navigator EX icon.
-
-
Click 'Preferences'.
-
Click the 'General' tab and select (model name) series (Network: XXXXXXXXXXXX) for Product Name.
(Where XXXXXXXXXXXX is the MAC address.)
-
Click 'OK'.The Preferences dialog box closes.
-
Click 'Photos/Documents (Platen)' on the Scan/Import tab.

Display varies according to the printer model. -
When the Photos/Documents (Platen) window is displayed, click 'Specify'.
Display varies according to the printer model. -
When the Scan Settings window is displayed, select the resolution in Scanning Resolution drop-down.
Select from the following scanning resolutions:
[Text(OCR)]: 300/400/600
Other: 75/100/150/200/300/400/600 -
If necessary, set other items as well.
-
Click 'OK'.
-
In the Photos/Documents (Platen) window, click 'Scan' to start scanning.
Note: Click Cancel to cancel the scan. -
When scanning is completed, the Scan Complete dialog box opens. Select 'Scan' or 'Exit'. Select Scan to scan the next document, or select Exit to end.
The scanned images appear in the Thumbnail window.

Scanning Via a USB Connection
You can forward scanned data to the computer using the Operation Panel of the machine.
- Connect the flat end of the USB cable to the computer (type-A receptacle).
- Connect the other end of the cable to the printer (10) (type-B receptacle).
Note: The USB connector will only fit in one-direction into the type-B receptacle on the printer. Please ensure the connector is oriented properly before inserting it into the printer.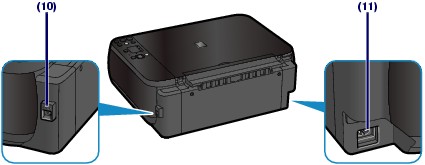
- Place the document face-down on the platen glass.
-
Launch MP Navigator EX.
- On the Windows desktop, double-click the MP Navigator EX icon.
- Alternatively, in the Windows taskbar, click Start, click (All) Programs, Canon Utilities, MP Navigator EX folder, then MP Navigator EX icon.
- On the Windows desktop, double-click the MP Navigator EX icon.
- Click 'Preferences'.
- Click the 'Scanner Button Settings' tab and specify the response when the Scan button is pressed.
For details, click here.
- Click 'OK'.The Preferences dialog box closes.
- Press the SCAN button.
Scanning starts and the images are forwarded to the computer according to the settings specified in MP Navigator EX.
Remove the original on the Platen Glass after scanning is complete. -
Specify MP Navigator EX 4.0.
If you are using Windows 7 or Windows Vista:
The program selection screen may be displayed after pressing the SCAN button. In this case, select MP Navigator EX Ver4.0 and click OK.
You can set MP Navigator EX to launch whenever pressing the SCAN button. For details, see For Windows Users.
If you are using Windows XP:
The program selection screen may be displayed after pressing the SCAN button for the first time. In this case, specify MP Navigator EX Ver4.0 as the application software to use, select Always use this program for this action, then click OK. From the next time, MP Navigator EX is automatically started.
If you want to scan originals with advanced settings, or if you want to edit or print the scanned images:
If you scan originals from a computer using MP Navigator EX, MP Navigator EX enables you to edit the scanned images, such as optimizing or trimming.
In addition, you can edit or print the scanned images using the bundled application software to make better use of them.
 Note
Note
-
You can use a WIA-compliant application software and the Control Panel (Windows XP only) to scan originals with this machine.
For Windows Users
Printer Status Monitor Is Not Displayed
-
Check: Is the printer status monitor enabled?
Make sure that Enable Status Monitor is selected on the Option menu of the printer status monitor.
-
Open the printer driver setup window.
-
On the Maintenance sheet, click View Printer Status.
-
Select Enable Status Monitor on the Option menu if it is not selected.
-
-
If you are using Windows 7 or Windows Vista:
Launching MP Navigator EX Whenever Pressing the SCAN Button on the Machine
-
Check: Specify the response from pressing the SCAN button on the machine.
Follow the procedure below to specify the response on your computer.
-
If you are using Windows 7:
-
Log on as a user account with administrator privilege.
-
Select Devices and Printers from the Start menu.
-
Right-click the Canon XXX Printer icon (where "XXX" is your machine's name), then select Scan properties.
If the User Account Control screen appears, click Yes.
-
Click the Events tab on the WIA Canon XXX ser Properties (where "XXX" is your machine's name) screen.
-
Select Start this program for Actions, then select MP Navigator EX Ver4.0 from the pull-down menu.
-
Choose an event from the Select an event pull-down menu, then select MP Navigator EX Ver4.0 to launch for each event. If MP Navigator EX Ver4.0 is already selected for each event, click Cancel.
-
Click OK.
-
-
If you are using Windows Vista:
-
Log on as a user account with administrator privilege.
-
Select the Start menu > Control Panel > Hardware and Sound > Scanners and Cameras.
-
Select WIA Canon XXX ser (where "XXX" is your machine's name), then click the Properties button.
If the User Account Control screen appears, click Continue.
-
Click the Events tab on the WIA Canon XXX ser Properties (where "XXX" is your machine's name) screen.
-
Select Start this program for Actions, then select MP Navigator EX Ver4.0 from the pull-down menu.
-
Choose an event from the Select an event pull-down menu, then select MP Navigator EX Ver4.0 to launch for each event. If MP Navigator EX Ver4.0 is already selected for each event, click Cancel.
-
Click OK.
-
-
Opening the Printer Driver Setup Window
The printer driver setup window can be displayed through the application software in use or the Start menu of the Windows.
Open the Printer Driver Setup Window through the Application Software
Follow the procedure below to configure print settings when printing.
-
Select the command you perform printing on the application software in use.
In general, select Print on the File menu to open the Print dialog box.
-
Select your model name and click Preferences (or Properties).
The printer driver setup window opens.
Note
-
Depending on application software you use, command names or menu names may vary and there may be more steps. For details, refer to the user's manual of your application software.
-
Open the Printer Driver Setup Window through the Start Menu
Follow the procedure below to perform maintenance operations such as print head cleaning, or to configure print settings that are common for all application software.
-
Select items from the Start menu as shown below.
-
In Windows 7, select Devices and Printers from the Start menu.
-
In Windows Vista, select the Start menu > Control Panel > Hardware and Sound > Printers.
-
In Windows XP, select the Start menu > Control Panel > Printers and Other Hardware > Printers and Faxes.
-
Right-click your model name icon and then select Printing Preferences from the displayed menu.
The printer driver setup window opens. Important
 -
-
Opening the printer driver setup window through Printer properties (Windows 7) or Properties (Windows Vista or Windows XP) displays such tabs regarding the Windows functions as the Ports (or Advanced) tab. Those tabs do not appear when opening through Printing Preferences or application software. About tabs regarding Windows functions, refer to the user's manual for the Windows.
-
Scanner Button Settings Tab (Save to PC)
On the Scanner Button Settings tab, you can specify how to respond when scanning using the Operation Panel of the machine.
-
With network connection, the Scanner Button Settings tab is not displayed.
Event
-
Select Event
Save to PC is set.
-
Document Type
Auto Scan is set.
Actions
Scan Settings
-
Document Size
This setting is automatically set.
-
Resolution
This setting is automatically set.
-
Specify...
Select whether or not to apply suitable corrections based on the document type.
Save Settings
-
Automatically save the image to your computer after scanning it
Select this to save the images to your computer as specified after scanning them.
The File Name, Save as type and Save in settings will be displayed.
Important-
If you select this function, you will not be able to set passwords for PDF files.
-
-
File Name
Enter the file name of the image to be saved (up to 64 characters).
-
Save as type
Select a file type to save the scanned images.
Select Auto, JPEG/Exif or TIFF.
Important-
When Save as type is Auto, the file format may differ depending on how you place the document.
Note-
When Auto is selected, files are saved in the following formats according to the document type.
Photos, postcards, BD/DVD/CD and business cards: JPEG
Magazines, newspapers and text documents: PDF
You can change the file format from Set....
-
-
Set...
When Save as type is Auto
Opens the Auto Save Settings dialog box in which you can specify the file format and other advanced save settings. Select a file format for items detected as documents, and for items detected as photos.
-
When JPEG/Exif is Selected
Click Set... to specify a compression type for JPEG files. Select High(Low Compression), Standard or Low(High Compression).
Important-
This setting is not available when the Compress scanned images when transferring checkbox is selected on the General tab of the Preferences dialog box.
-
-
When PDF is Selected
Click Set... to make advanced settings for creating PDF files.
When Save as type is JPEG/Exif
You can specify a compression type for JPEG files. Select High(Low Compression), Standard or Low(High Compression).
Important-
This setting is not available when the Compress scanned images when transferring checkbox is selected on the General tab of the Preferences dialog box.
-
-
Save in
Displays the folder in which to save the scanned images. To change the folder, click Browse... to specify another one.
By default, the scanned images are saved in the following folders.
Windows 7: MP Navigator EX folder in My Pictures folder
Windows Vista: MP Navigator EX folder in Pictures folder
Windows XP: MP Navigator EX folder in My Pictures folder
-
Save to a Subfolder with Current Date
Select this checkbox to create a subfolder in the folder specified in Save in with the current date and save scanned files in it. A subfolder with a name such as "2010_01_01" (Year_Month_Date) will be created.
If this checkbox is not selected, files are saved directly in the folder specified in Save in.
-
Open the save dialog box after scanning the image
Select this to open the save dialog box after scanning the images and specify the save settings such as destination folder, file name and Exif information.
Note-
To set passwords for PDF files, select Open the save dialog box after scanning the image. After scanning, you can set the passwords in the Save as PDF file dialog box.
-