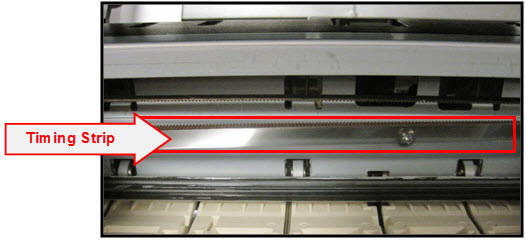
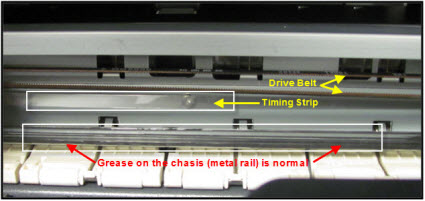
The timing strip is a clear, plastic strip approximately ¼" in height positioned horizontally across the center of the unit, just in front of the carriage drive belt. The timing strip contains many thin black vertical lines that help determine the carriage position during operation.
During certain uncommon tasks such as the removal of a paper jam, it is possible to inadvertently touch a lubricated area on the printer's chassis causing a small amount of grease to be deposited onto the timing strip.
Grease on the timing strip may result in poor print quality including; mis-aligned or distorted characters, vertical lines or, in some cases, an inoperable error condition or knocking / grinding noise.
In most cases, it is easy to remove the grease from the timing strip using common household items. If you wish, you may follow the steps below to remove the grease from the timing strip.
Items needed:
• Clean, unused cotton swab
• Small amount of Isopropyl Alcohol or window cleaner
• Flashlight or other light source
 Note: The illustrations will display a PIXMA MX870; however, the parts and cleaning procedure will be the same for your model. Note that the number of ink tanks and order varies by model.
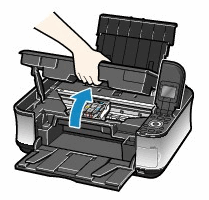
- Power on the printer and open the main access cover (scanning unit cover).
The Print Head Holder (carriage) will move to ink changing (center) position.
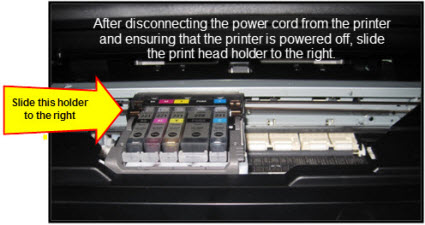
- With the scanning unit cover open, unplug the power cord from the wall outlet or power strip. Be sure the printer's power LED is no longer illuminated. This will allow you to easily slide the carriage left to right.
- Gently slide the carriage to the right side of the printer until it stops.
|
|
Carriage is centered |
|
|
Carriage is to the right |
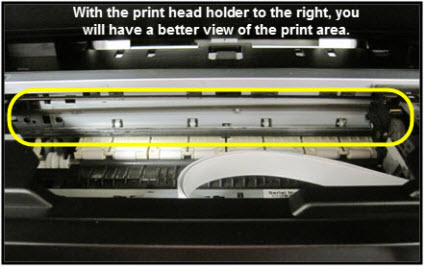
- Using a flashlight, carefully inspect the timing strip for grease that may have attached to the timing strip. It is helpful to view the timing strip from several angles as even a small amount of grease can impact print quality.
Note: The timing strip is a clear strip located in front of the carriage drive belt.
- Moisten the cotton swab with Isopropyl alcohol and carefully remove the grease from the timing strip. To prevent further spreading of grease, be careful not to touch the chassis or other areas inside the unit which may contain grease from the factory.
Note: If Isopropyl Alcohol is not available, you may use window cleaner solution.
 CAUTION: Do not remove the grease on the chassis (metal rail).
- Once you have confirmed that the left and center portions of the timing strip are clean, gently slide the carriage all the way to the left until it stops.
- Repeat steps 4 & 5 for inspecting the right side of the timing strip until is completely free of grease and other matter.
- Lift the scanning unit cover and then gently close it.
- Reconnect the power cord and power on the printer.
(The indicator light blinks steadily while the printer initializes.)
- Confirm operation of the unit by printing a text document and photograph. Printing this document is a good test since it contains text and images. If print quality is still poor, repeat the above steps.
 Return to Top of Document
