| Solution |
Selecting Wireless LAN
To connect the machine to the computer via wireless LAN, select wireless LAN using the operation panel. Note that if you change the setting from <Wired LAN> to <Wireless LAN> or vice versa, you will need to uninstall MF Drivers installed on your computer and then reinstall them. For details, see the "MF Driver Installation Guide" from the Canon website (canon.com/oip-manual).
1. Press  .
2. Use  /  to select <Network Settings>, and press  .
- If a screen for entering a PIN is displayed, enter the PIN with the numeric keys and press . For details, see the "User's Guide" from the Canon website (canon.com/oip-manual).
3. Select <Select Wired/Wireless LAN>, and press .
4. Select <Wireless LAN>, and press .

Setting Up Connection Using WPS Push Button Mode If your wireless router supports WPS push button mode, you can easily set up a connection with a WPS button.
IMPORTANT
How to operate the wireless router may vary on each device. See the instruction manuals for your networking device for help.
1. Press .
2. Use / to select <Network Settings>, and press .
- If a screen for entering a PIN is displayed, enter the PIN with the numeric keys and press . For details, see the "User's Guide" from the Canon website (canon.com/oip-manual).
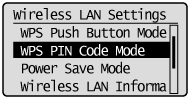
3. Select <Wireless LAN Settings> and press .
- If the <Enable the wireless LAN?> message is displayed, select <Yes>, and press .
- If the <Direct Connection will be disabled. Is it OK?> message is displayed, select <Yes>, and press .
4. Read the message that is displayed and press .
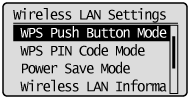
5. Select <WPS Push Button Mode>, and press .
6. Select <Yes>, and press .

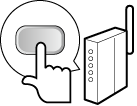
7. Press and hold the WPS button on the wireless router.
- The button must be pressed within 2 minutes after pressing in step 6.
- Depending on the networking device, you may need to press and hold the button for 2 seconds or longer. See the instruction manuals for your networking device for help.
If an error message is displayed during setup
- Press and return to step 5.
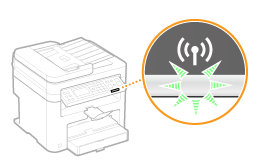
8. Check that the Wi-Fi indicator is blinking on the operation panel.
- The Wi-Fi indicator blinks when a wireless router is detected.
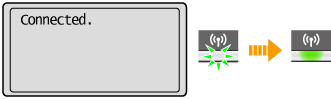
- When the setup is completed, the screen below is displayed, and approximately 2 seconds later, the Wi-Fi indicator lights up.
- Wait approximately 2 minutes until the IP address settings of the machine are completed.
Signal strength
- When more than one wireless router is available for connection, the machine connects to the device with the strongest signal. Signal strength is measured using RSSI (Received Signal Strength Indication).
NOTE
Reducing power consumption
- You can set the machine to enter <Power Save Mode> based on signals emitted from the wireless router. For details, see the "User's Guide" from the Canon website (canon.com/oip-manual).
If the IP address of the machine has changed
- In a DHCP environment, the IP address of the machine may be changed automatically. If this happens, the connection is maintained as long as the machine and the computer belong to the same subnet.
Setting Up Connection Using WPS PIN Code Mode If your wireless router supports WPS PIN code mode, generate a PIN code with the machine and register the code to the networking device.
IMPORTANT
How to operate the wireless router may vary on each device. See the instruction manuals for your networking device for help.
1. Access your wireless router from a computer and display the screen for entering a WPS PIN code.
- For more information, see the instruction manuals for your networking device.
2. Press .
3. Use / to select <Network Settings>, and press .
- If a screen for entering a PIN is displayed, enter the PIN with the numeric keys and press . For details, see the "User's Guide" from the Canon website (canon.com/oip-manual).
4. Select <Wireless LAN Settings>, and press .
- If the <Enable the wireless LAN?> message is displayed, select <Yes>, and press .
- If the <Direct Connection will be disabled. Is it OK?> message is displayed, select <Yes>, and press .
5. Read the message that is displayed and press .
6. Select <WPS PIN Code Mode>, and press .
7. Select <Yes>, and press .
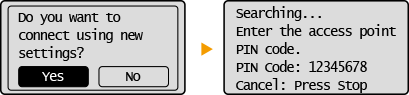
8. Register the generated PIN code to the wireless router.
- Register the PIN code on the setup screen displayed in step 1.
- The PIN code must be registered within 10 minutes after pressing in step 7.
If an error message is displayed during setup
- Press and return to step 6.
9. Check that the Wi-Fi indicator is blinking on the operation panel.
- The Wi-Fi indicator blinks when a wireless router is detected.
- When the setup is completed, the screen below is displayed, and approximately 2 seconds later, the Wi-Fi indicator lights up.
- Wait approximately 2 minutes until the IP address settings of the machine are completed.
Signal strength
- When more than one wireless router is available for connection, the machine connects to the device with the strongest signal. Signal strength is measured using RSSI (Received Signal Strength Indication).
NOTE
Reducing power consumption
- You can set the machine to enter <Power Save Mode> based on signals emitted from the wireless router. For details, see the "User's Guide" from the Canon website (canon.com/oip-manual).
If the IP address of the machine has changed
- In a DHCP environment, the IP address of the machine may be changed automatically. If this happens, the connection is maintained as long as the machine and the computer belong to the same subnet.
Viewing Network Settings
NOTE
- The IP address is not correctly configured if it is displayed as "0.0.0.0".
- Connecting the machine to a switching hub or bridge may result in a connection failure even when the IP address is correctly configured. This problem can be solved by setting a certain interval before the machine starts communicating. For details, see the "User's Guide" from the Canon website (canon.com/oip-manual).
- You can print a list of the current network settings. [ Printing Reports and Lists ]
 Viewing IPv4 Settings
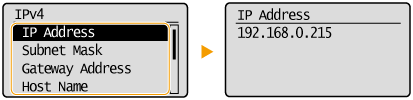
Viewing IPv6 Settings

|


 <Network Information>