
Storing Forwarding Settings
| Article ID: ART102594 | | | Date published: 05/11/2015 | | | Date last updated: 08/15/2015 |
Description
Storing Forwarding Settings
Solution
Storing Forwarding Settings
You can set the machine to forward received documents to other machines or file servers. If a received document matches the forwarding conditions, it is forwarded to the specified destination.
Storing Forwarding Settingnote:- The maximum number of forwarding settings that you can store is 11:10 with forwarding conditions and a fax or I-fax forwarding job without conditions.- You can set whether to print I-fax/fax documents with forwarding errors, and whether to store them in memory.- If a forwarding error occurs when all of Print Image, Store Image to Memory, and Memory Lock are set to [Off ], the received documents will be lost.
1. Press(Additional Functions).
2. Press [System Settings][Forwarding Settings].
If the System Manager ID and System Password have been set, enter the System Manager ID and System Password using(numeric keys), then press
(Log In/Out) to enter the System Settings menu. The Forwarding Settings screen appears.
3. Press [Register].
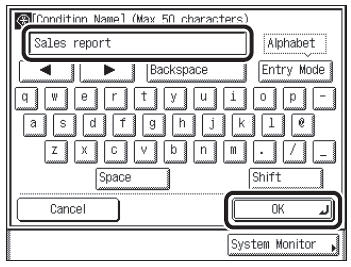
4. Press [Condition Name].
5. Enter a name for the forwarding condition (up to 50 characters), then press [OK].
6. Press [Forwarding Conditions].
7. Select [Fax] or [I-Fax], then press [Next].
For the imageCLASS MF7470/MF7460, skip this step.
8. Set the forwarding conditions.
If your machine is the imageCLASS MF7480 and [Fax] is selected as the receive type, or if your machine is imageCLASS MF7470/MF7460:
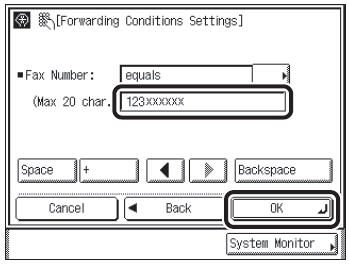
- Press the Fax Number drop-down list, then select the forwarding condition.
[disregarded]: Disregards the Fax Number information as a forwarding condition.
[does not exist]: Forwards the document if the Fax Number information does not exist.
[equals]: Forwards the document if the Fax Number information matches all of the characters entered.
[differs from]: Forwards the document if the Fax Number information differs from the characters entered.
[begins with]: Forwards the document if the Fax Number information begins with the characters entered.
[ends with]: Forwards the document if the Fax Number information ends with the characters entered.
[contains]: Forwards the document if the Fax Number information contains the characters entered.
[does not contain]: Forwards the document if the Fax Number information does not contain the characters entered.
- Enter the forwarding criterion (up to 20 characters) using
[Space]: Press to insert a space between numbers.
[+]: Use to insert a country code. Press [+] after the country code, and before the fax number.
[] [
]: Press to move the position of the cursor.
[Backspace]: Press to delete the last number entered.
The forwarding conditions are set, and the display returns to the Register screen.
note:- If you want to change the criterion for the forwarding conditions without changing the forwarding condition for the Fax Number drop-down list, press(Clear), enter the new criterion, then press [OK].
- The characters that can be entered are: 0 to 9, [Space], [+].- If [disregarded] or [does not exist] is selected as the forwarding condition, you cannot enter any criteria.
- Press the Destination, From, or Subject drop-down list.
[disregarded]: Disregards the Destination, From, or Subject information as forwarding conditions.
[equals]: Forwards the document if the From or Subject information matches all of the characters entered.
[differs from]: Forwards the document if the Destination, From, or Subject information differs from the characters entered.
[begins with]: Forwards the document if the Destination, From, or Subject information begins with the characters entered.
[ends with]: Forwards the document if the Destination, From, or Subject information ends with the characters entered.
[contains]: Forwards the document if the Destination, From, or Subject information contains the characters entered.
[does not contain]: Forwards the document if the Destination, From, or Subject information does not contain the characters entered.
? Select the forwarding condition, then press [Set.].
? Enter the forwarding criteria (up to 120 characters for the Destination, and 128 characters for the From or Subject), then press [OK].
- If necessary, repeat this step for the other drop-down list(s).
If you want to change the criteria for the forwarding conditions without changing the forwarding condition for the Destination, From, and Subject drop-down lists, press [Set.] next to the criteria you want to change, enter the new criteria, then press [OK].
- Press [OK].
The forwarding conditions are set, and the display returns to the Register screen.
note:If [disregarded] is selected as the forwarding condition, you cannot enter any criteria.
9. Press [Next].
10. Press [Forwarding Destination].
11. Select a destination, then press [OK].
If you select a fax number as the forwarding destination, proceed to step 13.
note:- You cannot select multiple destinations at the same time. To forward to multiple destinations, select a group address.- Press the alphanumeric keys (e.g., [ABC]) to display the individual keys for each letter or number. You can select a letter or number to restrict the displayed range of entries. Press [All] to return to the full address list.- If the desired destination is not displayed, press [?] or [?] to scroll to the desired destination. You can restrict the type of destinations displayed in the results list by pressing the Type drop-down list.- To view the detailed information of a selected destination, select the destination, then press [Details].
12. Press [File Format].
For the imageCLASS MF7470/MF7460, skip steps 12 to 14.
13. Select the file format of the document you want to forward, then press [Done].
This part of the procedure is not necessary if either of the following is true:
- A fax number is specified as the destination.
- An I-fax address is specified as the destination.
If you want to separate multiple images and send them as separate files, each of which consists of only one page, press [Divide into Pages].
If you want to send multiple images as a single file without dividing them, do not press [Divide into Pages].
File Formats:
- [TIFF]: Forwards the file in the TIFF (B&W) format.
- [PDF]: Forwards the file in the PDF format regardless of the color mode.
note:- You can select the file format only if you are sending the document to an e-mail address or a file server.- To view a TIFF file, a software application that supports the TIFF format (such as Imaging for Windows) is required.- To view a PDF file, Adobe Reader/Adobe Acrobat Reader is required.
14. Press [OK].
15. Press [Done] repeatedly until the Send Basic Features screen appears.
Forwarding Received Documents
You can set whether received documents are forwarded.1. Press(Additional Functions).
2. Press [System Settings]If the System Manager ID and System Password have been set, enter the System Manager ID and System Password using-
(numeric keys), then press
(Log In/Out) to enter the System Settings menu. The Forwarding Settings screen appears.
3. Select the desired forwarding setting, then press [Validate/Invalidate].- When you select the desired forwarding setting and press[Validate/Invalidate], the <On> or <Off> status displayed on the left side of the Condition Name is switched. (<On> becomes <Off>, and <Off> becomes <On>.)- <On>: The received document is forwarded to the specified destination if it matches the forwarding conditions.- <Off>: The received document is not forwarded to the specified destination even if it matches the forwarding conditions.- To cancel forwarding, press [Validate/Invalidate] again.- The selected forwarding setting is enabled.note:- If the desired forwarding setting is not displayed, press [] or [
] to scroll to the desired forwarding setting.
- You can set whether to print I-fax/fax documents with forwarding errors, and whether to store them in memory.
4. Press [Done] repeatedly until the Send Basic Features screen appears.
SIMS Doc Id
0