Connecting Your Printer to a Wireless LAN (WPS PIN Code) - G4210
Article ID: ART173507
|
Date published: 01/18/2019
|
Date last updated: 04/09/2019
Description
This article shows how to start a wireless connection of your PIXMA G4210 to a wireless LAN using the WPS PIN code method.
Solution
Some wireless routers will allow you to connect devices via a WPS PIN code. Follow the steps below to begin a wireless connection setup using the WPS PIN code method for the PIXMA G4210.
Press the Setup button.
In the Setup menu, Wireless LAN setup is the first option. Press the OK button.
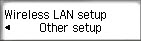
Press the right arrow button until Other setup appears. Press the OK button.
Press the right arrow button until WPS (PIN code) is shown on the screen. Press the OK button.
After a few moments, a PIN code will appear on the screen.
The PIN code must be entered into your router. Please refer to your router's documentation for information on how to enter a PIN code from a device.
After the PIN code has been entered into the router, the printer will attempt to connect to the network.
After the printer has connected, press the OK button.

 button.
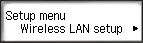
 until Other setup appears. Press the OK button.