How to connect the EOS Rebel T3/T3i to a printer and make prints.
| Article ID: ART111266 | | | Date published: 05/11/2015 | | | Date last updated: 09/29/2015 |
Description
Solution
You can connect your camera to a " PictBridge" compatible printer to make direct prints.
The direct printing procedure is done entirely with the camera while you look at the LCD monitor.
- Movies cannot be printed. To print from movies, import them into a computer, use something like ZoomBrowser EX to write still images from them, and then connect the computer to a printer to print them.
- The camera cannot be used with printers compatible only with CP Direct or Bubble Jet Direct.
- Do not use any interface cable other than the one provided.
- If you use a battery pack to power the camera, make sure it is fully charged.
- With a fully-charged battery, printing up to about 4 hours is possible.
- Before disconnecting the cable, first turn off the camera and printer. Hold the plug (not the cord) to pull out the cable.
- For direct printing, using AC Adapter Kit ACK-E8 (sold separately) to power the camera is recommended.
Depending on the printer, it might not support SDHC or SDXC cards. For details, please check with where the printer was purchased for support information.
1. Set the camera's power switch to <OFF>.
2. Set up the printer.
For details, see the printer's instruction manual.
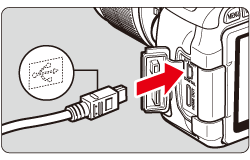
3. Connect the camera to the printer.
- Use the interface cable provided with the camera.
- Connect the cable to the camera's <DIGITAL> terminal with the cable plug's <
 > icon facing the front of the camera.
 - To connect to the printer, refer to the printer's instruction manual.

4. Turn on the printer.
5. Set the camera's power switch to <ON>.
Some printers may make a beeping sound.
- If there is a long beeping sound, it indicates a problem with the printer. A message like the ones shown in the table below will appear on the camera's LCD monitor. Press the <SET> button to stop printing, and then resume printing after fixing the problem.
- For details on how to fix a printing problem, refer to the printer's instruction manual.
| Paper Error | Check whether the paper is properly loaded in the printer. |
| Ink Error | Check the printer's ink level, and check the waste ink tank. |
| Hardware Error | Check for any printer problems other than paper and ink problems. |
| File Error | The selected image cannot be printed via PictBridge. Images taken with a different camera or images edited with a computer might not be printable. |
6. Press the <  >(Playback) button to playback the image.
The image will appear, and the < >(PictBridge) icon will appear on the upper left to indicate that the camera is connected to a printer.
7. Select the image to be printed, then press the <SET> button.
- Check that the < > icon is displayed on the upper left of the LCD monitor.
- Press the <Cross Keys> to select the image to be printed.

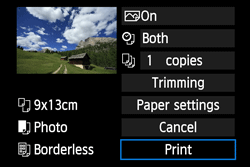
8. The print setting screen will appear.
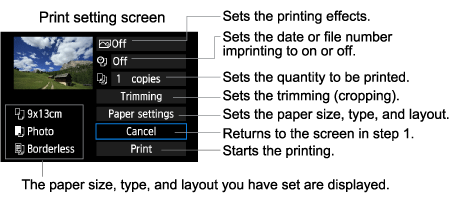
* Depending on the printer, certain settings such as the date and file number imprinting and trimming might not be selectable.
9. Select [Paper settings], then press the <SET> button.
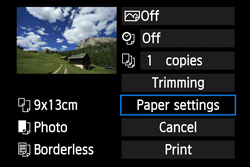
10. The paper settings screen will appear.
<Setting the Paper Size>

Select the size of the paper loaded in the printer, then press the <SET> button.
The paper type screen will appear.
<Setting the Paper Type>
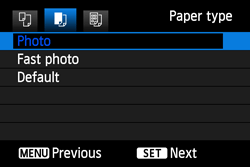
- Select the type of the paper loaded in the printer, then press the <SET> button.
- When attempting to use genuine papers with a Canon printer, check the instruction manual for the printer for information about the types of paper that can be used.
The page layout screen will appear.
<Setting the Page Layout>
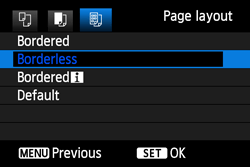
Select the page layout, then press the <SET> button.
The print setting screen will reappear.
| Bordered | The print will have white borders along the edges. If the edges of the images are cut when making prints with the [Borderless] setting, make prints with the [Bordered] setting instead. |
| Borderless | The print will have no borders. If your printer cannot print borderless prints, the print will have borders. |
Bordered |
The shooting information(*1) will be imprinted on the border on 9x13cm and larger prints. |
| xx-up | Option to print 2, 4, 8, 9, 16, or 20 images on one sheet. |
20-up35-up |
Images that have been print ordered in DPOF will be printed as thumbnails in groups of 20 or 35 images on A4 or letter size paper. (*2)[20-up ]will have the shooting information(*1) imprinted. |
| Default | The page layout will vary depending on the printer model or its settings. |
11. Set as necessary. If you need not set any printing effects, go to step 12.
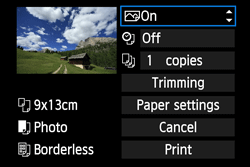
What is displayed on the screen differs depending on the printer.
11-1. Select the option on the upper right (circled in the screenshot), then press the <SET> button.
11-2. Select the desired printing effect, then press the <SET> button.
If the  icon is displayed brightly next to <INFO.>, you can also adjust the printing effect. For detals, refer to the instruction manuals that came with your camera.
| Printing Effect | Description |
 On On |
The image will be printed according to the printer's standard colors. The image's Exif data is used to make automatic corrections. |
| Off |
No automatic correction will be applied. |
| VIVID |
The image will be printed with higher saturation to produce more vivid blues and greens. |
| NR |
Image noise is reduced before printing. |
 B/W B/W |
Prints in black-and-white with true blacks. |
| Cool tone |
Prints in black-and-white with cool, bluish blacks. |
| Warm tone |
Prints in black-and-white with warm, yellowish blacks. |
 Natural Natural |
Prints the image in the actual colors and contrast. No automatic color adjustments are applied. |
| Natural M |
The printing characteristics are the same as the "Natural" setting. However, this setting enables finer printing adjustments than with "Natural." |
| Default |
The printing will differ depending on the printer. For details, see the printer's instruction manual. |
12. Set the date and file number imprinting as necessary.
- If you need to set the date and file number imprinting, select [
 ], then press the <SET> button.
 - Select whether to print the date, the image number, or , and then press the <SET> button.
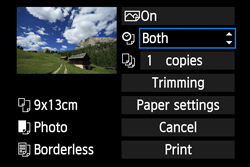
13. Set the number of copies as necessary.
- Select [
 ], then press the <SET> button.
 - Set the number of copies, then press the <SET> button.
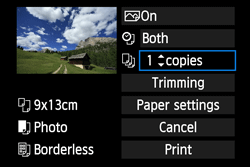
14. Select [Print], then press the <SET> button.