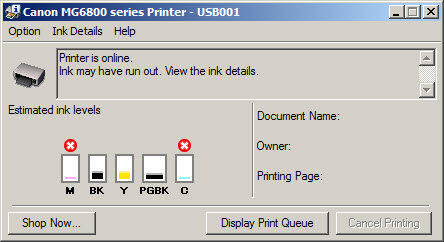
You can confirm the status of each ink tank on the printer status monitor (Windows).
Check if any symbol appears on the screen.
Ink with (Ink low) is running low.
You can continue printing for a while, but we recommend you to have a new ink tank available. Ink with  (Ink low) is running low. You can continue printing for a while, but we recommend you to have a new ink tank available.
Note: An error message may appear while printing. Confirm the message and take an appropriate action.
Follow the procedure below to open each of the confirmation screens.

- Open the Properties / Preferences window for the printer.
- Click 'View Printer Status' on the Maintenance screen. To confirm the ink tank information, click the Ink Details menu.
Note: You can also display the printer status monitor by clicking Canon XXX (where "XXX" is your printer's name) which appears on the taskbar during printing. Here is an example of the printer status monitor.
Properties / Preferences:
For Windows 10
- Click your right mouse button on the Start button. Click on 'Control Panel'. If the Control Panel is showing large or small icons, click on 'Devices and Printers'. If the Control Panel is showing categories, click 'View devices and printers' under 'Hardware and Sound'.
- Click your right mouse button on the listing for your printer, and then select 'Printing Preferences' from the menu that appears.
For Windows 8 / 8.1
- Hold the Windows
 key and type X. Click on 'Control Panel'. If the Control Panel is showing large or small icons, click on 'Devices and Printers'. If the Control Panel is showing categories, click 'View devices and printers' under 'Hardware and Sound'.
- Click your right mouse button on the listing for your printer, and then select 'Printing Preferences' from the menu that appears.
For Windows 7
- Click the 'Start' button from the bottom left of the Windows screen, and then click on 'Devices and Printers'.
- Click your right mouse button on the listing for your printer, and then select 'Printing Preferences' from the menu that appears.
For Windows Vista -
- Click / Select 'Start' from the bottom left of the Windows screen, 'Control Panel', 'Hardware and Sound', and then click on 'Printers'.
Note: If you are in 'Classic' view, Click 'Printers' directly from the 'Control Panel'.
- Click your right mouse button on the listing for your printer, and then select 'Printing Preferences...' from the menu that appears.
For Windows XP Home Edition -
- Click / Select 'Start' from the bottom left of the Windows screen, 'Control Panel,' 'Printers and Other Hardware,' and 'Printers and Faxes.'
- Click your right mouse button on the listing for your printer, and then select 'Printing Preferences...' from the menu that appears
For Windows XP Professional Edition -
- Click 'Start' from the bottom left of the Windows screen, and 'Printers and Faxes.'
- Click your right mouse button on the listing for your printer, and then select 'Printing Preferences...' from the menu that appears.
For Windows 2000/ Me/98 (if applicable) -
- Click / Select 'Start' from the bottom left of the Windows screen, and 'Settings,' then 'Printers.'
- Click your right mouse button on the listing for your printer, and then select 'Properties' from the menu that appears.
Return to top of the page