Installation - Settings After Installation
Configure the following settings after installing this software according to the operating system you are using:
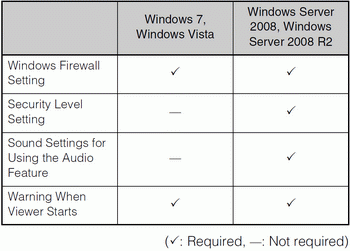
Windows Firewall Settings
If you install the Storage Server and the Viewer on different computers, you must change the Windows Firewall settings on the computer used for the Storage Server.
The changes to the settings are already complete if you selected the [Add storage server programs to the Windows Firewall exception list.] check box during installation. If you did not select the above check box during installation, perform the following procedure to change the Windows Firewall settings.
The following settings are not required if you install the Storage Server and Viewer onto the same computer.
When using Windows 7 or Windows Server 2008 R2
1 Click [Start] > [Control Panel] to open the [Control Panel].
2 Click [System Security] > [Windows Firewall].
3 Click [Advanced Settings] to display the [Windows Firewall with Advanced Security] window.
4 Click [Inbound Rules] and select [New Rule] from the [Action] menu to start the [New Inbound Rule Wizard].
5 Click [Port], and then click [Next].
6 Click [TCP] and [Specific local ports], and then enter 80 as the port number. Then click [Next].
7 Click [Allow the connection], and then click [Next].
8 Click [Next].
9 Enter a name (such as the Storage Server or Storage Server Group name) in [Name] and click [Finish].
10 The added inbound rule should be displayed in the [Windows Firewall with Advanced Security] window, with a checkmark icon displayed next to the rule.
When using Windows Vista or Windows Server 2008
1 Click [Start] > [Control Panel] to open the [Control Panel].
2 Click [System Security] > [Windows Firewall]. If the [Control Panel] is set to [Classic View], double click [Windows Firewall].
3 Click [Change settings]. - If the [User Account Control] dialog box is displayed, click [Continue].
4 Click the [Exceptions] tab and click [Add Port].
5 In the [Add a Port] dialog box, enter the name of the Storage Server and 80 as the port number. Make sure that [TCP] is selected and click [OK].
6 Confirm that the added Storage Server is now displayed in the [Windows Firewall] dialog box and that the check box is selected. Then, click [OK].
Security Level Setting
In Internet Explorer, the default security level setting for Internet or intranet sites in Windows Server 2008 and 2008 R2 is “High”. Therefore, you are not able to configure settings in the configuration or top page of the camera.
Follow these steps to register the site as a trusted site.
1 Start Internet Explorer and click [Tools] > [Internet Options] to display the [Internet Options] dialog box.
2 Click the [Security] tab.
3 Click [Trusted Sites] and click [Sites].
4 Clear the [Require server verification (https:) for all sites in this zone] check box.
5 Enter the IP address of your camera in [Add this website to the zone] and click [Add].
Note
For details on registration with trusted sites, click [Learn more about Internet Explorer’s Enhanced Security Configuration] in the [Internet Options] dialog box and refer to the displayed summary.
JavaScript may be disabled in the standard security setting, even if a content block dialog box is not displayed. This may limit the operation of the setting page or the camera’s Viewer. The JavaScript setting is enabled automatically once trusted site registration is complete.
Sound Settings for Using the Audio Feature
The sound feature is disabled by default in Windows Server 2008 and 2008 R2. To receive audio with the camera’s Viewer, follow these steps to enable the sound feature.
1 Click [Start] > [Control Panel] to open the [Control Panel].
If the [Control Panel] is set to [Classic View], doubleclick [Sound] and proceed to Step 3.
2 Click [Hardware and Sound] and click [Sound].
3 If the [Audio Service Not Running] dialog box is displayed, click [Yes].
4 The [Sound] dialog box is displayed. Select the [Playback] tab and confirm that an appropriate audio device is installed.
If no audio device is installed, refer to the manual for your computer on how to install an audio device.
Warning When Viewer Starts
If [User Account Control] is enabled, the [User Account Control] screen will be displayed when you start the Viewer. Click [Yes] (or [Continue]) to start the Viewer.
