Print head alignment instructions F30 / F50
| Article ID: ART157277 |
| |
Date published: 06/09/2015 |
| |
Date last updated: 08/17/2015 |
Description
Print head alignment instructions F30 / F50.
Solution
Print Head Alignment F30 / F50
Prior to aligning the print head, make sure paper is stacked in the multi-purpose tray and the ink tanks are properly seated and contain ink.
- Press the <Menu> button on the operation panel repeatedly until [PRINTER SETTINGS] appears in the LCD.
- Press the [Set] button. to select [MAINTENANCE].
- Press the <Menu> button until [ALIGN PRINT HEAD] displays on the bottom row.
- Press the <Set> button. Vert Line Pattern will appear while the vertical pattern prints out.
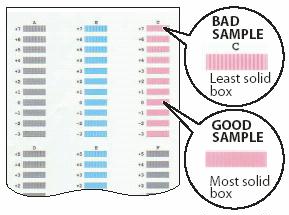
- In column A on the printout, note which box has the most solid image with the least vertical striping. Note the value next to this box and use [+] or [-] buttons to enter it.
- Press the <Set> button.
- Repeat steps 5 and 6 for columns B through F. When all values have been entered, the LCD will print a vertical pattern.
- Review the printout for the pattern with the most solid pattern in column G.
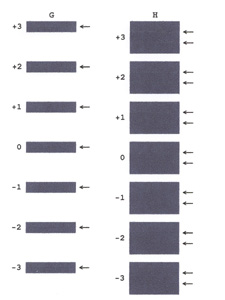
- In column G on the printout, note which box has the most solid image. Note the value next to this box and use [+] or [-] buttons to enter it.
- Press the <Set> button.
- Repeat steps 9 and 10 for column H.
