|
|
Print the received fax from memory - MX350
| Article ID: ART106505 |
| |
Date published: 05/11/2015 |
| |
Date last updated: 08/15/2015 |
Description
Print the received fax from memory - MX350
Solution
Document Stored in Memory
In the following cases, the machine is not able to print the received fax and will automatically store the fax in its memory.
- Ink has run out.
- Paper has run out.
- A different size of paper from that specified by Page size is loaded.
- Page size is set to other than A4, 8.5"x11"(LTR), or 8.5"x14"(Legal) (MX350 series).
- OFF is selected for Auto print in FAX user settings.
- You pressed the <Stop> button to cancel printing of a received fax.
Note:
- If you disconnect the power cord, all the documents stored in memory are deleted. Send or print necessary documents before disconnecting the power cord.
- When confirming, printing, or deleting a document stored in memory, you specify it by its transaction number. If you do not know the transaction number for your target document, print the list of documents first.
Printing a Document in Memory
If the machine was not able to send a fax or print a received fax, it stores the unsent or unprinted fax in its memory. If an error occurred during a fax transmission, the document is not stored in memory. You can print a list of stored documents (the memory list) or print a specified document.
Note: The memory list shows the transaction number of the unsent or unprinted fax (TX/RX NO.), transaction mode, recipient's number, and the date and time of the transaction.
Printing a Memory List or Specified Document in Memory
- Load paper.
- Press the <FAX> button, then press the right <Function> button.
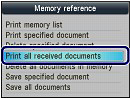
The memory reference screen is displayed.
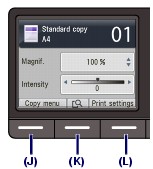
Note: The Function buttons are located below the display. In the below illustration, the Copy menu shows three available Function buttons.
-
Print a specified document or memory list.

To print a memory list:
(1) Use the   button to select [Print memory list], then press the <OK> button. button to select [Print memory list], then press the <OK> button.
(2) Use the button to select [Yes], then press the <OK> button.
(3) The memory list stored in memory is printed.
To print a specified document:
(1) Use the button to select [Print specified document], then press the <OK> button.
(2) Use the button to select the transaction number of the document you want to print, then press the <OK> button.
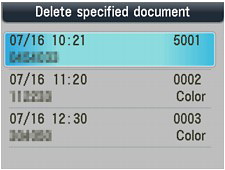
The date and time of transaction and fax/telephone number, the transaction number, and the color information are displayed on a list screen of documents stored in memory.
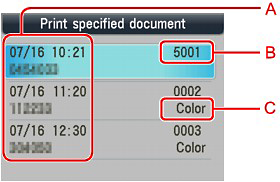
A. Date and time of transaction and fax/telephone number
B. Transaction number (TX/RX NO.)
A transaction number from 0001 to 4999 indicates a document being sent.
A transaction number from 5001 to 9999 indicates a document being received.
C. Color information
(3) Use the button to select [Yes] or [No], then press the <OK> button.
If you select Yes, only the first page of the document will be printed. If you select No, all pages of the document will be printed.
To print other documents, repeat the procedure from steps (2) and (3).
Note:
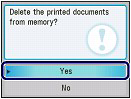
- If you select No to print all the pages of the document, and all the pages in memory have been printed, Delete the printed documents from memory is displayed on the LCD. If you select [Yes], printed pages in memory are deleted.
- If there are no documents stored in memory, There is no document in memory is displayed. Press the <OK> button to return to the previous screen.
Printing All the Documents in Memory
- Load paper.
- Press the <FAX> button, then press the right <Function> button.
The memory reference screen is displayed.
Note: The Function buttons are located below the display. In the below illustration, the Copy menu shows three available Function buttons.
- Use the button to select [Print all received documents], then press the <OK> button.
-
Use the button to select [Yes], then press the OK button.

Note:
- Delete the printed documents from memory is displayed on the LCD each time a document is printed. If you select [Yes], the document is deleted from memory.
- If there are no documents stored in memory, There is no document in memory is displayed. Press the <OK> button to return to the previous screen.
Deleting a Document in Memory
- Deleting a Specified Document in Memory
- Press the <FAX> button, then press the right <Function> button.
The memory reference screen is displayed.
Note: The Function buttons are located below the display. In the below illustration, the Copy menu shows three available Function buttons.
- Use the button to select [Delete specified document], then press the <OK> button.

- Use the button to select the transaction number (TX/RX no.) of the document you want to delete, then press the <OK> button.
- Use the button to select [Yes], then press the <OK> button.
- To delete other documents, repeat the procedure from steps 3 and 4.
- Deleting All the Documents in Memory
- Press the <FAX> button, then press the right <Function> button.
The memory reference screen is displayed.
- Use the button to select [Delete all documents in memory], then press the <OK> button.
- Use the button to select [Yes], then press the <OK> button.
Note: This function is not available while the machine is receiving a fax.
|
