To align the print head in Windows
1. Place a sheet of blank paper in the sheet feeder.
2. Access the printer driver setup widow:
For Windows 7
- Click the 'Start' button from the bottom left of the Windows screen, and then click on 'Devices and Printers'.
- Click your right mouse button on the listing for your printer, and then select 'Printing Preferences' from the menu that appears.
For Windows Vista
- Click / Select the 'Start' from the bottom left of the Windows screen, 'Control Panel', 'Hardware and Sound', and then click on 'Printers'. Note: If you are in 'Classic' view, click 'Printers' directly from the 'Control Panel'.
- Click your right mouse button on the listing for your printer, and then select 'Preferences' from the menu that appears.
For Windows XP Home Edition
- Click / Select the 'Start' button from the bottom left of the Windows screen, 'Control Panel,' 'Printers and Other Hardware,' and 'Printers and Faxes.'
- Click your right mouse button on the listing for your printer, and then select 'Preferences' from the menu that appears.
For Windows XP Professional Edition
- Click 'Start' from the bottom left of the Windows screen, and 'Printers and Faxes.'
- Click your right mouse button on the listing for your printer, and then select 'Preferences' from the menu that appears.
For Windows 2000
- Click / Select 'Start' from the bottom left of the Windows screen, and 'Settings,' then 'Printers.'
- Click your right mouse button on the listing for your printer, and then select 'Properties' from the menu that appears.
3. Right-click the Canon printer icon, then select 'Properties'.
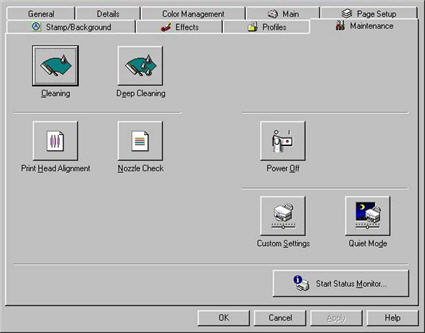
4. From the Maintenance tab, click the 'Print Head Alignment' button.
5. When prompted to print an alignment test page, click 'OK'.
If the pattern printed successfully, click 'Yes'.

6. Compare the different patterns for each color on the printout. Notice that most patterns have vertical lines, but some in the middle look smooth and uniform.
7. For each color on the test printout, enter the number in the Print Head Alignment dialog box that corresponds with the smoothest looking test pattern.
8. When finished, click 'OK'
To align the print head in Mac OS
1. Place a sheet of blank paper in the sheet feeder.
In OS 9.x :
Click 'File', then 'Page Setup'.
Click the 'Utilities' button. The Canon Printer Utility dialog box will display.
In OS X v10.x :
Double click the hard drive icon
Double click the 'Applications' icon
Double click the 'Utilities' folder
Double click the 'Printer Setup Utility' icon
Select the correct printer in the Printer List and click the 'Utility' icon
Select the correct printer and click the 'Maintenance' button.
2. Select 'Test Print' from the pull-down menu, and click the 'Print Head Alignment' button.
3. When prompted to print an alignment test page, click 'OK'.
4. Compare the different patterns for each color on the printout. Notice that most patterns have vertical lines, but some in the middle look smooth and uniform.

5. For each color on the test printout, enter the number in the Print Head Alignment dialog box that corresponds with the smoothest looking test pattern.
6. When finished, click 'Send'.
