Loading Paper - IVY Mini Photo Printer
| Article ID: ART169939 |
| |
Date published: 04/06/2018 |
| |
Date last updated: 02/16/2024 |
Description
Understand how to properly load paper
Solution
- Remove the top cover by sliding it slightly forward and away from the paper output slot. This will release the lid and allow you to remove the top cover to insert paper. Close the lid properly.
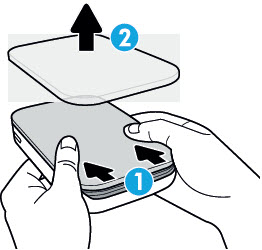
- Unwrap a photo paper pack (10 sheets). Ensure the included smart sheet (blue) is on the bottom of the pack and barcode is facing down.
- Place both the photo paper and smart sheet into the paper compartment.
Stack the photo paper on top of the smart sheet with the white side (printing side) facing top.
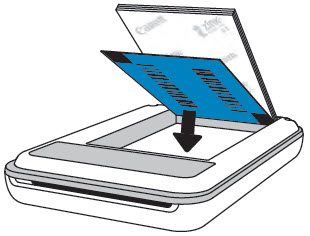
- Place the top cover back onto the printer. It should click into place when fastened
Caution
- Do not insert more than 10 photo papers and 1 smart sheet into the mini photo printer at a time to avoid paper jams or print errors.
- Only use Canon ZINK™ photo paper with the mini photo printer to to optimize print quality.
- You may purchase additional paper within the Canon Mini Print App by tapping "Buy Paper" in the main menu.
- In case of a paper jam, do not pull the paper out. Instead, turn the printer OFF and ON to automatically eject the paper.
- Do not pull the paper out of the printer during printing.
Note on Smart sheet
- The smart sheet will pass through the Mini Photo Printer automatically before the first print job. It cleans and calibrates the printer for the paper pack.
- Use the smart sheet within each pack of new paper for best printing quality.
- Discard the sheet after you have printed all 10 sheets of photo paper in the pack.
- Using a smart sheet from another pack may result in low quality.
Note on Photo Paper
- Do not damage or bend the papers.
- Ensure not to soil the paper when loading it into the printer.
- Do not expose to direct sunlight or moisture.
- Do not leave it in a place where the temperature or humidity is too high or too low. It may reduce the quality of the printed photo.
