Paper Requirements
 Paper Size
The following paper sizes are supported.
 : Supported
  : Not supported
| Paper Size |
Paper Source |
| Paper cassette |
A4
(8 1/4" x 11 3/4" (210 mm x 297 mm)) |
|
B5
(7 1/8" x 10 1/8" (182 mm x 257 mm)) |
|
A5
(5 7/8" x 8 1/4" (148 mm x 210 mm)) |
|
Legal
(8 1/2" x 14" (216 mm x 355 mm)) |
|
Letter
(8 1/2" x 11" (216 mm x 279 mm)) |
|
Statement
(5 1/2" x 8 1/2" (140 mm x 216 mm)) |
|
Executive
(7 1/4" x 10 1/2" (184 mm x 267 mm)) |
|
Officio
(8 1/2" x 12 1/2" (216 mm x 318 mm)) |
|
B-officio
(8 1/2" x 14" (216 mm x 355 mm)) |
|
M-officio
(8 1/2" x 13 3/8" (216 mm x 341 mm)) |
|
Government - Letter
(8" x 10 1/2" (203 mm x 267 mm)) |
|
Government - Legal
(8" x 13" (203 mm x 330 mm)) |
|
Foolscap
(8 1/2" x 13" (216 mm x 330 mm)) |
|
A-foolscap
(8 1/8" x 13 3/8" (206 mm x 338 mm)) |
|
Envelope COM10
(4 1/8" x 9 1/2" (104.7 mm x 241.3 mm))*1 |
|
Envelope Monarch
(3 7/8" x 7 1/2"(98.4 mm x 190.5 mm))*1 |
 |
Envelope C5
(6 3/8" x 9" (162 mm x 229 mm))*1 |
|
Envelope B5
(6 7/8" x 9 7/8" (176 mm x 250 mm))*1 |
|
Envelope DL
(4 3/8" x 8 5/8" (110 mm x 220 mm))*1 |
|
Index Card
(3" x 5" (76 mm x 127 mm)) |
|
*1 Make sure the flap is folded.
Paper Type
The following paper types are supported.
| Paper Type |
Printer Driver Setting |
Paper Capacity |
| |
| Plain paper |
16 to 21 lb Bond (60 to 80 g/m²) |
[Plain Paper] |
150 sheets |
| 21 to 24 lb Bond (80 to 90 g/m²) |
[Plain Paper L] |
120 sheets |
| Heavy paper |
24 to 28 lb Bond (90 to 105 g/m²) |
[Heavy Paper 1] |
100 sheets |
| 28 lb Bond to 60 lb Cover (105 to 163 g/m²) |
[Heavy Paper 2]*1 |
60 sheets |
| Rough paper |
16 lb Bond to 60 lb Cover (60 to 163 g/m²) |
[Rough Paper] |
100 sheets |
| Transparency*2 |
[Transparency] |
100 sheets |
| Label |
[Labels] |
50 sheets |
| Index Card |
[Index Card] |
Not available |
| Envelope |
[Envelope] |
20 sheets |
*1 If you want to improve the fixation when printed with [Heavy Paper 1] selected, select [Heavy Paper 2].
*2 Use only the types designed for laser printers.
To prevent paper jams, do not use the following paper types.
- Wrinkled or creased paper
- Curled or rolled paper
- Torn paper
- Damp paper
- Very thin paper
- Paper printed by a thermal transfer printer (Do not copy on the reverse side.)
The following paper types do not print well:
- Highly textured paper
- Very smooth paper
- Glossy paper
Make sure that the paper is free of dust, lint, and oil stains.
Make sure to test print before purchasing large quantities of copy paper.
Keep the paper wrapped in its original package (unopened or opened) and stored in a cool, dry place until ready to use. Make sure to keep it on a flat surface.
Store paper stacks in a place where temperatures are somewhere between 64.4 to 75.2°F (18 to 24°C) and humidity is somewhere between 40 % to 60 % RH.
attention:
To print on damp paper
- The following problems may occur.
- Steam is emitted from the machine's output area.
Water droplets form on the back side of the operation panel and in the output area.
Moisture evaporates from damp paper due to the heat generated inside the fixing unit (it is most likely to occur at low room temperatures). This is not a malfunction, but you can prevent this by using a stack of new unopened paper.
Should you smell something burning, immediately turn OFF the machine, unplug the power plug from the AC power outlet, and contact your local authorized Canon dealer or the Canon help line. Continued use may lead to a fire or electrical shock.
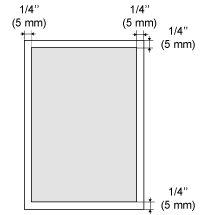
Printable Range
The shaded area in the illustration on the following page represents the printable area (A4 size paper).
Note that the margins indicated in the illustration are for your reference. Actual margins can vary.
Document Requirements
| Type |
Plain paper
Heavy paper
Photograph
Small documents (for example, index cards)
Special types of paper (for example, tracing paper, transparencies, etc.)*1
Booklet (thickness not specified) |
| Size (W x L) |
Maximum 8 1/2" x 11 3/4" (216 mm x 297 mm) |
| Weight |
Maximum 4.4 lb (2 kg) |
| Paper Capacity |
1 sheet |
*1 To copy transparent documents (for example, tracing paper or transparencies), make sure to place the documents face down on the platen glass and cover them with plain white paper.
important:
To place your document
- Make sure any glue, ink, or correction fluid on the document is completely dry before placing it on the platen glass or into the feeder.
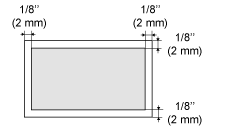
Scanning Range
Make sure that your scan area fits within the shaded area, as shown in the illustrations on the following page.
* Note that the margins indicated in the illustrations are for your reference. Actual margins can vary.
* Place the document face down.
Copy
Scan

