Saving Received Fax Documents in the Memory/Forwarding Received Fax Documents
Memory Lock Settings
Normally, received documents are immediately printed. However, you can specify whether or not to store received faxes in memory before printing. You can then print the stored faxes at any time or delete them without printing to save paper.
 How to access the option
[  ] (Menu) -> <System Settings> -> <Communication Management Settings> -> <Memory Lock Settings>
* If <Memory Lock PIN> is specified, use the numeric keys [  to [
to [  ] ] to enter those numbers, and then press [OK].
Settings
(Boldface: Default setting)
| Off |
Disable Memory Lock. |
| On |
Memory Lock PIN: Seven-digit number |
Once the PIN is set, you are prompted to enter it every time you change or disable the Memory Lock mode settings. |
| |
Print Report:
Off, On |
Specify whether to print the RX result report when receiving a fax.
Activate to enable this setting |
| |
Memory Lock Time :
Off, On |
When <On> is set, received faxes are stored in memory only for a specified length of time.
Set <Memory Lock Start Time> and <Memory Lock End Time> respectively. |
| |
note:
Memory Lock PIN
- Press [OK] without entering any numbers when you do not want to set the PIN.
- You cannot set a PIN consisting only of <0> (<0000000>).
- When you set a PIN starting with <0>, the PIN is set in the following manner.
Example: When you enter <02> or <002>, the PIN is set as <0000002>.
Memory Lock Settings operations
- When memory lock settings are changed from <On> to <Off>, the documents saved in the memory up to then are combined and printed.
- At <Memory Lock End Time>, you can combine and print received documents saved in the memory from the <Memory Lock Start Time> to the <Memory Lock End Time>.
Forwarding Received Faxes Stored in Memory to Other Destinations (Manual Forwarding)
When a fax is stored in memory, you can manually forward it to a specified destination.
note:
Destinations that can be specified
- You can specify followings as destinations.
- Fax
- E-mail
- File server
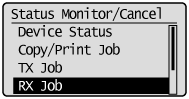
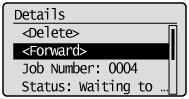
1. Press [  ] (Status Monitor/Cancel).
2. Select <RX Job> using [  ] or [
  ] and press [OK].
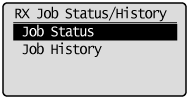
3. Select <Job Status> using [ ] or [ ] and press [OK].
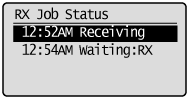
4. Select the job that you want to forward using [ ] or [ ] and press [OK].
You cannot forward received faxes when
- the machine is in the middle of receiving another fax
- the machine starts printing a job after it has received a fax
5. Select <Forward> using [ ] or [ ] and press [OK].
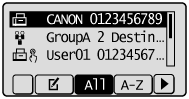
6. Specify the forwarding destination.
For details on the procedures for specifying destinations, see the "e-Manual" (HTML manual) in the CD-ROM supplied with the machine.