Checking / Clean The Print Head Nozzles (Windows)
The following contains instructions to check the nozzles for poor print quality and perform print head nozzle cleanings. If print results are faint or streaks are printed, the print head nozzles may be clogged. To improve print quality, perform print head cleanings or print head deep cleanings.
Caution: Only used the approved methods below to clean the print head. Use of other methods may further clog the nozzles on the print head and may cause permanent damage the print head.
Note: It is important to check the cleaning results by printing Nozzle Check Pattern after each cleaning. Cleaning and Deep Cleaning consumes a certain amount of ink. Only perform a cleanings when necessary.
Print a Nozzle Check Pattern
- Confirm that the printer is connected to the computer and the printer is turned on.
- Complete or cancel any print jobs in progress.
- Open the Printers folder.
- For Windows XP Home Edition : Click/Select 'Start,' 'Control Panel,' 'Printers and Other Hardware,' and 'Printers and Faxes.
- For Windows XP Professional Edition : Click 'Start' and 'Printers and Faxes.'
- For Windows Vista : Click 'Start,' 'Control Panel,' 'Hardware and Sound,' and 'Printers.'
- For Windows 2000 : Click/Select 'Start,' and 'Settings,' then 'Printers.'
- Right-click the printer icon and select 'Properties'.
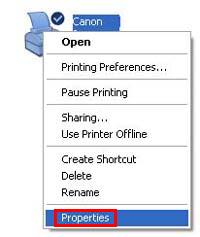
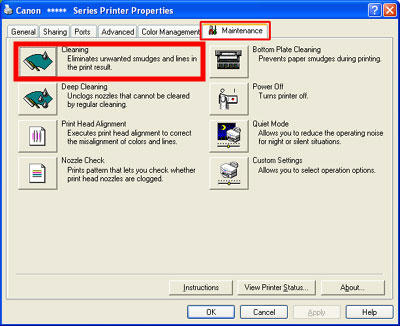
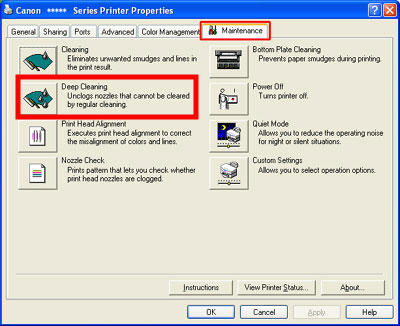
- Click the Maintenance tab. (The Maintenance window opens.)

Note: The layout varies depending on the printer and version of Windows you are using.
- Load a sheet of A4 or letter size paper in the rear tray.
- Select 'Nozzle Check'.

- At the Nozzle Check dialog box, click 'Print Check Pattern'.
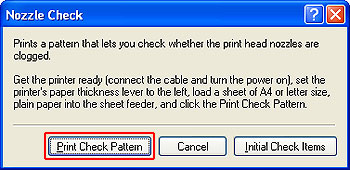
Note: By clicking 'Initial Check Items' before clicking 'Print Check Pattern', you can see the specific confirmation items in Nozzle Check.
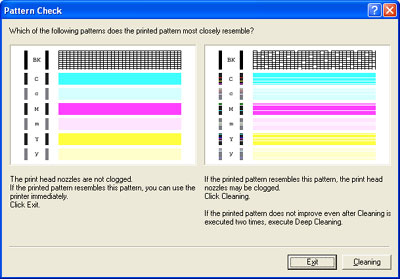
Pattern Check window
- When the confirming message is displayed, click 'OK'. (Nozzle Check printing will start.)
- Examine the Nozzle Check output.

(A) No missing lines/No horizontal white streaks
(B) Lines are missing/Horizontal white streaks are present
- Confirm there are no missing lines in the grid (1) or no horizontal white streaks in the pattern (2).
-
- When there are no missing lines or horizontal white streaks in (1) and (2), click 'Exit' to return to the Maintenance window.
- Click 'OK' to finish and exit the Properties window.
- If there are missing lines or horizontal white streaks in (1) or (2), click 'Cleaning' to perform print head cleaning.
Perform a Cleaning of the print head nozzles:
Caution: Cleaning consumes a certain amount of ink. Perform Cleaning only when necessary.
Note: The pattern varies depending on the printer and version of Windows being used.
- Click 'Cleaning' to perform print head cleaning from the Pattern Check window and proceed to step 3 of the print head cleaning instructions. If the Pattern Check window is closed, skip this step and proceed to step 2.

- To perform a print head cleaning from the Maintenance window, click 'Cleaning'.
- When the confirming message is displayed, check the contents, and click 'OK'.
Caution: Although the Nozzle Check window is displayed, do not perform any other operations until Cleaning is completed.. Cleaning will take about 40 seconds.
- Print a Nozzle Check Pattern and examine it.
- Perform Cleaning again if necessary.
Note: If the pattern is still abnormal after two Cleanings, perform up to two Deep Cleanings.
Perform Deep Cleaning of the print head
Caution: Deep Cleaning consumes a larger amount of ink than normal Cleaning. Perform Deep Cleanings only when necessary.
- In the Maintenance window, click 'Deep Cleaning'.
Note: The layout varies depending on the printer and version of Windows you are using.
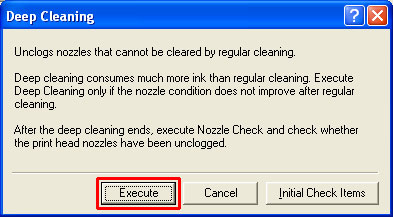
- When the Deep Cleaning window is displayed, check the contents, and click 'Execute'.
Note:
Cleaning consumes a certain amount of ink. Performing Cleaning often, ink will be consumed quickly. Furthermore, Deep Cleaning consumes more ink than Cleaning; execute Deep Cleaning only if the nozzle condition does not improve even after Cleaning.
By clicking Initial Check Items before clicking Print Check Pattern, you can see the specific confirmation items in Nozzle Check.
- When the confirmation window is displayed, click 'OK'.
- When the confirming message is displayed, check the contents, and click 'OK'.
Do not perform any other operations until cleaning is completed.
- Print a Nozzle Check Pattern and examine it.
- Perform Deep Cleaning again if necessary.
- If the print quality does not improve, turn off the printer and let it sit for 24 hours or more, then perform Deep Cleaning again. The wait time may allow dried ink in clogged print head nozzles to liquify, and resolve the problem.
- If the print quality does not improve, replace the ink cartridge(s).
