You can connect the camcorder to the optional DW-100 DVD Burner to create DVD discs from your movies or Photo DVD discs from your photos. For details about the connection and operation, refer to the instruction manual of the DW-100.
Refer to this section along with the relevant sections in the instruction manual of the DW-100.
Preparations on the Camcorder
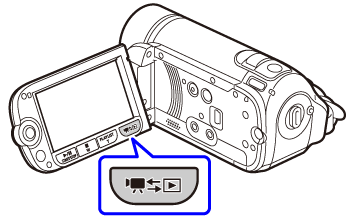
Set the camcorder to playing movies mode to create DVD discs of your movies or Viewing photos mode to create Photo DVDs of your photos.
- Power the camcorder using the compact power adapter.
- Select in advance the memory from which you want to add the scenes or photos.

- Select the scenes or photos you want to add to the disc.
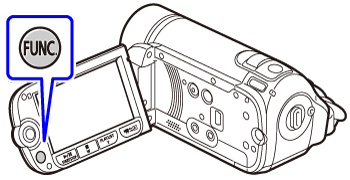
3-1. Press <  > .
> .
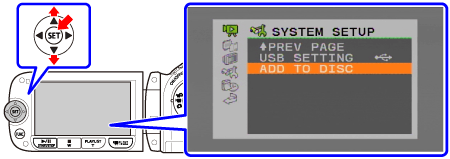
3-2. Select [  ] (MENU) -> [
  SYSTEM SETUP] -> [ADD TO DISC] and press <
  >.
>.
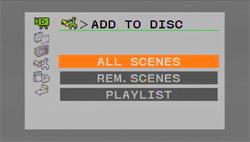
3-3. Select [ALL SCENES], [ [REM.SCENES] or [ [PLAYLIST ] and press < > .
3-4. Press < > .
- Connecting to the DVD Burner and turn on the DVD burner.
- Connect the camcorder to the DVD burner using the supplied USB cable.
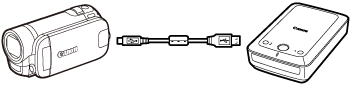
- If the device type selection screen appears, select [DVD BURNER] and press < > .
- When the connection is completed, [NO DISC] will be displayed.
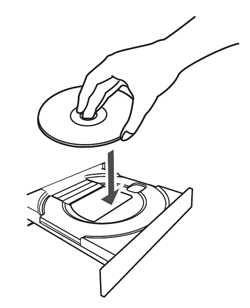
- Insert a brand new disc into the DVD burner.
- Use the < OPEN/CLOSE > button on the DVD burner to open and close the disc tray.
- After the disc is recognized, an information screen will display the type of DVD you are creating, the estimated time and number of discs it will require (based on the disc you inserted).
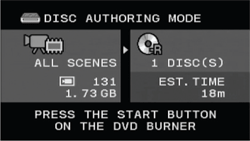
If you inserted a DVD-RW disc that already contains data, [THE DISC CONTAINS DATA] will be displayed. To overwrite the data (erasing the previous content of the disc), press< > , select [ YES] and press < > again.
- Press the < start > button on the DVD burner.
- A progress bar will be displayed on the screen.
- After pressing the start button (while the current disc is being written) the operation cannot be canceled.
- When the disc (or the last disc, if the data requires multiple discs) is finalized, [TASK COMPLETED] will be displayed. Take out the disc and close the disc tray.
WHEN THE DATA REQUIRES MULTIPLE DISCS
After a disc is finalized it will be ejected automatically and [INSERT A NEW / BLANK DISC AND CLOSE THE DISC TRAY] will appear. Insert the next disc and close the disc tray.
TO CREATE AN ADDITIONAL COPY OF THE SAME DISC
After the operation is finished, [INSERT A NEW / BLANK DISC] will be displayed again. Insert a brand new disc and close the disc tray.
Attention:
While the camcorder is connected to the DVD burner, do not open the memory card slot cover and do not remove the memory card.
Observe the following precautions while the ACCESS indicator on the camcorder is on or flashing. Failing to do so may result in permanent data loss.
- Do not open the memory card slot cover.
- Do not disconnect the USB cable.
- Do not disconnect the power source or turn off the camcorder or the DVD burner.
- (FS30, FS31, FS300 only) When creating discs with the optional DW-100 DVD burner, you cannot add using the [PLAYLIST] option, scenes recorded while the pre-recording function was on or divided scenes. To add such scenes, use the [ALL SCENES] or [REM. SCENES] option.
Note:
TO PLAY BACK A DVD DISC
Discs created with this camcorder and the DVD burner can be played back on DVD players and computers that meet the following requirements:
- Compatible with the discs you created (DVD-R/DVD-R DL/DVD-RW discs)
- Compatible with DVD-Video specifications
- DVD playback software that is installed and running (in the case of computers)
- Disconnect the USB cable before changing the operating mode.
- The amount of time required for step 2 depends on how many scenes are being included on a disc. We recommend keeping the number of scenes to 2000 or less. (In such case, the connection time will be about 3 minutes 30 seconds).
