
ScanGear MF-Advanced Mode Settings-ICMF 3200
| Article ID: ART125487 | | | Date published: 05/12/2015 | | | Date last updated: 08/14/2015 |
Description
Solution
ScanGear MF-Advanced Mode Settings
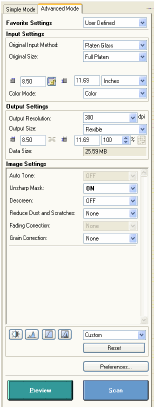
Favorite Settings
Favorite Settings enables you to save a set of settings (Input Settings, Output Settings, Image Settings and Color Settings) made for the focal cropping frame. If there are no cropping frames, settings for the whole preview area are saved. You can also recall the saved settings and apply them to the selected frames or the whole preview area.
The following items cannot be saved in Favorite Settings:
| - | Values of |
| - | Activation of  button (maintaining the proportion of width and height) in [Input Settings] button (maintaining the proportion of width and height) in [Input Settings] |
| - | Value of [%] (Scale) in [Output Settings] |
| [User Defined] | When this option is selected, specify a value for each setting. |
| [Default] | Restores the default settings. The preview image will be cleared. |
| [Add/Delete] | Opens the [Add/Delete Favorite Settings] dialog box. This dialog box enables you to name and register a set of settings for the current preview image. |
Input Settings
| [Original Input Method] | Selects where the document is placed. You can select [Platen Glass] only. |
| [Original Size] | Selects the size and orientation of the original document. If you change this setting after previewing, the preview image will be deleted. |
| [Input Size] | You can specify the parameters of the scan by entering a value in -Some applications have a limit to the amount of image data they can receive. If the parameters of a scan contain more than 21,000 x 30,000 pixels, the image will not be received. -When [Output Resolution] is set to [600] dpi, minimum parameters of an image are 96 x 96 pixels. |
| [Color Mode] | Selects the type of document and the way in which it is scanned. [Black and White]: To output documents to a monochrome printer. The contrast in the image is divided at certain levels (threshold values) into black and white and is displayed in two colors. [Grayscale]: To scan black and white photos or monochrome images. The image is expressed in a 0-255 scale of black and white. [Color]: To scan color documents. The image is expressed in 256 levels (8 bit) of R(ed), G(reen) and B(lue). [Color (Documents)]: To scan color documents that include texts or charts in addition to color photos. The image is expressed in 256 levels (8 bit) of R(ed), G(reen) and B(lue). [Text Enhanced]: To scan texts crisply, particularly to process it with OCR software. The image is displayed in black and white. |
Output Settings
| [Output Resolution] | Selects the resolution for the scan. Enter a resolution between 25 to 9,600 dpi. |
| [Output Size] | Selects the output size of the scanned image. If you select [Add/Delete], the [Add/Delete the Output Size] dialog box will appear and you can add and delete the custom output size. If [Flexible] is selected, enter values in Click |
| [Data Size] | Shows the data size of the scanned image according to your settings. |
 Add/Delete the Output Size
Selecting [Add/Delete] for [Output Size] opens the [Add/Delete the Output Size] dialog box. This dialog box enables you to add and delete the custom output size.
| [Purpose] | Select the purpose of using output ([Print] or [Image Display]). |
| [Output Size Name] | Specifies the output size name you want to register. |
| [Width] | Specifies the width of the output size. |
| [Height] | Specifies the height of the output size. |
| [Unit] | Select the unit of measurement of the output size. |
| [Add] | Adds the output size to the [Output Size List]. |
| [Delete] | Deletes the selected output size from the [Output Size List]. |
| [Save] | Apply the settings specified in the [Add/Delete the Output Size] dialog box. |
You cannot delete the output size that is currently selected in [Output Size] of the [Advanced Mode] tab.
top
Image Settings
| [Auto Tone] | Set to [ON] to automatically adjust the tone of the image. You can apply this setting when the preview image is displayed. -This setting is available when [Color], [Color (Documents)] or [Grayscale] is selected in [Color Mode]. -This setting is not available when [Color Correction] is set to [None] in the [Preferences] dialog box. |
| [Unsharp Mask] | Set to [ON] to emphasize the outline of an image and make it sharper. It is effective for scanning photos etc., which have a soft focus. This setting is available when [Color], [Color (Documents)] or [Grayscale] is selected in [Color Mode]. |
| [Descreen] |
Set to [ON] to reduce the distorted pattern (moire') when scanning printed photographs and pictures. |
| [Reduce Dust and Scratches] | Reduces the dust and scratches on photos. [None]: No reduction of dust and scratches will be made. [Low]: Reduces only small dust and scratch marks. [Medium]: Normally this setting is recommended. [High]: Reduces large dust and scratch marks. This may remove delicate parts of the image. This setting is available when [Color], [Color (Documents)] or [Grayscale] is selected in [Color Mode]. |
| [Fading Correction] | Rebuilds the color quality that has faded over time. It also increases saturation of dull-colored originals to reproduce a vivid image. You can apply this setting when the preview image is displayed. [None]: No fading correction will be made. [Low]: Corrects slightly faded images. [Medium]: Normally this setting is recommended. [High]: Corrects highly faded images, but it may change the tone of the image. This setting is available when [Color] or [Color (Documents)] is selected in [Color Mode] and [Color Correction] is set to [Recommended] in the [Preferences] dialog box |
| [Grain Correction] | Smoothes out the film grain of the image recorded on fast film. The result is smoother tones and higher overall quality. [None]: No grain correction will be made. [Low]: Select this setting when the grain in the picture is not so notable. [Medium]: Normally this setting is recommended. [High]: Smoothes out the grain in the picture even when the grain is very notable but it may lower the image sharpness and tonal quality. -This setting is available when [Color], [Color (Documents)], or [Grayscale] is selected in [Color Mode]. -This setting is not reflected in the preview image. |
Color Settings
Using Color Settings buttons, you can adjust the brightness and contrast of the whole image, specify highlights and shadows, and adjust the contrast and balance in an image.
The Color Settings buttons are displayed when [Color], [Color (Documents)], or [Grayscale] is selected in [Color Mode]. When [Black and White] is selected, the Threshold button is displayed instead of the Color Settings buttons.
When [Color], [Color (Documents)], or [Grayscale] is selected in [Color Mode]:
When [Black and White] is selected in [Color Mode]:
By selecting [Add/Delete] from the drop-down list, you can name and save a set of color or threshold settings.
Clicking a button opens the dialog box for each color setting. If [Reset] is clicked, all color adjustment settings will be reset to the default values.
Brightness/Contrast ![]()
This dialog box enables you to adjust the levels of brightness and contrast of the image.
Click  to adjust the brightness and contrast diagrammatically.

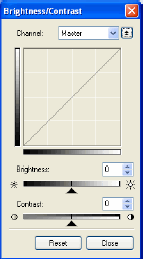
| [Channel] | Selects a color to adjust either [Red], [Green], or [Blue], or select [Master] to adjust the three colors together when [Color] or [Color (Documents)] is selected in [Color Mode]. Adjust the elements of grayscale when [Grayscale] is selected in [Color Mode]. |
| [Brightness] | Adjust the brightness of the image by moving the slider |
| [Contrast] | Adjust the contrast of the image by moving the slider |
| [Reset] | Resets all the current values to their default values. |
Histogram ![]()
This dialog box enables you to see the data concentration at each brightness level in an image. You can specify the darkest and brightest levels within an image, cut the levels and expand the middle of the tonal range of the image.
| [Channel] | Select a color to adjust either [Red], [Green], or [Blue], or select [Master] to adjust the three colors at once when [Color] or [Color (Documents)] is selected in [Color Mode]. Adjust the elements of grayscale when [Grayscale] is selected in [Color Mode]. |
| Click this button, then click a point inside the focal crop in the preview image to specify the darkest point. You can also enter a value (0 to 245) or move the slider |
|
| Click this button, then click a point inside the focal crop in the preview image to specify the midtone point. You can also enter a value (5 to 250) or move the slider |
|
Click this button, then click a point inside the focal crop in the preview image to specify the highlighted point. You can also enter a value (10 to 255) or move the slider  to an appropriate level. to an appropriate level. |
|
| When adjusting a color image, click this button, then click a point in the preview image (or inside the focal crop) to specify the point to execute gray balance adjustment. The gray elements within a scanned image will appear as a neutral gray, and other elements within the image will also have true color reproduction. | |
| [Reset] | Resets all the current settings to their default values. |
Tone Curve Settings 
This dialog box enables you to adjust the brightness of a specific area of an image by selecting the type of the tone curve. The tone curve is a graph showing the balance of tone input and output.
| [Channel] | Selects a color to adjust either [Red], [Green], or [Blue], or select [Master] to adjust the three colors together when [Color] or [Color (Documents)] is selected in [Color Mode]. Adjust the elements of grayscale when [Grayscale] is selected in [Color Mode]. |
| [Select Tone Curve] | Select the tone curve from [No correction], [Over Exposure], [Under Exposure], [High Contrast], or [Invert the Negative/Positive Image]. |
| [Reset] | Resets all the current settings to their default values. |
Final Review ![]()
This dialog box enables you to confirm the color settings.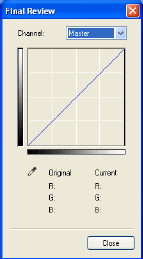
top
Threshold ![]()
This dialog box enables you to adjust the threshold. By adjusting the threshold, you can sharpen characters in a text document and reduce back-printing such as in newspapers.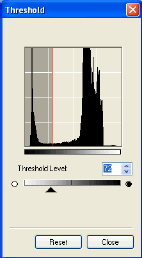
| [Threshold Level] | Adjust the threshold by moving the slider |
| [Reset] | Resets all the current settings to their default values. The brightness of color and grayscale images are expressed as a value from 0 to 255 but the brightness of black and white images is expressed in terms of either black or white, including the parts of an image which are a color between the two. The boundary at which black and white is divided is called "threshold". |
Tone Curve/Threshold Drop-Down List
This drop-down list enables you to save a set of Color Settings made from the focal cropping frame. If there are no cropping frames, settings for the whole preview area are saved. You can also recall the saved settings and apply them to the selected frames or the whole preview area.
| [Custom] | When this option is selected, specify a value for each Color Setting item. Even after the registered settings are applied, [Custom] resumes automatically if you change any setting or make adjustments to the selected cropping frame. |
| [Add/Delete] | Opens the [Add/Delete Tone Curve Settings] dialog box ([Add/Delete Threshold Settings] dialog box, when [Black and White] is selected in [Color Mode]). This dialog box enables you to name and register a set of Color Settings. |
[Preferences] Dialog Box
Clicking [Preferences] on the [Advanced Mode] tab sheet opens the [Preferences] dialog box. This dialog box enables you to adjust settings for scanning and previewing.
top
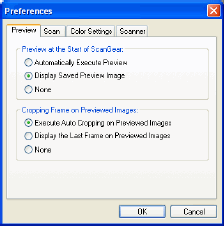
| [Preview at the Start of ScanGear] | Selects the preview operation when you open the ScanGear MF. [Automatically Execute Preview]: The preview scan starts automatically when you open the ScanGear MF. [Display Saved Preview Image]: Displays the image last previewed. [None]: Nothing is displayed. |
| [Cropping Frame on Previewed Images] | Sets how the cropping frame is displayed when you preview images. [Execute Auto Cropping on Previewed Images]: The image will be automatically cropped to match the document size. [Display the Last Frame on Previewed Images]: Displays the last frame. [None]: No frame will be displayed. |

| [Scan without Using ScanGear's Window] | Enables you to scan in a specific color mode when using an application that will not display the [ScanGear MF] dialog box (such as OCR software), overriding the application settings. [Color Mode (Text and Table)]: The document is scanned in [Color (Documents)] mode regardless of the application settings. [Text Enhanced]: The document is scanned in [Text Enhanced] mode regardless of the application settings. |
| [Automatically Quit ScanGear after Scanning] | If selected, the [ScanGear MF] dialog box quits automatically after the image is scanned. Some applications will automatically quit ScanGear MF after scanning irrespective of this setting. |
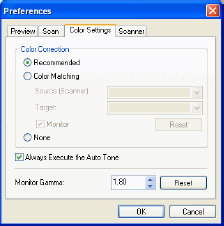
| [Color Correction] | Selects the type of color correction. [Recommended]: Vividly reproduces the tone of a document on the screen. [Color Matching]: Select to automatically match the scanner, monitor and color printer colors. If selected, the Color Settings buttons are invalid in the [Advanced Mode] tab sheet. This setting is available when [Color] or [Color (Documents)] is selected in [Color Mode]. [None]: No color matching is made. This setting is available when [Color], [Color (Documents)], or [Grayscale] is selected in [Color Mode]. |
| [Always Execute the Auto Tone] | If selected, the image color will always be automatically corrected. This setting is available when [Color], [Color (Documents)], or [Grayscale] is selected in [Color Mode]. |
| [Monitor Gamma] | Enables you to perform gamma correction. Specify the gamma value (0.10 to 10.00) of the monitor for viewing the scanned image. [Monitor Gamma] value will be fixed to 1.80 when [Color Matching] is selected in [Color Correction]. |

| [Select Folder Where Temporary Files are Saved] | Click [Browse] and specify the folder in which the temporary files are saved. |
| [Sound Settings] | Sets the scanner to play music during scanning or play a sound when scanning is completed. [Play Music During Scanning]: If selected, the scanner plays music during scanning. Click [Browse], then specify a sound file. [Play Sound When Scanning is Completed]: If selected, the scanner plays sound when scanning is completed. Click [Browse], then specify a sound file. You can specify the following files: MIDI files (*.mid, *.rmi, *.midi), Audio files (*.wav, *.aiff, *.aif), MP3 file (*.mp3). |
| [Test Scanner] | Click this button, then click [Start] to check the power cord plugged in, or the USB cable connected between the machine and your computer. |