Ensure that the printer is powered on and open the paper support.
Load a sheet of 4" x 6" or 5" x 7" sized paper in the rear tray.
Note: Using Matte Photo Paper (MP-101) or Glossy Photo Paper (GP-501) is recommended.
Press the <Home> button.
Use the Easy-Scroll Wheel or the <> or <> cursor buttons to select 'Settings' , and then press the <OK> button.
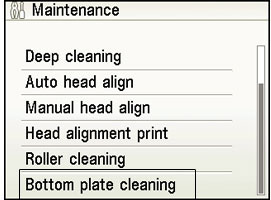
Use the Easy-Scroll Wheel or the <> or <> cursor buttons to select 'Maintenance' and press the <OK> button.
Use the Easy-Scroll Wheel or the <> or <> cursor buttons to select 'Bottom plate cleaning' and press the <OK> button.
Press the up / down cursor button to select 'Yes', and then press the <OK> button to start bottom plate cleaning.
Note: Do not do other operations until bottom plate cleaning is completed.
Inspect the discharged paper. If ink can be seen on the paper, repeat the cleaning process.
Note: If the discharged paper is still dirty after you have run this cleaning process three times, the inside of the printer is probably dirty. Clean the inside of the printer using a swab.
Clean the inside of the printer manually
Turn off the printer and remove the power plug.
Open the printer cover.
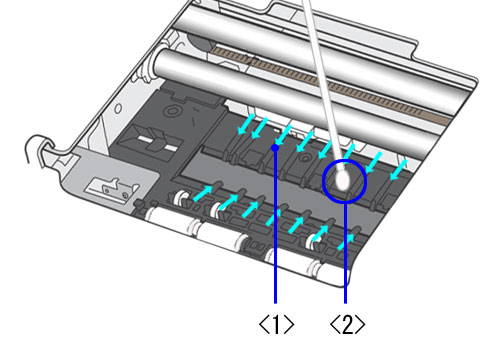
Wipe ink off the protrusions <1> (shown by the arrow) and their peripheries <2> using a swab.
Caution: Do not touch the transparent film or any metal part within the printer. Doing so may damage the printer.