| Solution |
- You can control the camera remotely from EOS Utility Ver.3.x, and by viewing the subject in the EOS Utility Ver.3.x window, you can set the camera and shoot. You can also shoot by directly operating your camera even during remote shooting, or preset a time allowing the camera to shoot automatically with timer shooting.
NOTE
- For information on how to connect the camera with the computer, please see the "Related information" section.
Shooting Still Photos 1. Connect your camera and computer, and then turn the camera's power switch to <ON>.
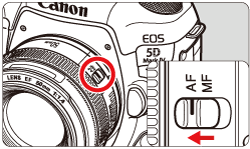
2. Set the lens focus mode switch to <AF>.
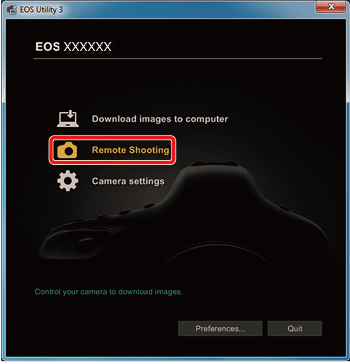
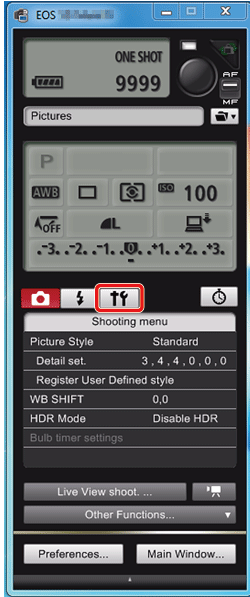
3. Once EOS Utility Ver.3.x starts, click [Remote Shooting].
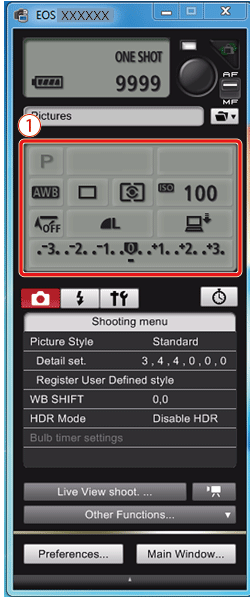
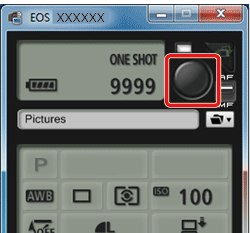
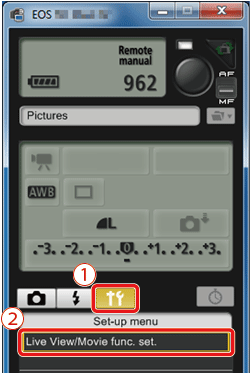
4. Set the camera.
Click or right-click the setting item and select the setting.*1*2
 Capture window
*1: If you checkmark [Change settings using mouse wheel on capture screen] on the [Remote shooting] tab sheet on the [Preferences], you can also select settings with the scroll-wheel on your mouse. You cannot use the scroll-wheel in the mirror lockup menu or under [Image saving location].
*2: You can right-click the Exposure level/AEB level item and perform AEB setting using the <Shift> key + scroll-wheel.
IMPORTANT
- You cannot perform RAW processing. If you connect the camera to your computer during in-camera RAW processing, the camera and computer will connect after the processing is finished.
NOTE
- The settings that cannot be set in the capture window can be set by operating the camera.
- A warning lamp blinks during the countdown for self-timer shooting and the countdown time is displayed in the area for the number of possible shots.
- Mirror lockup settings are available when the camera mode is P, Tv, Av, M or B.
- During mirror lockup, the mirror lockup icon blinks.
- When shooting with auto exposure, the shutter speed or aperture blinks to indicate under-exposure or over-exposure conditions.
- When shooting with manual exposure, the metering value is displayed in real time in the exposure level area.
5. Click the [  ] button.
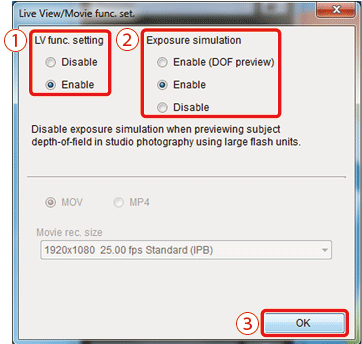
6. Set the Live View function.
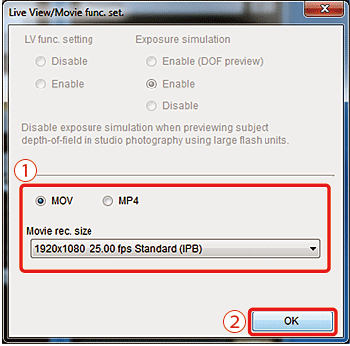
- Click [Live View/Movie func. set].
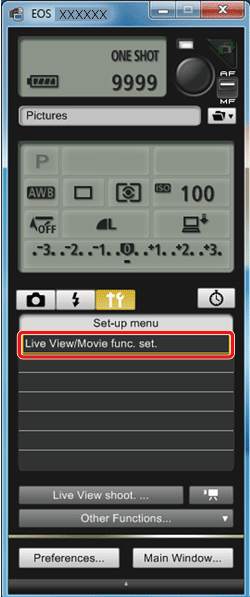
- Select [Enable] for [LV func. setting] and the setting for [Exposure simulation], then click [ OK ].
 LV func. setting
 Exposure simulation
 [ OK ]
Exposure simulation
Exposure simulation simulates and displays the image with a brightness close to the actual resulting image.
| Option | Explanation |
| Enable | The displayed image brightness will be close to the actual brightness (exposure) of the resulting image. If you set exposure compensation, the image brightness will change accordingly. |
| Disable | The image is displayed at the standard brightness to make the Live View image easy to see. Even if you set exposure compensation, the image is displayed at the standard brightness. |
| Enable (DOF preview) | Normally, the image is displayed at the standard brightness to make the Live View image easy to see. The image will be displayed close to the actual brightness (exposure) of the resulting image only while you hold down the depth-of-field preview button. |
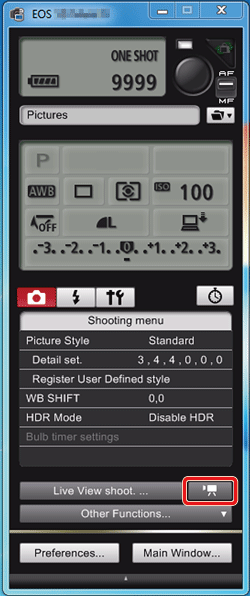
7. Click [Live View shoot.].
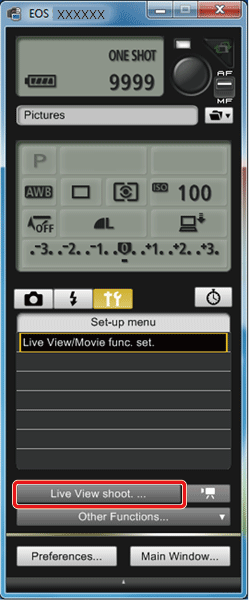
- The [Remote Live View window] appears.
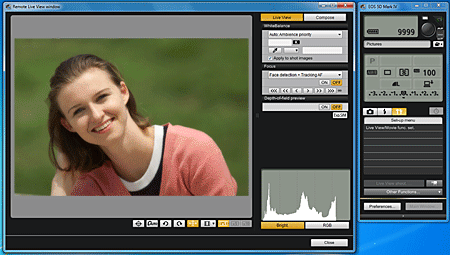
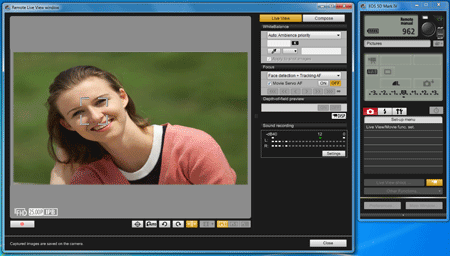
8. Click the [  ] button to shoot.
- The shot image is transferred to your computer and displayed in the [Quick Preview] window. Then, Photo Professional Ver.4.x starts up automatically.
NOTE
- You can quickly review the shot image in the [Quick Preview] window displayed before Digital Photo Professional Ver.4.x starts up. You can also resize the [Quick Preview] window.
- You can show/hide the [Quick Preview] window by clicking the [Other Functions] button in the capture window and selecting [Quick Preview] from the menu that appears.
- You can shoot by operating the capture window, even if the [Remote Live View window] is not displayed.
- To perform exposure simulation with [Remote Live View window] or enable display of histograms, set your camera's [Exposure simulation] in the menu to [Enable].
- You can also use mirror lockup with remote shooting. (Mirror lockup is not possible during Remote Live View shooting).
- Self-timer shooting is possible.
- You can change the software that starts up automatically when remotely shot images are transferred to your computer from Digital Photo Professional Ver.4.x to other software in preferences ([Linked Software] tab sheet).
Shooting Movies 1. Connect your camera and computer, and then turn the camera's power switch to <ON>.
2. Set the lens focus mode switch to <AF>.
3. Once EOS Utility Ver.3.x starts, click [Remote Shooting].
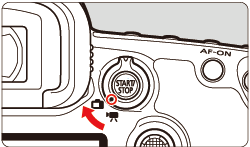
4. Set your cameraâs Live View shooting/Movie shooting switch to <  >.
5. Click [  ].
IMPORTANT
- You cannot operate the camera when the [ ] button is clicked. To operate the camera, click the [ ] button again or close the [ Remote Live View window ].
6. The [Remote Live View window] appears, so drag the enlargement display frame to move it to the position where you want to focus.
7. Click [ON] in the [Focus] window.
- AF is executed.
- When focus is achieved, the camera makes a beeping sound and the AF point turns green.
- If focus is not achieved, the AF point turns red.
8.ãSet the movie functions on the capture window.
Click  to display the [Set-up menu], and then click [Live View/Movie func. set.] (  ).
9. The [Live View/Movie func. set.] window appears, so select the movie format and the movie recording size ( ), then click [OK] ( ).
REFERENCE
The following movie compression formats can be selected:ã
- ALL-I (I-only)/ALL-I (For editing)/ For editing (ALL-I): Compresses one frame at a time for recording. Although the file size will be larger than with IPB, the movie will be more suited for editing.
- IPB/IPB (Standard)/ Standard (IPB)/ Standard: Compresses multiple frames at a time efficiently for recording. Since the file size will be smaller than with ALL-I, you can shoot longer.
- IPB (Light)/ Light (IPB)/ Light: Selectable when the movie recording format is set to [MP4]. The movie is recorded at bit rate lower than with IPB (Standard) resulting in a smaller file size and compatibility with a larger range of playback systems. Of the three methods available, this method allows the longest total possible movie shooting time on a card of a given capacity.
10. Click the [  ] button and begin shooting.
- At the bottom left of the [Remote Live View window], a [
 ] icon and the recording time are displayed. ] icon and the recording time are displayed.
- Click the [
 ] button again to end shooting. ] button again to end shooting.
11. When the [Remote Live View window] closes, the following window appears if some movie files remain to be downloaded to your computer. Select [Download].

12. After you click the [Download], the file names of the image data shot in movie mode (movie/still image) appear in a list.
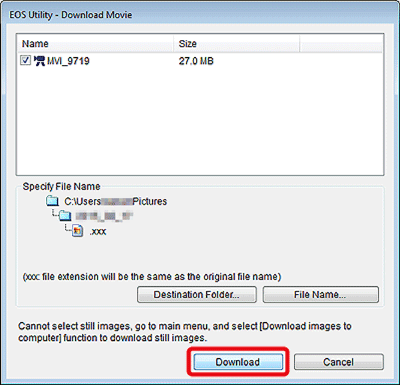
After specifying [Destination Folder] and [File Name], click the [Download] button in the window, and movie files will be downloaded from the camera's memory card to your computer. Movie files having a check mark removed from its file name are not downloaded. When downloading movie files to your computer afterwards from the camera's memory card, please refer to the cameraâs instruction manuals (included on the CD-ROM).
This completes the explanation of movie shooting operations with Remote Live View.
|