
Using the My Colors mode PowerShot SD500/SD550
| Article ID: ART160220 | | | Date published: 06/09/2015 | | | Date last updated: 08/18/2015 |
Description
Solution
Shooting in a My Colors Mode
A My Colors mode easily changes the colors in an image when it is shot, allowing you to alter the balance between red, green and blue, transform pale or tanned skin or change a color specified in the LCD monitor into a different color. Since they work with stills and movies, these modes let you enjoy producing various image or movie effects.
However, depending on the shooting conditions, the images may appear rough or you may not get the expected color. Before you try to photograph important subjects, we highly recommend that you shoot trial images and check the results.
Moreover, the camera will record the My Colors image and the original unaltered image if you set [Save Original] to [On]. Changing the Save Method for the Original Image
|
|
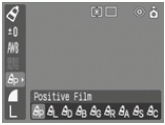
Positive Film |
Use this option to make red, green or blue colors more intense like the Vivid Red, Vivid Green or Vivid Blue effects. It can produce intense natural-appearing colors like those obtained with positive (slide) film. |
|
|
Lighter Skin Tone* |
Use this option to make skin tones lighter. |
|
|
Darker Skin Tone* |
Use this option to make skin tones darker. |
|
|
Vivid Blue |
Use this option to emphasize blue tints. It makes blue subjects, such as the sky or ocean, more vivid. |
|
|
Vivid Green |
Use this option to emphasize green tints. It makes green subjects, such as mountains, new growth, flowers and lawns, more vivid. |
|
|
Vivid Red |
Use this option to emphasize red tints. It makes red subjects, such as flowers or cars, more vivid. |
|
|
Color Accent |
Use this option to have only the color specified in the LCD monitor remain and to transform all others to black and white. |
|
|
Color Swap |
Use this option to transform a color specified in the LCD monitor into another. The specified color can only be swapped into one other color, multiple colors cannot be chosen. |
|
|
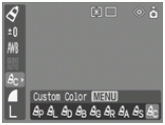
Custom Color |
Use this option to freely adjust the color balance between red, green, blue and skin tones*. It can be used to make subtle adjustments, such as making blue colors more vivid or face colors brighter. |
*The skin colors of non-human subjects may also be altered.
You may not obtain the expected results depending on the skin color.
- Turn the mode dial to
 or
or  .
.
- Press the <FUNC./SET> button and use the
 or
or  button to select
  or
or  .
.


- Use the to select
 .
.
- Use the
 or
or  button to select a My Colors mode.
 ,
,  ,
,  ,
,  ,
,  , and
, and  Modes
Modes
Press the <FUNC./SET> button. The display will return to the shooting screen and you can shoot. : See Shooting in the Color Accent Mode
 : See Shooting in the Color Swap Mode
 : See Shooting in the Custom Color Mode
Changing the Save Method for the Original Image
When you are shooting still images in a My Colors mode, you can specify whether or not the altered image and the original image are recorded.
- In the
 (Rec.) menu, select [Save Original].
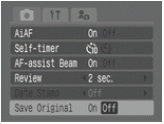
-
Use the or button to select [On] or [Off] then press the <MENU> button.

- The display will return to the shooting screen.
- Select [On] to record the original image also or [Off] to not record it.
- If [On] is selected, the two images will be numbered consecutively with the altered image following the original.
|
Shooting in the Color Accent Mode
Colors other than the color specified in the LCD monitor are shot in black and white.
- In the FUNC. menu, select . All colors but the previously specified one display in black and white.

- Press the <MENU> button.
The camera will switch to color input mode and the display will alternate between the original image and the color accent image. -
Aim the camera so that the color you wish to retain appears at the center of the LCD monitor and press the button.

- Only one color can be specified.
- You can use the or button to change the color that is retained.
- You can shoot immediately after this step. The screen will reappear after the shot allowing you to change the settings and shoot again.
- Press the <MENU> button.
The color input mode will no longer be in effect. - Press the <FUNC./SET> button.
The display will return to the shooting screen.
|
Shooting in the Color Swap Mode
This mode allows you to transform a color specified in the LCD monitor into another.
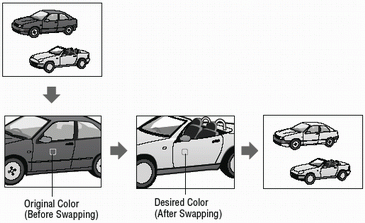
- In the FUNC. menu, select .

- Press the <MENU> button.
The camera will switch to color input mode and the display will alternate between the original image and the color swap image. -
Aim the camera so that the original color appears at the center of the LCD monitor and press the button.
- Only one color can be specified.
- You can use the or button to change the color that is swapped.
-
Aim the camera so that the desired color appears at the center of the LCD monitor and press the button.

- Only one color can be specified.
- You can shoot immediately after this step. The screen will reappear after the shot allowing you to change the settings and shoot again.
- Press the <MENU> button.
The color input mode will no longer be in effect. - Press the <FUNC./SET> button.
The display will return to the shooting screen.
|
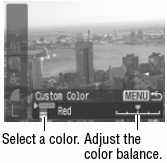
Shooting in the Custom Color Mode
This mode allows you to adjust the color balance for red, green, blue and skin tones.
- In the FUNC. menu, select and press the <MENU> button.
- Use the or button to select [Red], [Green], [Blue] or [Skin Tone] and the or button to adjust the color balance.

The display will alternate between the original image and the custom color image. - Press the <MENU> button.
- Press the <FUNC./SET> button.
The display will return to the shooting screen.