
Check the Ink Status - iX7000
| Article ID: ART132442 | | | Date published: 05/12/2015 | | | Date last updated: 08/17/2015 |
Solution
You can check the ink status with the ink lamps or your computer screen.
Checking the Ink Status with the Ink LampsThis section describes how to check the color or black ink status with the ink lamps.
- You cannot check the clear ink status with the ink lamps. Check with the computer.
1. Make sure that the power is turned on, and open the Front Tray gently.
2. Open the Top Cover.
3. Check the ink lamps.
Close the Top Cover after confirming the ink lamp status.
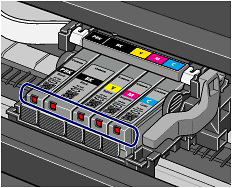
- Ink lamp is on
The ink tank is correctly installed and there is sufficient ink left for printing.
- Ink lamp is flashing
Flashing slowly (at around 3-second intervals)
 ..... Repeats
Ink is low. You can continue printing for a while, but we recommend you to have a new ink tank available.
Flashing fast (at around 1-second intervals)
 ...... Repeats
The ink tank is installed in the wrong position or it is empty. Make sure that the ink tank is installed in the correct position as indicated by the label on the Print Head Holder. If the position is correct but the lamp flashes, the ink tank is empty. Replace it with a new one.
- Ink lamp is off
The ink tank is not installed properly or the function for detecting the remaining ink level is disabled. If the ink tank is not installed properly, press the mark  (Push) on the ink tank until the ink tank clicks into place. If it does not click into place, make sure that the orange protective cap has been removed from the bottom of the ink tank. If the function for detecting the remaining ink level is disabled, replace the ink tank with a new one.
If the ink lamp is still off after reinstalling the ink tank, there has been an error and the printer cannot print. Check the Alarm lamp on the printer.
Checking the Ink Status with the Computer ScreenThis section describes how to check the color, black, or clear ink status with the computer.
You can confirm the status of each ink tank with the printer status monitor (Windows) or the Canon IJ Printer Utility (Macintosh).
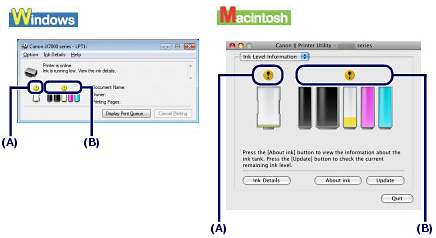
Clear ink (A): If  (Ink low) appears, the clear ink is running low. You can continue printing for a while, but we recommend you to have a new ink tank available.
Color or black ink (B): The ink with (Ink low) is running low. You can continue printing for a while, but we recommend you to have a new ink tank available.
- If the clear ink has completely run out, you cannot print on plain paper.
- An error message may appear while printing. Confirm the message and take an appropriate action.
- It is possible to print on photo paper, or any type of paper other than plain paper, loaded in the Rear Tray, even if clear ink has run out.
Follow the procedure below to open each of the confirmation screens.

1. Open the printer driver setup window.
For Windows Vista
- Click / Select 'Start' from the bottom left of the Windows screen, 'Control Panel', 'Hardware and Sound', and then click on 'Printers'. Note: If you are in 'Classic' view, Click 'Printers' directly from the 'Control Panel'.
- Click your right mouse button on the listing for your printer, and then select 'Preferences' from the menu that appears.
For Windows XP Home Edition
- Click / Select 'Start' from the bottom left of the Windows screen, 'Control Panel,' 'Printers and Other Hardware,' and 'Printers and Faxes.'
- Click your right mouse button on the listing for your printer, and then select 'Preferences' from the menu that appears.
For Windows XP Professional Edition
- Click 'Start' from the bottom left of the Windows screen, and 'Printers and Faxes.'
- Click your right mouse button on the listing for your printer, and then select 'Preferences' from the menu that appears.
For Windows 2000
- Click / Select 'Start' from the bottom left of the Windows screen, and 'Settings,' then 'Printers.'
- Click your right mouse button on the listing for your printer, and then select 'Properties' from the menu that appears.
2. Click View Printer Status on the Maintenance sheet.
To confirm the ink tank information, click the Ink Details menu.
- You can also display the printer status monitor by clicking Canon XXX (where "XXX" is your printer's name) which appears on the taskbar while printing.

1. Open the Canon IJ Printer Utility.
- Launch IJ Printer Utility.
Note: In versions of Mac OS X older than 10.4, open the IJ / BJ Printer Utility from the Library>Printers>Canon>BJPrinter>Utilities folder. - In the Apple menu select System Preferences
- Open Print & Fax.
- Make sure the correct printer is selected and, depending on OS version, click 'Open Print Queue...' or 'Print Queue...'.
- Click the Utility / Printer Setup icon.
Note: In Mac OS X 10.6, select 'Utility' at the top of the screen, and then click the 'Open Printer Utility' button. - Select the printer from the list, then click 'Maintenance'.
2. Select Ink Level Information in the pop-up menu.
To confirm the ink tank information, click Ink Details.
This section describes the procedure to replace an ink tank if ink runs out while printing is in progress.
- When ink runs out or other errors occur, the Alarm lamp will flash orange to inform you of the error.
When color or black ink runs out while printing is in progress, the Alarm lamp will flash orange four times and the error message will appear on your computer screen.
Make sure which ink tank has run out of ink and follow the procedure below to replace it.
Handling ink
- To maintain optimal print quality, we recommend the use of specified Canon brand ink tanks. Refilling the ink is not recommended.
- If you remove an ink tank, replace it immediately. Do not leave the printer with ink tanks removed.
- Use new ink tanks for replacement. Installing used ink tanks may cause the nozzles to clog. Furthermore, with such ink tanks, the printer will not be able to inform you when to replace the ink tanks properly.
- Once an ink tank has been installed, do not remove it from the printer and leave it out in the open. This will cause the ink tank to dry out, and the printer may not operate properly when it is reinstalled. To maintain optimal printing quality, use an ink tank within six months of first use.
- Color ink may be consumed even when printing a black-and-white document. Every ink is also consumed in the standard cleaning and deep cleaning of the Print Head, which may be necessary to maintain the printer's performance. When an ink tank is out of ink, replace it immediately with a new one.
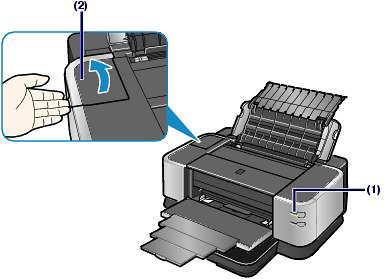
1. Make sure that the power is turned on, and open the Front Tray gently.
2. Open the Top Cover.
The Print Head Holder moves to the replacement position.
- Do not hold the Print Head Holder to stop or move it forcibly. Do not touch the Print Head Holder until it stops completely.
- Do not place any object on the Top Cover. It will fall into the Rear Tray when the Top Cover is opened and cause the printer to malfunction.
- Do not touch the metallic parts or other parts inside the printer.
- If the Top Cover is left open, the Print Head Holder moves to the right. In this case, close and reopen the Top Cover.
- The printer may make operating noise when the Print Head moves to the replacement position.

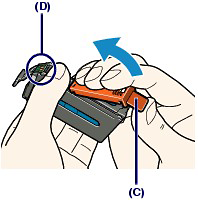
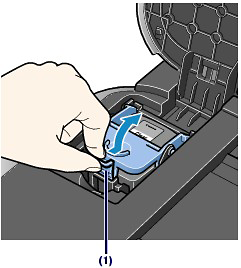
3. Remove the ink tank with the lamp flashing fast.
Push the tab (A) and lift the ink tank to remove.
Do not touch the Print Head Lock Lever (B).

- Handle the ink tank carefully to avoid staining of clothing or the surrounding area.
- Discard the empty ink tank according to the local laws and regulations regarding disposal of consumables.
- Do not remove two or more ink tanks at the same time. Be sure to replace ink tanks one by one when replacing two or more ink tanks.
4. Prepare the new ink tank.
(1) Take a new ink tank out of its package.

(2) Remove the orange protective cap (C) from the bottom of the ink tank as indicated in the figure below.
Remove the protective cap while holding it to prevent the ink from staining your fingers.
Discard the protective cap once it is removed.
- Do not touch the electrical contacts (D) on the ink tank. It can cause the printer to malfunction or become unable to print.
- If you shake the ink tank, the ink may spill out and stain your hands and the surrounding area. Be careful to handle the ink tank.
- Do not squeeze the side of ink tanks as this may cause the ink to leak out.
- Be careful not to stain your hands and the surrounding area with ink from the orange protective cap.
- Do not reattach the protective cap once you have removed it. Discard it according to the local laws and regulations regarding disposal of consumables.
- Do not touch the open ink port once the protective cap is removed, as this may prevent the ink from being ejected properly.
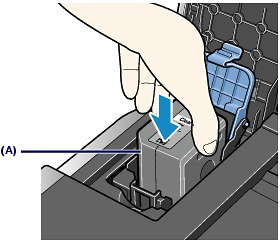
5. Install the new ink tank.
(1) Insert the front end of ink tank into the Print Head at a slant.
Make sure that the position of the ink tank matches the label.

(2) Press the mark  (Push) on the ink tank until the ink tank snaps firmly into place.
Make sure that the ink lamp lights up red.

- You cannot print if the ink tank is installed in the wrong position. Be sure to install the ink tank in the correct position according to the label on the Print Head Holder.
- You cannot print unless all the ink tanks are installed. Be sure to install all the ink tanks.
6. Close the Top Cover.
The printer will start mixing the ink automatically.
Wait until the Power lamp stops flashing and stays lit and the printer has stopped making operating noise. It takes about 2 minutes or less.
Do not open the Top Cover while the printer is operating (the Power lamp is flashing green).
- When you start printing after replacing the ink tank, the printer starts cleaning the Print Head automatically. Do not perform any other operations until the printer completes the cleaning of the Print Head. The Power lamp flashes green while cleaning.
-
If printed ruled lines are misaligned or the print head position is misaligned, adjust the print head position.
- The printer may make noise during operation.
Replacing the Clear Ink Tank
When clear ink runs out while printing is in progress, the Alarm lamp will flash orange 4 times and the error message will appear on your computer screen.
When the clear ink tank runs out of ink, follow the procedure below to replace it.
Handling Ink
- When clear ink has run out, you cannot print on plain paper.
- To maintain optimal printing quality, we recommend the use of specified Canon brand clear ink tanks. Refilling ink is not recommended.
- Once you remove a clear ink tank, replace it immediately. Do not leave the printer with the ink tank removed. The printer will not operate without the clear ink tank installed.
- Do not replace the clear ink tank until the message informing you that the ink has run out is displayed. If the clear ink tank is replaced before it runs out of ink, the printer will be unable to accurately inform you when it is time to replace the tank.
- Replace an empty tank with a new one. Inserting a partially used ink tank may cause a malfunction. Furthermore, with such a tank, the printer will not be able to inform you when to replace the tank properly.
- Once a clear ink tank has been installed, do not remove it from the printer and leave it out in the open. This will cause the ink tank to dry out, and the printer may not operate properly when it is reinstalled. To maintain optimal printing quality, use a clear ink tank within six months of first use.
- It is possible to print on photo paper, or any type of paper other than plain paper, loaded in the Rear Tray, even if clear ink has run out.
1. Open the Clear Ink Tank Cover.
(1) Make sure the printer is turned on.
- When replacing the clear ink tank, make sure that the printer is turned on. If the ink tank is replaced when the printer is turned off, the detected ink level may not match the actual ink level.
(2) Open the Clear Ink Tank Cover.
2. Remove the clear ink tank.
(1) Push the tab and open the Clear Ink Tank Locking Cover.
(2) Remove the clear ink tank.
- Handle ink tanks carefully to avoid spilling ink or staining clothing or the surrounding area.
- Discard empty ink tanks according to the local laws and regulations regarding disposal of consumables.
3. Prepare the replacement tank.
Remove the orange tape in the direction of the arrow to peel off the protective film from the new clear ink tank.

- Do not shake ink tanks as this may cause the ink to leak out and stain your hands or the surrounding area.
- Do not squeeze the side of the clear ink tank as this may cause the ink to leak out and stain your clothes and hands.
- Though the clear ink is clear liquid, be careful not to stain your clothes and hands with ink on the removed protective film.
- Do not touch the open ink port once the protective film is removed, as this may prevent the ink from being ejected properly.
4. Install the clear ink tank.
(1) Be sure that the clear ink tank is properly aligned when inserting.
Be sure that the sharp corner of the ink tank (A) is closest to you and on your left.
(2) Close and press the round, indented portion on the Clear Ink Tank Locking Cover until it snaps firmly into place, locking the ink tank.

5. Gently close the Clear Ink Tank Cover.
Printing cannot be done until the printer is ready. This takes about 2 minutes.