
Here is a list of adjustments can be made on the Setting Title Page for the VB-C300
| Article ID: ART105072 | | | Date published: 05/11/2015 | | | Date last updated: 08/15/2015 |
Description
Solution
From the Settings Title Page, you can move to each settings page, save setting parameters after changing, and reboot.
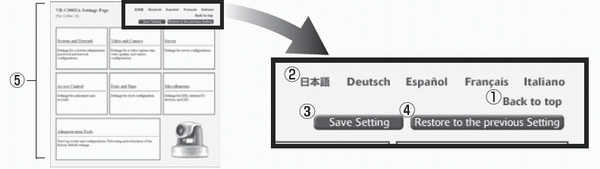
1 "Back to top" button
Click "Back to top" to move to the top page of the camera.
2 Language button
Click one of the language buttons to change the display of the settings pages.
3 "Save Setting" or "Save Setting and Reboot" button
After changing settings on each page and clicking "OK" returns to the Settings Title Page, however, setting parameters are not saved in the VB-C300, yet. Click "Save Setting" and the changes are confirmed and saved in VB-C300. Where it is necessary to restart the VB-C300 to make the change, the "Save Setting and Reboot" button is displayed. If no setting has been changed, neither of these buttons appears.
4 "Restore to the previous settings" button
Click if you want to discard the changes you have made to the settings on each page. All changes are cancelled and return to the values before you made the change.
5 Title of each settings page
Click to move to each settings page.
Note
- Do not open multiple web browser windows simultaneously to change the settings of different pages.
- Do not use the "Back" and "Forward" button of the web browser to move between the settings pages. Due to the effects of caching, there are possibilities that an old settings page will appear, settings will return to their original values, or unintended changes will occur.
- After changing settings, be sure to click the "Save Setting" or "Save Setting and Reboot" button on the Settings Title Page.
Tip
- A red mark indicates a setting item which requires rebooting the camera to make the new setting to take effect.

- Detail information of each setting is available by clicking "HELP" on the Settings pages.

You can perform the following settings on the System and Network page.
- Root Account: Set up the Administrator password.
- Network: Configure settings required for network connection (e.g., IP address).
- Connection Keeping: Transmits packets regularly to maintain network connectivity.
After changing the setting, click "OK" to return to the Settings Title Page. If you do not want to make any changes, click "CANCEL".
Root Account

1 Password
Set an administrator password. You can use up to 8 ASCII characters (including space and other printable characters). The factory default setting is "VB-C300" (case sensitive). If you are connecting to the NC Viewer or VBAdmin tools, terminate the connection and then change the password.
2 Confirm Password
Re-enter the password to confirm the spelling in the field above.
Note
- Be sure to change the Root Account password to maintain system security. Do not forget the new password.
- If you have forgotten the Root Account password, press the Reset switch to initialize the settings. However, note that all settings will be initialized.
Network
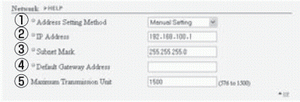
1 Address Setting Method
Select an address setting method from "Auto Setting (DHCP)" and "Manual Setting". If you select "Auto Setting (DHCP)", "IP Address", "Subnet mask", and "Default gateway address" are assigned by the DHCP automatically. If you select "Manual Setting", enter these values which suit your environment.
2 IP Address
Enter a fixed IP address.
3 Subnet Mask
Enter a subnet mask assigned to each network.
4 Default Gateway Address
Be sure to specify this address when the camera is connected to a subnet other than the subnet where the NC Viewer resides.
5 Maximum Transmission Unit
Enter a maximum transmission unit size to be sent at one time. Normally, there is no need to change this setting from 1500.
If you are using ADSL, slightly lowering the value may increase the transmission efficiency. If you are using LAN, do not change the value from 1500.
Note
- Please consult with your network administrator for the IP address, subnet mask and default gateway address settings.
- Pay much attention to the IP address, subnet mask and default gateway address settings. If any of the values is incorrect, network access becomes unavailable, and you may have to use the VB Initial Setup Tool to restore the default settings.
- When using "Auto Setting (DHCP)" for the address setting, the IP address may not be correctly assigned if there is a router between DHCP server and VB-C300. In this case, assign a fixed IP address with "Manual Setting".
Connection Keeping

1 Send Packet Regularly
Check this option when connecting a camera to a system which automatically disconnects if it does not receive any packet for a certain period of time.
2 Target IP address
Specify where the packet should be sent.
3 Interval (min.)
Specify the transmission interval from 1 to 60 minutes.

You can perform the following settings on the Video and Camera Page.
- Video Settings: Set up the video capture size and quality.
- Camera Settings: Set up the camera's shutter speed, focus, Day & Night mode, digital zoom, installation, etc.
- Camera Name: Enter the name of the camera. You will need this name when using VK-64 with the VB-C300.
After changing setting click "OK" to return to the Settings Title Page. If you do not want to make any changes, click "CANCEL".
Video Settings

1 Video Capture Size
Select the Video Capture Size for transmission from "Small", "Medium", and "Large".
Small: 160 x 120 (NTSC/PAL)
Medium: 320 x 240 (NTSC/PAL)
Large: 640 x 480 (NTSC/PAL)
2 Video Quality
Select the video quality from 1 - 5 (in 5 levels). Higher value ensures higher quality but larger data size, which may cause lower frame rate.
Note
- Higher video capture size or quality causes larger data size per frame and heavier network load. After setting, start the NC Viewer and select "Video Information" from the View menu bar to check the data size per frame
- If you are using Network Video Recorder VK-64/VK-16 (optional), the video capture size and quality settings affect the required hard disk space on recording.
Camera Settings
1 Shutter Speed
Select the shutter speed for the camera. NTSC: "Auto", "1/60", and "1/100". PAL: "Auto", "1/50", and "1/120".
Note
- The shutter speeds of 1/60 and 1/100 can be used to suppress flicker of fluorescent lamp. If video view flicks too much, use "NTSC: 1/100 PAL: 1/120" in the place where commercial frequency is 50 Hz and "NTSC: 1/60 PAL: 1/50" in the place where commercial frequency is 60 Hz. Note that even when one of these shutter speeds is selected, the camera automatically shifts to a higher shutter speed if the exposure is too high with these values.
- Please refer to the "Start Guide" to confirm whether your VB-C300 is NTSC model or PAL model.
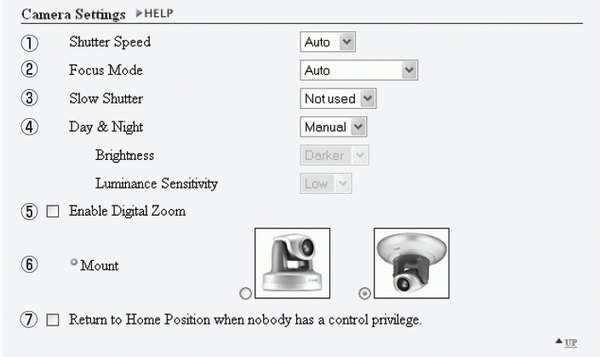
2 Focus Mode
Set the focusing mode for the camera.
Auto: Adjust the focus automatically.
Auto (for domes): When the indoor dome housing (optional) is used, select this mode not to allow the camera to focus on the surface of the dome.
Note
If you are using the indoor dome housing other than optional dome housing (VBRD41S - C/S) and dust or water drop exists on the surface of the dome, the camera may focus on the dome surface. Be sure to install the camera so that the distance between the dome and camera may be as short as possible.
- The focusing range (approx) differs depend on the Day Mode or Night Mode. The ranges for Wide and Tele ends are the same.

* When you are using an infrared lamp, the focusing range for "Auto" and "Auto(for domes)" will be approximately 0.6m (23.6in) to 8, and for "Fixed at infinity", itmay become out of focus depending on objects.
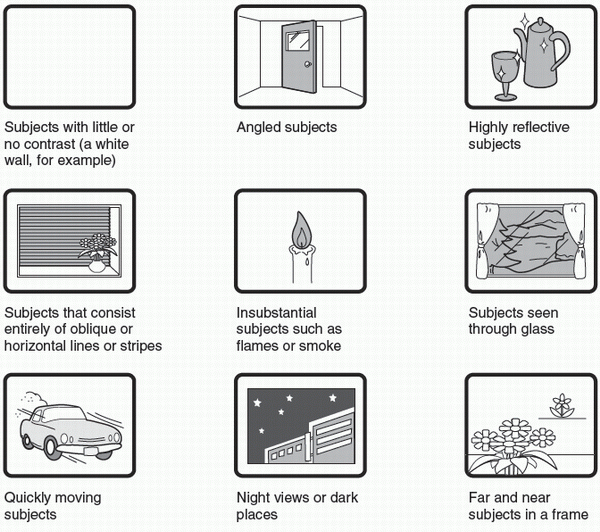
- When focus adjustment is difficult (e.g., when shooting a night scene which has low contrast), it is recommended to fix the focus to infinity.
3 Slow Shutter
Select the longest slow shutter speed used in the Auto Exposure mode when shooting a dark image. NTSC: "Not Used", "1/15", and "1/8." PAL: "Not Used", "1/12", and "1/6". A longer shutter speed results in a longer trail with a moving object. Select a speed appropriate for the shooting scene.
4 Day & Night
Specify how to switch between the Day and Night modes. Select from "Manual" and "Auto".
* If you are using an infrared lamp, you cannot use the Auto mode.
Brightness
Specify how the camera changes from the Day Mode to Night Mode. If you want to shoot video in color as long as possible, select "Darker". If you want to rather suppress noises in video by capturing in black and white, select "Brighter".
Luminance Sensitivity
Luminance Sensitivity refers to the time required for determining to switch between Day and Night modes.
"Low" : approx. 30 sec. "High" : approx. 10 sec.
Day Mode or Night Mode switches when bright conditions remain above or below the threshold value for either of the above period of time.
If the brightness changes frequently, due to a light source passing in front of the camera for example, select "Low". If the brightness does not change frequently, select "High".
5 Enable Digital Zoom
Check to enable Digital zoom.
* With the digital zoom, higher magnification causes lower image quality.
6 Mount
Select a camera mount type. The factory default setting is Inverted.
7 Return to Home Position when nobody has a control privilege.
When this option is checked and the home position is specified, the camera is moved to its home position if there is no request for a control privilege. You can set Home Position from VBAdmin Tools
Note
- When setting "Day & Night Mode" to "Auto", be sure to test the camera operation in advance to check effectiveness of this option.
- When setting "Day & Night Mode" to "Auto", use "Auto Exposure"
- If you are using an infrared lamp, set the "Day & Night Mode" to "Manual". You cannot use the Auto mode.
- If you set the "Day & Night Mode" to "Auto", the infrared cut filter may make several round trips when the camera switches the Day & Night modes.
Camera Name

1 Camera Name
This setting is required. You can use up to 15 ASCII characters (including blank and printable characters) for the camera name.
Note
If you are using the Network Video Recorder VK-64/VK-16 (optional), the camera name specified here will be displayed when registering the camera.

You can perform the following settings on the Server Page.
- HTTP Server: Set the HTTP port.
- Video Server: Configure settings to transmit the video from the VB-C300.
- Audio Server: Configure settings related to audio transmission.
After changing setting click "OK" to return to the Settings Title Page. If you do not want to make any changes, click "CANCEL".
HTTP Server

1 HTTP Port
Enter 80 or 1024 to 65535 (Integer).
Normally use 80 (factory default setting).
Video Server
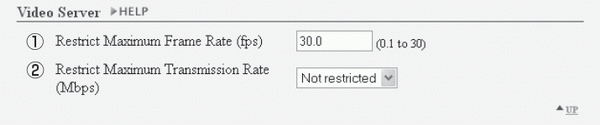
1 Restrict Maximum Frame Rate (fps)
Mitigate the Viewer load by limiting the maximum frame rate for transmitting video in one second. The maximum value is 30 fps (for NTSC) or 25 fps (for PAL). Enter a value from 0.1 to 30.0 (for NTSC) or 0.1 to 25.0 (for PAL)
2 Restrict Maximum Transmission Rate (Mbps)
Mitigate the network load by limiting the maximum data quantity transmitted in one second. The maximum value is 10 Mbps. Select a value from 1 to 10 (Integer). If you do not want to limit the network traffic, select "Not restricted".
Audio Server
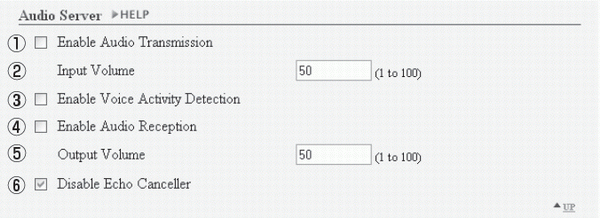
1 Enable Audio Transmission
If you check this option, you can send audio to NC Viewer, through a microphone with amp connected to the camera.
2 Input Volume
Specify the input audio volume from 1 to 100. The audio will be louder when you enter a larger value.
3 Enable Voice Activity Detection
Select this option, the camera transmits minimal data when audio is turned mute. In this way, you can reduce the network load.
4 Enable Audio Reception
If you check this option, you can receive audio from the NC Viewer and output it from a speaker with amp connected to the camera.
5 Output Volume
Specify the output audio volume from 1 to 100. The audio will be louder when you enter a larger value.
6 Disable Echo Canceller
If you uncheck this option, echo between a microphone and speaker with amp can be avoided.
Note
- Be sure to use a microphone and speaker with amp
- If you uncheck the Disable Echo Canceller box, audio quality or volume may be affected. Check or uncheck this option according to the environment and usage of the camera, as required.
- When transmitting audio, read the "Usage Notice of Audio" carefully You must set the following settings in advance to transmit and receive audio.
- Check the Enable Audio Transmission box and Enable Audio Reception box on the Audio Server section of the Server settings page
- Check the Send and receive audio box in the Connection Setting dialog when starting the NC Viewer
- When starting the NC Viewer from the VBAdmin Tools, check the Send and receive audio option on the Connection Settings tab in the Setup properties dialog