|
|
Mk2600PC - Sending Data to the Printer
| Article ID: ART180236 |
| |
Date published: 08/18/2021 |
| |
Date last updated: 08/19/2021 |
Description
This article provides information on using Mk2600PC to send print data to the Mk2600.
Solution
Sending Data to the Printer
You can data you create with Mk2600PC to the Mk2600.
-
Connect the printer to the computer with the USB cable.
-
Power the printer on. When the character entry screen appears, press the [PC Conn] key on the printer.
![Press the [PC Conn] key on the keyboard](/library/CANON/CITS_TECH_SUPPORT/Printers/Mk%20Series/Mk2600/Mk2600PC/Sending%20Data/press_PC_conn_key.jpg)
-
From Mk2600PC, open the file you want to send to the printer.
-
Click Send data, and Save file / Print. in the File menu or click the 
The Data Transfer dialog box appears.
-
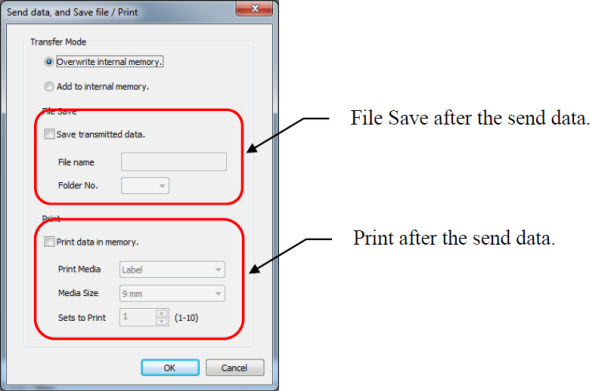
Set each of the items.
Transfer Mode
| Overwrite internal memory. |
Clears the document area in the printer, and saves the transmitted data at the beginning of the document area. |
| Add to internal memory. |
Adds the sent data at the end of the last page in the printer.
(The printer adds new pages to the data in the printer.) |
File Save
| Save transmitted data. |
When this option is selected, after list data is sent to the printer, data in the printer's document area is saved under the specified file name in the specified folder of the printer's storage area.
If you do not select this, the data will not be saved. |
| File name |
Inputs the file name. |
| Folder No. |
Selects the folder number (from 1-10) for saving data. |
Print
| Print data in memory. |
Select this to print data stored in the printer's memory after sending, according to settings you specify. |
| |
If you do not select this, the data will not be printed. |
| Print Media |
Selects the type of printing media. |
| |
Select either Tube, Shrink Tube, Label, |
| |
4mm I.D. Strip, Clear Tube, Wrap Around or Terminal I.D. |
| Media Size |
Selects the size of printing media. |
| |
The sizes you can select depend on the type of printing media used. |
| |
Tube |
2.5, 3.0, 4.0, 5.0, 6.0, or 6.5mm |
| |
Shrink Tube |
3.0, 3.2, 4.8, 6.0 or 6.4mm |
| |
Label |
6.0, 9.0, 12.0mm |
| |
4mm I.D. Strip |
Size not selectable. |
| |
Clear Tube |
2.5, 3.0, 4.0, 5.0, 6.0 or 6.5mm |
| |
Wrap Around |
Size not selectable |
| |
Terminal I.D. |
8.0, 8.5, 9.0, 9.5 or 10.0mm |
| Sets to Print |
Selects the number of items to be printed. |
| |
Select from 1-10. |
-
Click OK.
Format settings and data list contents are sent to the printer.
-
If there is no data when you click OK, No character data appears.
-
Click Cancel to cancel data transfer and close the dialog box.
-
During actual printing, the printer may automatically change the settings made at data creation according to the printing media type in order to maintain the required print quality.
-
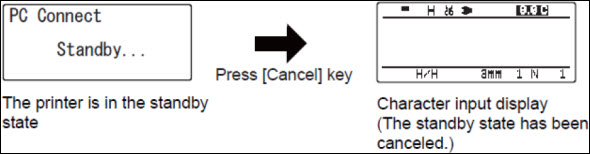
To use the printer after sending data, you need to cancel the standby state (ready for data reception) of the printer. Make sure that the printer is not receiving data, then press the [Cancel] key. When the character entry screen appears, you can operate the printer.
If your product issue was not resolved after following the steps above, or if you require additional help, please create or log in to your Canon Account to see your technical support options.
Or if you still need help, visit our Canon Community by clicking the button below to get answers:

____________________________________________________________________________________________
|
