1. Open [System Preferences] ? click [Print & Fax], [Print & Scan], or [Printers & Scanners].
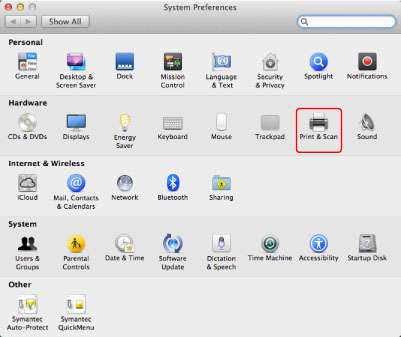
2. Click [+].

If you are using Mac OS X 10.7 or later, and there are shared printers or Bonjour supported devices on the network, click [+] and select [Add Other Printer or Scanner].
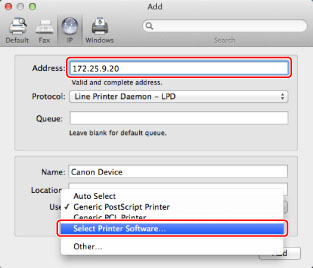
3. Select [IP] or [IP Printer] ? select [Protocol].

| NOTE |
| For [Internet Printing Protocol - IPP], you can select printer models that support IPP (Internet Printing Protocol), but you can use this setting only with IPv4. |
4. Enter the IP address of the device you are going to use in [Address] ? select [Select a driver to use]/[Select Printer Software] from [Print Using].
<If you enter an IPv6 address>
If you are using Mac OS X 10.6 or earlier, IPv6 is not supported.
Mac OS X 10.7 and later:
Enter a link-local unicast address, unicast address, or global unicast address in [Address].

- When entering a link-local unicast address, if required, enter a network interface that has "%" added to the end of the address.
- You can enter an abbreviated notation unicast address.
- When entering a global unicast address, you can set a DNS name if a DNS server that supports IPv6 has been specified beforehand in the network settings for the computer you are using.
- Although there may be a message saying that you have entered an incorrect address even if you have entered the correct IPv6 address, you can still add the printer.
5. Select the driver corresponding to the device you are going to use from the list.
If you are using Mac OS X 10.6 or later, select the driver in the [Printer Software] dialog box ? click [OK].

| NOTE |
| For the driver name corresponding to your device, refer to the Readme file. |
6. Click [Add].

7. Confirm that the device has been added ? close the dialog box.
Confirm that the driver name selected in the step 5 is displayed beside [Kind].
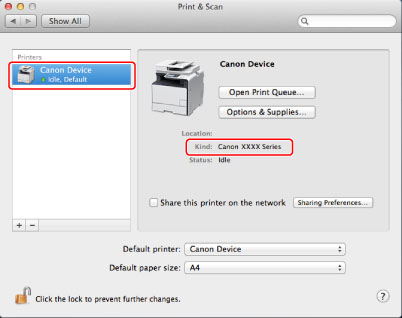
After this, set the options of the device
